WordPress constantly evolves, introducing new features that expand the platform’s capabilities for users and developers alike. Newly introduced for WordPress 6.6 are overrides in Synced Patterns, which let users make content-specific changes without changing the underlying layout or design of the pattern. This feature can be used to create curated editing experiences, improve workflows, enforce design consistency, and more.
This post will explore what overrides in Synced Patterns are, how they work, and possible enhancements on this feature’s roadmap.
Table of Contents
So, what are overrides?
Take a look at the image below. The Editor shows a relatively simple card design, but pay special attention to the block toolbar and the inspector on the right.

Each card features the same collection of blocks packaged together in a pattern but has different content. Users can only modify (or override) the content of specific blocks within the pattern or reset it to the original. Access to block settings and styles is disabled.
Although it’s not obvious from the image, the same synchronized (or synced) pattern powers both cards. Each piece of editable content within the pattern is an override.
At a high level, these requirements must be met for pattern overrides to work:
- Pattern design must be synchronized.
- Users must be able to edit the content of an individual pattern instance without changing the layout or design of the whole pattern.
- User modifications to the content must be “connected” to the synced pattern.
Before discussing how to create overrides in Synced Patterns, let’s quickly recap what Synced Patterns are and explore the key functionalities that support the last two requirements: content-only editing and the Block Bindings API.
Eager to start creating overrides? Jump ahead.
Synced Patterns
Synced Patterns have been a feature of WordPress for some time, originally referred to as reusable blocks before WordPress 6.3. You create these patterns in the Editor by grouping blocks and configuring their settings and styles. The design can then be saved to the database, and all pattern instances are kept synchronized whenever you make additional changes.
This type of pattern helps keep your site’s design and content consistent. For example, if you have a call-to-action (CTA) on multiple pages, updating the synced pattern containing this CTA will change it on every page where it’s used.
Here’s a brief video on how to create Synced Patterns.
While Synced Patterns have many applications, there are plenty of situations where you might want the pattern’s layout and design fixed but the content editable by the user.
Looking at the card example in the video above, you would likely want users to be able to edit the content of the Heading, Paragraph, and Button blocks.
But before we get there, let’s tackle the second requirement of pattern overrides using content-only editing.
Content-only editing
Introduced in WordPress 6.1, content-only editing uses a locking mechanism called “contentOnly” to ensure that only the nested text and media inside a block or pattern can be edited, keeping the overall layout and design structure the same.
This feature, supported by blocks like Columns, Cover, and Group, hides block types without text or media content from the List View and disables inspector controls for settings and styles. This simplifies the editing process and maintains design consistency.
To enable content-only editing on a block, set the templateLock attribute to contentOnly. There is no user interface for this in the Editor, so you must manually add the attribute to the block markup. While this is often done in pattern and template files, you can test it by switching to the Code Editor view and adding "templateLock": "contentOnly" to any container block.Try it out using this WordPress Playground demo. Applying the attribute to the Stack block in the demo content should result in the following.


Notice how all the settings in the block inspector have disappeared. A user can now edit only the content of the Heading, Paragraph, and Button blocks within the Stack.
Requirement number two: check.
You might wonder why overrides are only now being introduced in WordPress version 6.6, even though Synced Patterns and content-only editing have been available for years.
The missing piece was the ability to “connect” user modifications to the synced pattern. The Block Bindings API has now made this possible.
The Block Bindings API
The Block Bindings API, introduced in WordPress 6.6, enables developers to connect block attributes to various data sources, such as custom fields (post metadata), site data, user data, and more.
This API is crucial for enabling pattern overrides, as it connects the user’s modifications with the corresponding Synced Patterns. You don’t need to know how to use the Block Bindings API to implement overrides, but it helps illustrate why they are intrinsically linked to this API and the current limitations.
Let’s look at a simple example of how this works in practice.

Using the card design again, assume you want to connect custom fields to the Heading, Paragraph, and Button blocks. Instead of storing this information as block content, it will be stored as post metadata and displayed in each block.
First, register custom fields for each attribute of the blocks that should be connected to post metadata. In the code below, custom fields card_header, card_description, card_button_text, and card_button_url are registered for posts using the register_meta() function, with default values provided for each.
function theme_slug_register_meta() {
	register_meta(
		'post',
		'card_heading',
		array(
			'show_in_rest'      => true,
			'single'            => true,
			'type'              => 'string',
			'sanitize_callback' => 'wp_strip_all_tags',
			'default'           => __( 'Card heading', 'theme-slug' )
		)
	);

	register_meta(
		'post',
		'card_description',
		array(
			'show_in_rest'      => true,
			'single'            => true,
			'type'              => 'string',
			'sanitize_callback' => 'wp_strip_all_tags',
			'default'           => __( 'Card description. Lorem ipsum dolor sit amet, consectetur adipiscing elit. Sed do eiusmod tempor incididunt ut labore et dolore magna aliqua.', 'theme-slug' )
		)
	);

	register_meta(
		'post',
		'card_button_text',
		array(
			'show_in_rest'      => true,
			'single'            => true,
			'type'              => 'string',
			'sanitize_callback' => 'wp_strip_all_tags',
			'default'           => __( 'Learn more', 'theme-slug' )
		)
	);

	register_meta(
		'post',
		'card_button_url',
		array(
			'show_in_rest'      => true,
			'single'            => true,
			'type'              => 'string',
			'sanitize_callback' => 'esc_url_raw',
			'default'           => 'https://wordpress.org'
		)
	);
}
add_action( 'init', 'theme_slug_register_meta' );
This code registers custom fields and makes them available in the REST API, allowing them to be bound to the appropriate block attributes. When working with block bindings, the show_in_rest argument must be set to true.
Next, connect the custom metadata to the blocks using the metadata attribute. For example, the attribute for the Heading block would look like this:
"metadata": {
    "bindings": {
        "content": {
            "source": "core/post-meta",
            "args": {
                "key": "card_heading"
            }
        }
    }
}
Here’s a quick overview of the properties:
metadata: An object containing metadata about the block.metadata: An object that includes one or more bindings for the block.content: The block attribute to bind to the custom field, which varies by block.source: The bindings source. For custom fields, the source iscore/post-meta.args: An object containing arguments passed to the binding source. For custom fields, set thekeyproperty to the name of the registered meta key.
Currently, the Editor does not have a user interface for applying bindings to blocks. These attributes must be added manually in the block markup. Switch to the Code Editor view and add this attribute to the Heading block. The complete markup should look like this:
<!-- wp:heading {"metadata":{"bindings":{"content":{"source":"core/post-meta","args":{"key":"card_heading"}}}}} -->
<h2 class="wp-block-heading">Card heading</h2>
<!-- /wp:heading -->
Note that the binding targets content, which is the content attribute of the Heading block. When repeating this process for the Paragraph and Button blocks, update the attributes accordingly.
Here are the blocks and attributes currently supported by the Block Bindings API as of WordPress 6.6:
| Supported Blocks | Supported Attributes |
|---|---|
| Image | url, alt, title |
| Heading | content |
| Paragraph | content |
| Button | url,text, linkTarget, rel |
Since pattern overrides are essentially block bindings, the blocks that support overrides are the same as those that support bindings. As more blocks become compatible with the Block Bindings API, they will likely become overridable.
The screenshot below shows the card design with each block bound to the registered custom fields. Although it looks largely the same due to default content, note the new value for card_heading and the Bindings panel in the block inspector.

To learn more about the Block Bindings API, check out these articles and more on the Developer blog.
- Introducing Block Bindings, part 1: connecting custom fields
- Introducing Block Bindings, part 2: Working with custom binding sources
These resources will provide you with a solid understanding of implementing and leveraging the Block Bindings API in your WordPress projects.
Putting it all together
Now that we have covered Synced Patterns, content-only editing, and block bindings, it’s time to create a few pattern overrides.
Again, let’s look at the card design.

You can follow along with the next steps using this WordPress Playground demo.
In this example, a user should be able to modify the header, description, and button. Everything else should be fixed and remain in sync across each instance of the pattern.
The first step is to turn the design into a synced pattern. Select the outer Stack block and choose Create pattern from the options menu in the block toolbar.
In the modal that appears, give the pattern a name and ensure the Synced toggle is selected.

The block toolbar will now have a purple icon, and the block will be outlined in purple instead of blue. This color change indicates that the content is synced. Notice that you can no longer directly edit the content of the blocks.
Select Edit original from the block toolbar to edit the content of your new synced pattern. Doing so will open the pattern in a dedicated screen.

The next step is to add overrides to the Heading, Paragraph, and Button blocks. Since all three blocks support block bindings, they also support overrides.
Start by selecting the Heading block and open the Advanced panel in the block inspector. You will see a button that reads Enable overrides.

Click Enable overrides, and a modal will open.
The modal will prompt you to input a unique name for the override. This requirement enables WordPress to map the user-created content to the correct block within the pattern.
Choose any name you wish. The image below keeps things simple with the name “Card heading”.

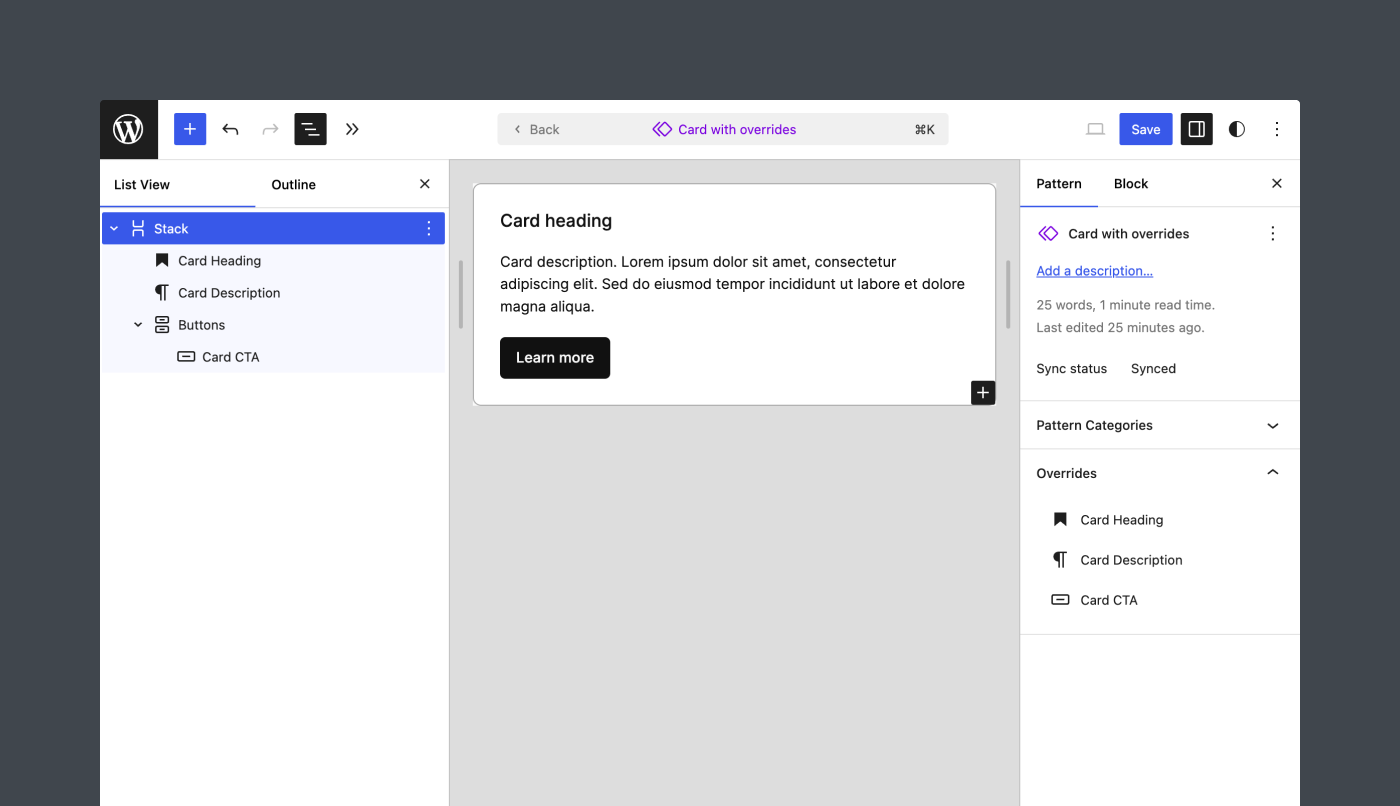
Repeat this process for the Paragraph and Button blocks. Your pattern should now look similar to the one shown below. Note the named blocks in the List View and the defined overrides on the right in the pattern inspector.
Before you continue, switch to the Code Editor view and inspect the block markup. You will see the binding source for each block with overrides set to core/pattern-overrides. This is the Block Bindings API in action.
Here’s an example of what the Paragraph block should look like.
<!-- wp:paragraph {"metadata":{"bindings":{"__default":{"source":"core/pattern-overrides"}},"name":"Card Description"},"fontSize":"small"} -->
<p class="has-small-font-size">Card description. Lorem ipsum dolor sit amet, consectetur adipiscing elit. Sed do eiusmod tempor incididunt ut labore et dolore magna aliqua.</p>
<!-- /wp:paragraph -->
Save the pattern and navigate back to the post containing the card pattern. You’ll see it in the first column of a Columns block. Insert the same pattern into the second column and modify the headings to see how the overrides work. The editing experience should look the same as the content-only editing example in this article.

Next, modify the synced pattern to see how it updates each instance while retaining your content changes. Try adding additional overrides, like an image at the top of the card. Have some fun with this feature!
Here’s a video of my own experimentation.
By now, you’re hopefully starting to see the power of pattern overrides. With just a few clicks, you can create highly curated editing experiences while maintaining full control over each pattern’s design aesthetic. And this is just the beginning.
Next steps
Overrides for Synced Patterns will soon be available with the release of WordPress 6.6. However, some limitations will be present, including:
- The number of supported blocks and attributes is limited, and there is currently no opt-in mechanism for custom blocks.
- Synced Patterns are only stored in the database and cannot be packaged as pattern files in your theme.
Future releases will support more Core blocks and attributes. View the ongoing discussion on an opt-in mechanism for custom blocks. You can follow the progress in the official tracking issue on GitHub.
Enabling Synced Patterns in theme files is a bit more complicated. There are early explorations you can review in this issue. As of this post’s publishing date, contributors have started drafting objectives for what will be included in WordPress 6.7. Share your thoughts on the issue.
Despite these limitations, you can still accomplish quite a bit. You should begin exploring pattern overrides in WordPress 6.6, as they will fundamentally change the way many site owners manage content in WordPress.For more content on this subject, check out the Developer Hours session from June 11, 2024. The recording is available on WordPress.tv.
Props to @greenshady and @dansoschin for feedback and reviewing this post.
Leave a Reply