The style of the text characters on your website is known as the font. This guide will show you how to choose the fonts on your site.
In this guide
If your site uses a theme that supports the site editor, you can change your site’s fonts using this method. A quick way to find out if your site uses the site editor is to check under Appearance in your dashboard. If you see Editor here, you can change your site’s fonts by following these steps:
- Visit your WordPress.com dashboard.
- Go to Appearance → Editor.
- Click on Styles on the left, or select the Styles icon as shown here. The icon looks like a black-and-white circle.
- Select Typography.
- Choose from the following text elements on your site:
- Text
- Links
- Headings
- Captions
- Buttons
- Click the dropdown under Font and choose your desired font. The text will update to your chosen font for you to see how it looks.
- Click Save.
These steps are demonstrated in the video below:
This feature is available on sites with our WordPress.com Premium, Business, and Commerce plans. If your site has one of our legacy plans, it is available on the Pro plan.

See our Styles guide for more detailed information on everything you can do to adjust the appearance of text on your website.
If your site uses one of these themes, you can change the site’s font using the Global Styles setting.
- Visit your WordPress.com dashboard.
- Go to Pages and click on any page to edit it.
- Click on the Global Styles icon, as shown here. The icon has an upper case ‘A’ followed by a lower case ‘a’.
- Click the dropdown under Heading Font or Base Font to see the available font options:
- Heading Font is used for all of the headings on your site, such as post and page titles, widget titles, comment headers, and headlines inside posts and pages.
- Base Font is used for the main body text and for the menus on your site.
- Choose your desired font. The text will update to your chosen font for you to see how it looks.
- If you’re unsure which font to choose, you will see some recommended pairings below the dropdowns.
- Click Publish to save your choice or Reset to revert the changes.
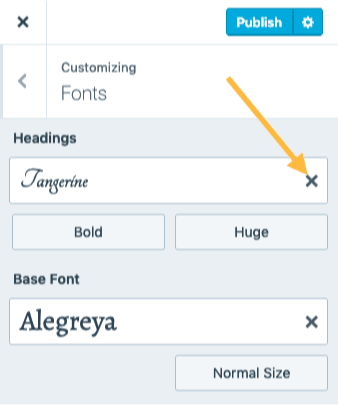
In classic WordPress themes, you’ll find the font settings in the Customizer. A quick way to check if your site has a classic theme is to check under Appearance → Customize in your dashboard. If you see Fonts here, you can change your site’s fonts by following these steps:
- Visit your dashboard.
- Go to Appearance → Customize.
- Click on the Fonts option.
- Click the dropdown under Headings or Base Font to see the available font options:
- Headings is used for all of the headings on your site, such as post and page titles, widget titles, comment headers, and headlines inside posts and pages.
- Base Font is used for the main body text and for the menus on your site.
- Choose your desired font. The text will update to your chosen font for you to see how it looks.
- Click Save Changes to publish your new font choices. to the site.

Depending on the font you have chosen, you may see additional options:
Font style – To adjust the style of your heading fonts, click the option below and to the left of the font. The available styles will vary depending on the font you have chosen.
Font size – To adjust the size of either your heading or your base fonts, click the size option below and to the right for each selected font and select a size from the drop-down menu.

You can switch back to your theme’s default font by clicking the X to the right of the font name:
When choosing fonts, you’ll see options to set the fonts for your overall site, not for individual pages or a specific line of text. This is a best practice when it comes to design — websites look best when there is consistency with the fonts across the entire site. If a site had a bunch of different fonts, it could get unwieldy.
If your goal is to make a piece of text stand out, consider other ways of doing so, such as applying different colors, using a Heading or Quote block, or inserting an image.
This section of the guide applies to sites with the WordPress.com Business or Commerce plan. If your site has one of our legacy plans, this feature is available on the Pro plan.
You will find a large selection of font styles for your website. If you would like more fonts to choose from, you can use a plugin that installs more fonts on your site.
One popular option is the Google Fonts Typography plugin. This tool gives you access to over one thousand Google Fonts and Adobe Fonts.
Other plugins such as Use Any Font will allow you to upload your own fonts to your site in a ttf, otf, or woff file format. When reviewing plugins, check the ratings, the number of positive comments, and the type of support you can expect from the plugin’s developer. If you decide not to use a plugin after testing it, make sure to deactivate/delete it to keep your plugin list clean.
Flash of Unstyled Text (FOUT) is when a different font briefly appears before your chosen font appears. The text is displayed in the theme’s default font on slower connections first. This way, people can start reading your content before your chosen font loads instead of waiting while looking at a blank page. This might mean that there’s a flash of a different font before the page finishes loading, but overall this is better for viewers on slower connections than seeing a blank screen.
If you don’t want this to happen, you can add this CSS code to your site using the CSS Editor in Appearance → Customize → Additional CSS (Premium plan and above only):.wf-loading body { visibility: hidden; }
orhtml:not(.wf-active) body { display: none; }
All requests to serve Google Fonts used in WordPress.com themes are served through WordPress.com’s servers and no longer use Google’s CDN/FDN. This change was made in December 2022.
If your site uses a custom plugin or third-party theme, verify with the plugin and/or theme developers to ensure they are not serving Google Fonts through Google’s CDN/FDN. You can learn more about GDPR here.

