

Staining your favorite outdoor hangout is easier than you think
Deck stain does more than add a boost of color to your outdoor space. Learning how to stain a deck also helps protect it from water, rot, mold, sun damage, and other problems. You should stain your new and existing decks every two to three years.
While staining your deck may sound like a daunting chore to complete, it’s easier than you think. The hardest part (aside from the elbow grease) is partnering with Mother Nature to get a few days of relatively warm, rain-free days to get the project done. Follow the simple steps below to learn how to stain a deck.
Prepping to Stain Your Deck
Great things take time, and the same goes for outdoor projects like staining a deck. While it’d be nice to slap some stain onto the deck floor and be done with it, you need to prepare your deck and the surrounding area thoroughly. We promise you’ll thank us later.
Check if Your Deck Needs to Be Stained and Sealed
“Wait at least 30 days before staining a new deck,” Says Tara Dudley, Angi Expert Review Board member and owner of Plant Life Designs. “This gives the wood time to dry.”
If you’re unsure whether your deck needs to be treated, test it. Simply pour a few drops of water onto your dry wooden deck. If the water immediately seeps into the wood, then your deck is ready to stain and seal. If the water sits on the board and beads up, then you can hold off.
Check Your Local Weather Forecast
Since it takes a few days to complete this process, check your local weather forecast before getting started so you won’t get delayed by a rainstorm.
"The outside temperature is also important, as it should be between 50 and 90 degrees Fahrenheit," says Dudley. "If possible, avoid times when the deck is in direct sunlight to stain."
Clear the Deck of Furniture and Accessories
Move your outdoor furniture and accessories off of your deck to start with a clean slate. Also, don’t forget to remove any additional items that are attached to the wood portion of the deck like plant hangers, birdfeeders, or wind chimes.
If you have a covered deck, use a drill to remove the downspouts if they’re attached to the posts of your deck so you don’t get stain on them.
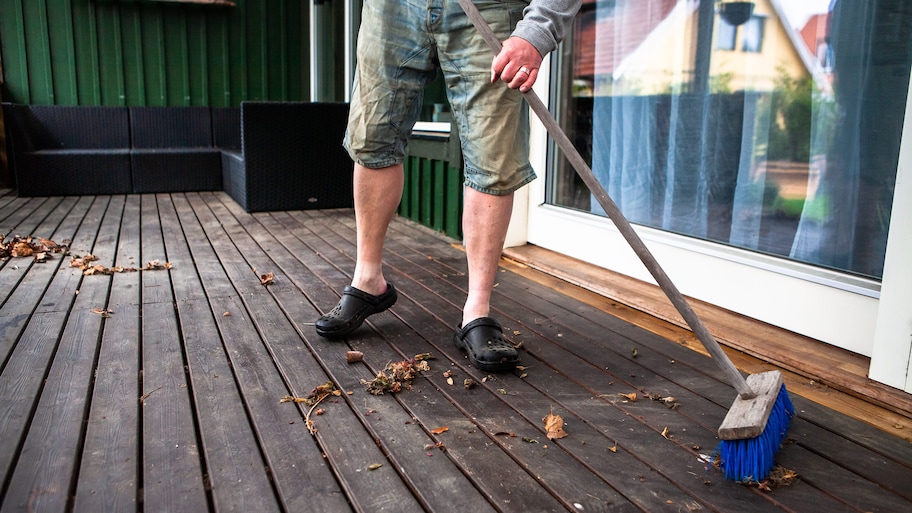
Remove Debris
It’s essential to have a clean surface to work with. Start by sweeping the deck free of pebbles, dirt, or leaves. If you have a hard time getting pesky loose debris stuck in between crevices, use a shop vac to get them (since you’ll have it out, you can vac the dirt off your window sills and screens too!).
Lastly, use a hose with a high-pressure nozzle or an electric power washer to clean the deck. Pro tip: wear long pants, close-toe shoes, and hearing protection for safety when using a power washer.
Important: If you’re using a power washer, read the manufacturer’s instructions to learn which nozzle to use and the distance the spray tip should be from the deck. If not followed correctly, you could damage the wood—pine, spruce, and cedar are the easiest to damage. To be sure, test the power washer in an inconspicuous area first.
Protect Your Shrubs
The chemicals in your cleaner and stain can damage the health of the shrubs and landscaping around your deck. To protect them, cover them with a plastic sheet or tarp while you’re cleaning and staining. Once you’re done, take off the covering and water thoroughly because leaving plastic on for an extended period can potentially cause damage to the shrubs.
How to Clean Deck Wood Thoroughly

While this portion of the process might seem tedious, it’s essential. If you skip this portion of the process, the stain and sealant might end up not adhering and the deck could end up peeling.
1. Apply Painter’s Tape for Protection
Once you’ve thoroughly washed the deck, apply painter’s tape to the base of the railings and along the edges of the house to protect your painted surfaces from the chemicals in the cleaners.
3. Select the Right Deck Cleaner
There are a variety of different deck cleaners available, so to help you make the right decision, consider your wood type and tools. For example, if you prefer to use a power washer rather than a brush and hose, get a cleaner and degreaser that is made specifically to use with power washers.
4. Apply the Cleaner
While you can choose to use a separate wood degreaser and cleaner, we recommend using an all-in-one solution to save time and money. Before applying, put on safety glasses and gloves. Then, remember to check the instructions on the package to see if you need to dilute the solution, add anything to it, and how long you need to wait before rinsing it off.
Apply the solution with a brush and pole or power washer 5 to 10 boards at a time in long, steady strokes. Once you’re done and waiting for the solution to sink in, use a stiff bristle brush to really work the solution in (also known as back brushing).
Important: If you’re using a power washer and have a covered deck, be aware of which direction you’re spraying in. Why? If you spray upwards at the columns of your deck then you might get water behind the ceiling trim, which can cause mold to grow.
5. Let It Dry
Next, sit back and relax. Yes, really! Once you’ve thoroughly cleaned the deck, you need to let the deck stain dry out for at least 48 hours and keep everything off of it.
6. Sand Down the Wood
After the deck has dried, check the surface for any splintering or remaining stains. To prep the surface, sand your deck with an orbital sander with 60- or 80-grit sandpaper. If you’re using a pole sander then use 120-grit sandpaper instead. After you’re done sanding, use a broom or leaf blower to get rid of any sawdust or remaining debris.
7. Inspect Your Deck
Next, conduct a DIY deck inspection and check out the surface to see if there are any splintering or nails sticking up. If you notice any protruding nails, hammer them down so they won’t catch on the stain pad. If the hammer isn’t enough, you can use a nail set or punch to push them below the surface of the deck.
If you have any loose boards, boards that need to be replaced, or other damage, make the repairs before applying the stain.
8. Select a Stain
There are a lot of stain options that come in different colors and with different perks. To help you decide, research what type will be best for your deck, schedule, and budget.
Water-based stain products are typically easier to clean up and don’t have a strong smell, while oil-based products usually penetrate the surface and might last longer. Semi-transparent stains are subtle and show the grain and texture of the wood, but if you have a lot of stains on your deck that cannot be removed you might want to opt for a darker tone.
How to Apply Deck Stain and Sealant to Your Deck
You’re almost done! Before you start staining, check the weather forecast to make sure you won’t get rained on in the middle of the application.
1. Apply Fresh Painter’s Tape
Before you apply any stain, add some fresh painter’s tape to the base of your railings and along the sides of your house for protection.
2. Prep Your Deck Stain Station
To ensure you have everything you need at your fingertips, prepare a stain station. Put down a drop cloth first to protect the deck from spills. Once you’ve opened your stain, mix it with a stir stick or a mixer, and mix it up each time you refill your paint tray.
Next, get your application tools ready: a 2- to 3-inch-wide paint brush for crevices, posts, and corners, and a roller on an extension pole or stain applicator.
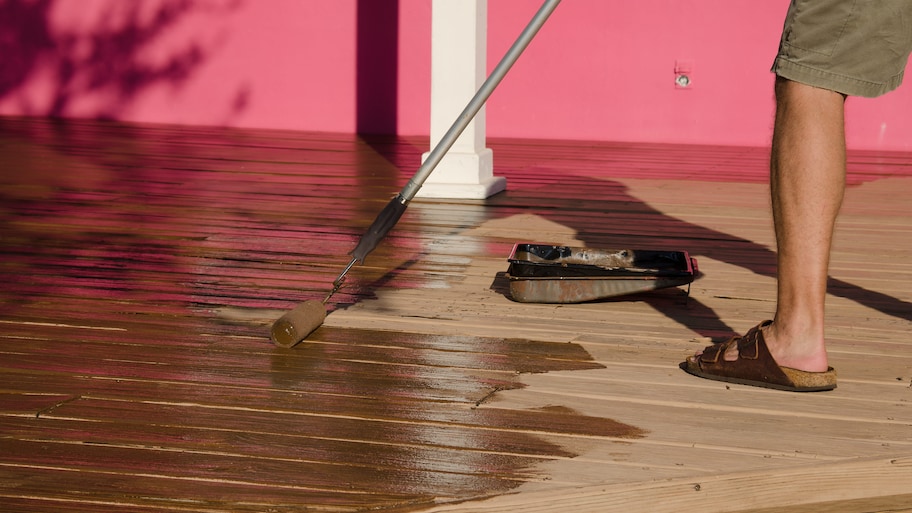
3. Apply the Stain
Stain, well… it stains, so put on gloves before you begin. Start with the posts, railings, and spindles. Use a ladder to reach the back sides of the posts and the outside of the railings and spindles.
Once you’ve applied stain to the vertical areas of the deck, focus on the floor of the deck. Start at the far end of the deck so you don’t stain yourself into a corner then roll the stain onto three to four boards at a time. Then, use a 2- to 3-inch paint brush to get the corners and crevices. Repeat this until you’ve stained the entire deck. Keep in mind that some stains require more than one coat, so read the instructions on the product for specific directions.
4. Wait for Stain to Dry
Once you’ve finished staining your deck, it’ll be tempting to move your furniture back onto it and to have a barbecue to celebrate. However, you still need to wait two to three more days for the deck to dry and cure fully.
How To Stain Deck Stairs
Once you’ve applied stain to your deck’s surface, you’re ready to move on to the stairs. Here’s how to stain your deck stairs.
1. Sweep the Entire Surface of the Stairs
Starting from the top step and working down, sweep the entire surface of each stair to get rid of any debris. This step creates a clean surface to start the staining process.
2. Lay a Protective Tarp or Drop Cloth
Stain can easily drip down through your staircase, especially when you’re working on the underside of the stairs. Place a protective tarp underneath your deck stairs to protect your landing pad below.
3. Apply the Stain to the Top Surface of the Stairs
Next, apply the stain with a rag or paint brush to the top of the stairs. Start at the top step and work your way down, ensuring you cover every crevice.
4. Apply Stain to the Underside of the Stairs
Once you’ve covered the top portion, begin applying the stain to the underside of the steps. Grab a stepladder to reach the top steps, if necessary.
5. Wait for the Stain to Dry
Allow the stain to dry for at least four hours between coats if you’re doing multiple coats. Otherwise, allow the stain to dry for three days before walking on the surface.
How To Stain Deck Banisters
Staining the spindles on deck banisters can get tedious with a brush, but using a fluffy paint mitt can make the process much quicker. Otherwise, grab a rag or a paint brush and get ready to finish your banisters. You may need to pick up a smaller 1-inch brush if you have a lot of tight crevices to cover.
1. Wipe the Area Down
First, take a dry rag or microfiber cloth and gently sweep it down the surface of the banisters. This step will help remove any debris before you apply the stain.
2. Apply the Stain to the Banisters, Working From Top to Bottom
Next, take a rag or small paint brush and apply stain to the entire surface of the banister. Be sure to view your work from every angle and cover every surface and crevice.
3. Work in the Stain From Top to Bottom
For spindles, it’s best to stick with a rag or a paint mitt that you can wrap around the spindle easily. Dip your mitt in the stain and work it in from top to bottom, going with and against the grain.
4. Allow the Stain to Dry
Allow the stain to dry for at least four hours before doing a second coat. Once you’re done staining, wait three days before enjoying your new deck.
How to Stain a Deck for the First Time
Staining your new deck brings out the natural beauty of the wood and helps shield it from the elements. Since the wood is new, you can skip the wood cleaner—a sweep with a broom should suffice. Here’s how to stain a new deck.
1. Allow the Wood to Season Before Staining
Before you apply stain to a new deck, it’s important to allow the wood to season (or dry out) properly. You’ll want to give the wood a minimum of four to eight weeks to season. This first step is crucial because, if not allowed to season properly, the stain will lock moisture into the wood, eventually leading to mold, rot, and other moisture-related issues.
2. Perform a Water Droplet Test
To test whether the wood is seasoned and ready to take a stain, add a few droplets of water to the wood’s surface. If the droplets quickly absorb, then the wood is ready to stain.If not, continue waiting a few more days before conducting the test again.
3. Sweep and Prep the Area
Next, sweep the deck surface to get rid of any debris. Protect surrounding surfaces with drop cloths and painter’s tape as you would for any deck staining project.
4. Apply the Stain
Now you can apply the stain as you normally would, using a brush, rag, or your preferred tool. Allow the stain to dry for two to three days before enjoying your beautiful new deck.
DIY vs. Hiring a Pro
The total cost of staining a deck varies depending on several factors, including the type of stain you choose, the size of your deck, and the additional tools or materials. If you decide to seal or waterproof your deck, the total cost will increase. However, you should expect to pay between $550 to $1,250 for a professional deck staining.
If you’d rather leave the deck-staining process to the pros, consider hiring a local deck painter to tackle the job. That way, you can dedicate time to other outdoor projects while a pro transforms your deck surface efficiently and accurately.
Paul Pogue contributed to this piece.
Frequently Asked Questions
Your tool of choice ultimately comes down to personal preference. Many DIYers prefer applying stain with a lint-free rag, but others stick with a paint brush or a roller. Wipe the stain and work it into the wood, working with and against the grain. If you’re applying multiple coats, allow the stain to dry for around four hours between coats.
It depends on the size of the surface. If you’re covering a large area, a paint roller will allow you to stain the entire surface in much less time. Paint rollers also offer the advantage of creating a smoother, more even coat. However, they’re not as practical for smaller surfaces such as banisters, spindles, and crevices—for these, opt for a paintbrush, paint mitt, or lint-free rag instead.
You’ll want to avoid excessively hot or humid conditions, so it’s best to apply your stain in late spring to early fall. It's also important to watch the weather forecast and aim for days when there isn’t rain expected for at least three days. For new decks, allow the wood to season beforehand for at least four to eight weeks.
Hot, intense sunshine can cause your stain to dry too quickly, which could lead it to look uneven or patchy. If you’re staining the deck during hotter months, it’s best to do it in the morning or evening once the wood has had time to cool down. If you’re staining in cooler weather with less sunshine, the time of day won’t make as much of a difference.


