1 to 2 hours, depending on the number of tanks and the complexity of each setup
Cost
$25–$50
You might need a few supplies.
Need professional help with your project?
Get quotes from top-rated pros.
What you'll need:
TOOLS
Siphon hose
Aquarium thermometer
Fishnet
Battery-powered heater (optional)
Containers to house your aquarium fish, plants, and other live elements
SUPPLIES
Sealable bucket
Moving boxes
Bubble wrap or packing paper
Foam board
Towels
Packing tape
If you thought you dislike moving, your fish probably dislikes it even more. Moving your fish will inevitably take them out of their comfort bubble, but with the right plan, you’ll get it done with minimal stress.
Keep in mind that fish should be the last thing you move out and the first thing you move in, and you should never try to move a tank with the water and fish still in it. Along with moving your fishy friends, you’ll have to determine the best way to move their large aquariums, tanks, and other equipment. Follow these steps to move a fish tank without making too much of a splash.
Create a Plan (and Supply List) for Moving Your Fish Tanks
Photo: Kolevski.V / Adobe Stock
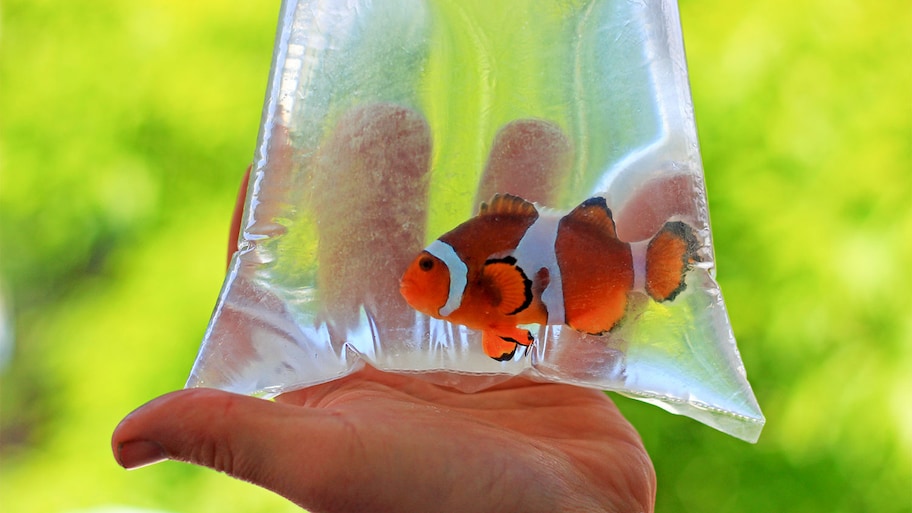
Before the big move, pick up housing containers for the fish and other living elements of your tank. Gather enough clean containers, storage totes, or 5-gallon buckets to hold all of your fish comfortably. If you’re using containers you already have on hand, make sure they never held chemicals, cleaners, or other substances that could harm your fish. Likewise, don’t wash containers out with soap—rinse them only. You may need a battery-operated heater and other accommodations for tropical fish and other sensitive setups for tropical fish and other sensitive setups.
If you’re moving less than an hour away, you can hold your fish in polythene bags, but it’s best to give them larger, aerier containers if possible. Cross-country moves are tricky and risky for the fish—consider selling the fish or finding a friend to house them and ship them to you once the new tank is ready.
Move Fish and Live Plants to Their Travel Containers
Your fish and live plants must be fully submerged in separate travel containers. It’s best to wait as long as you can before moving the fish, minimizing their stress.
Once you’re ready, use a siphon hose to fill your housing containers with water from the tank. Do not use fresh water—the sudden change in pH levels can lead to shock. For jumpy fish, use a loose cover with a gap to allow air to get through. Tape the cover in place if needed, but do not seal the container or close the lid completely, as the fish will need oxygen during the trip.
Unplug and Drain the Tank
Once your plants and fish friends are safe in their travel containers, unplug all the mechanisms in and around the tank. To maintain the beneficial bacteria in the tank, leave enough water so the substrate is slightly submerged (around ½ an inch or so of water at the bottom should suffice). This step might make the tank significantly heavier, so you should consider enlisting the help of a local moving company to transport it safely.
Retain Some Tank Water
If possible, it is a good idea to collect some tank water in a large, sealable bucket or a similar container. If you prefer, you can empty and dry out the tank before moving, but you’ll start your new tank’s ecosystem from scratch. Fish tank water develops plenty of beneficial bacteria over time, making it far better than tap water. This simple step makes the move easier on your fish. There is no hard and fast rule here as to how much water to preserve, but take as much as possible within reason.
Remove and Pack the Filters
Next, remove your filter, keeping as much water as possible. Again, this will keep more of those helpful bacteria alive and make your tank transition run smoother. Keep these in a storage tote or bucket to prevent spillage during transit.
Pack Up Decorations and Other Non-Living Elements
Wipe off any decorations, pebbles, and other non-living elements and pack them up. Use moving boxes and wrap fragile items in packing paper or bubble wrap to ensure safe transportation.
Wipe Down and Clean the Tank
Before packing the tank and its various components, make sure to wipe it down until it is bone dry. You don’t want any errant moisture to attract mold spores and the like during transit. Go slowly here and use a soft microfiber cloth to avoid agitating or scratching the glass, though keeping the filter damp is fine.
You should also give every part of the fish tank a thorough yet gentle cleaning. Scrape any algae off and use a low-powered siphon or vacuum to clear away gunk from the gravel. Transition pebbles or sand from the bottom of the tank to a bucket or plastic container. Finally, take the time to examine filters, pumps, lights, and related parts for debris or damage before packing them away.
Secure the Tank for Transport
This is one of the most important steps, as unpacking a broken fish tank is no fun. Here are some packing tips to ensure your tank is safe and secure for the move.
Wrap the lid in protective packing material, such as air-filled plastic padding. Place the lid in a box and cover it with more padding. Secure the box with packing tape. If you are forgoing a box, wrap the padded lid in packing tape to keep it secure.
Transition your pebbles and sand from the bottom of the tank to a bucket or a similar type of secure container. Pack any other decorations as you see fit, but wrap any fragile parts with padding.
Fill up the interior of the tank with towels or packing paper and wrap the tank with air-filled plastic padding. Feel free to use the same materials you wrapped around the lid.
Line the bottom and sides of a large box with foam board insulation for tank placement. Make sure the box is large enough to accommodate the tank and any associated insulation, but not so big that it allows the tank to shift during transit. If there is any space, fill it up with packing paper.
Seal and label the box and use a marker to indicate which side is up. During transport, refrain from stacking boxes on top of the fish tank to preserve its structural integrity.
Keep Your Fish Safe and Happy During Transit
Once you’re on your way to the new home, secure your fish containers so they stay put during transit. Ideally, they should go in the car with you to prevent spills and other accidents. If it’s extremely hot or cold, keep them near your car’s heater or AC system to maintain a safe water temperature.
Set Up the Tank in Your New Home
After you arrive at your new home, start unpacking and get the tank ready as soon as possible. If you’re working with a local mover, give them clear directions to unload the tank before anything else. Here are some tips to ensure you successfully unpack and set up your fish tank after a move.
Before setting it up, set aside an appropriate location within the home.
Carefully open up the box containing the tank, remove any padding, and gently lift it from the box. Inspect the tank for any cracks, chipping, or other signs of damage.
Next, unpack all other tank-related components, such as filters, decorations, and accessories.
Fill the bottom of the tank with sand, pebbles, gravel, accessories, and any necessary equipment.
Pour in your reserved water from your previous setup, filling the tank halfway. You can supplement with another water source if you don’t have enough reserved water.
Add coral, plants, and any remaining decorative pieces.
Plug your tank in but wait for about two hours to power on the filter and pump, allowing particles that were disturbed during setup to settle.
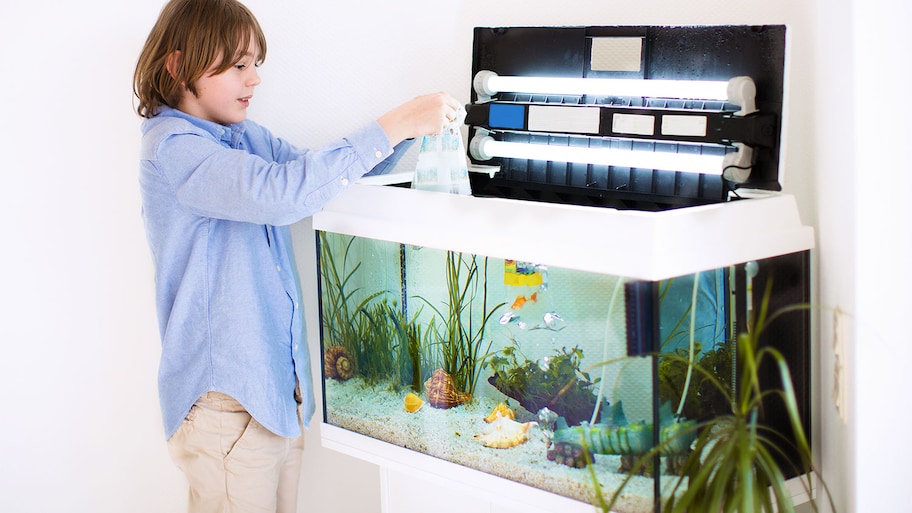
Add the Fish to the Tank
Photo: FamVeld / iStock / Getty Images
Now it’s time for the moment of truth. The tank is unpacked and the decorations are placed, so the fish are ready to move into their new home. Follow these tips to ensure your amphibious friends are happy and healthy in their new digs.
Gently place the sealife back in the tank. Go slowly to ensure a stress-free experience.
Prepare for “new tank syndrome,” even if you replenished the tank with reserved water. The ecosystem of a fish tank is delicate, so you’ll likely see some cloudiness in the water, in addition to ammonia and nitrate spikes.
In the case of cloudy water, cut back on feeding for a day and place more carbon in the filter until it clears up.
Test for ammonia and nitrate three to five days after setting up the tank, adjusting these levels with chemical additives if necessary.
Check the temperature daily for the first week to ensure a comfortable habitat for the fish. Adjust accordingly.
Observe your fish closely for the first week to look for any signs of diseases such as ich (ichthyophthirius multifiliis). How to check for ich? Look for small white spots resembling salt grains on the body, odd behaviors such as hiding, and a sharp decrease in appetite.