
Planet Python
Last update: October 22, 2022 10:41 AM UTC
October 21, 2022
Real Python
The Real Python Podcast – Episode #130: Fostering an Internal Python Community & Managing the 3.11 Release
Does your company have a plan for growing an internal Python community? What are the attributes to look for when bringing someone into your department? This week on the show, Pablo Galindo Salgado returns to talk about building community through the Python Guild at Bloomberg and managing the release of Python 3.11.
[ Improve Your Python With 🐍 Python Tricks 💌 – Get a short & sweet Python Trick delivered to your inbox every couple of days. >> Click here to learn more and see examples ]
IslandT
wxPython Tutorial — Create Check Box
In this wxPython tutorial let us create a check box within the previously created top-level window. The parameters within the wx.CheckBox’s class are as follows:-
parent (wx.Window) –

id (wx.WindowID) –

label (string) –

pos (wx.Point) –

size (wx.Size) –

style (long) –

validator (wx.Validator) –

name (string) –
I am not going to use all of them but one thing to keep in mind is the size parameter is not to make the box larger or smaller but instead to make the area that surrounded the check box larger or smaller instead.
self.chkbox1 = wx.CheckBox(self.the_frame, id=2, label="Yes or No", pos=wx.Point(250, 150),
         size=wx.Size(width=100, height=20), style=0,
         name="check1")
Again I have created a function for the creation of the checkbox as follows:-
def CreateCheckBoxes(self):
    self.chkbox1 = wx.CheckBox(self.the_frame, id=2, label="Yes or No", pos=wx.Point(250, 150),
    size=wx.Size(width=100, height=20), style=0,
    name="check1")
Next, I will call the above function within the CreateWidgets function. The entire program is as follows:-
import wx

class DerivedApp(wx.App):

    def OnInit(self):
        self.the_frame = wx.Frame(None, -1) # create the top frame
        self.the_frame.Show(True)
        return True

    def CreateWidgets(self): # create various  widgets
        self.CreateButton()
        self.CreateCheckBoxes()

    def CreateButton(self):
        self.the_button =  wx.Button(self.the_frame, id=1, label="Hello World!", pos=wx.Point(150, 150), name="Hello!")

    def CreateCheckBoxes(self):
        self.chkbox1 = wx.CheckBox(self.the_frame, id=2, label="Yes or No", pos=wx.Point(250, 150),
         size=wx.Size(width=100, height=20), style=0,
         name="check1")

wxapp = DerivedApp()
wxapp.CreateWidgets() # initialise all widgets
wxapp.MainLoop()
Below is the outcome of the above wxPython program!

Tkinter Tutorial — Create Check Button Widget
In this Tkinter tutorial let us create a check button widget within the previously created top-level window. These lines of code will create the check box widget.
# Create a check button
chVarName = tk.IntVar()
check0 = tk.Checkbutton(win, text="No Show Input", variable=chVarName)
check0.select()
check0.grid(column=2, row=1)
The above check button will be used to decide whether to replace the text within the label widget or not. As you might have expected the chVarName value will be used to get the state of the check button (checked or un checked), if checked then the program will not show the replacing text on the label widget.
def showHello():
    if chVarName.get() == 1:
        pass
    else:
        hello_label.configure(text=helo.get() + " " + slogan.get()) # change the text inside the label
The entire program is as follows:-
import tkinter as tk
from tkinter import ttk

win =  tk.Tk()
win.title("Hello World!")

def showHello():
    if chVarName.get() == 1:
        pass
    else:
        hello_label.configure(text=helo.get() + " " + slogan.get()) # change the text inside the label

hello = ttk.Button(win, text="Hello!", command=showHello) # create a button
hello.grid(column=0, row=0)

hello_label = ttk.Label(win, text="Hello!") # create a label
hello_label.grid(column=1, row=0)

# create a text box widget
helo = tk.StringVar() # create the helo string variable object
entry_text = ttk.Entry(win, width=16, textvariable=helo)
entry_text.grid(column=0, row=1)

# create a hello world combo box
slogan = tk.StringVar()
helo_combo = ttk.Combobox(win, width=16, textvariable=slogan, state='readonly') # readonly term will avoid the user from typing value into the combo box
helo_combo['value'] = ('Hello', 'Hello Again', 'Hellowin') # create the combo box selection values
helo_combo.grid(column=1, row=1)
helo_combo.current(0)

# Create a check button
chVarName = tk.IntVar()
check0 = tk.Checkbutton(win, text="No Show Input", variable=chVarName)
check0.select()
check0.grid(column=2, row=1)

win.mainloop()
The outcome is as follows:-

If you like my tutorial don’t forget to share it on other social media because I do need lots of readers to motivate myself to continue preparing tutorials which indeed takes lots of my time and energy to do so. Thank you in advance for your help!
Reuven Lerner
Lots of new YouTube videos about Python and Pandas!
I’ve been blogging a lot less lately, in part because I’ve been writing more on Twitter and recording more YouTube videos.
Among those YouTube videos are:
- Intro to Python exceptions, https://www.youtube.com/watch?v=ilJfD65d-2Q
- “for” loops vs list comprehensions, https://www.youtube.com/watch?v=dY8lD_fk0r4
- Understanding the “if __name__ == ‘__main__'” line in Python modules: https://www.youtube.com/watch?v=sf3vENkPKj8
- All about Python identifiers: https://www.youtube.com/watch?v=CTxLVMFkbT8
- Peeking at Python bytecodes: https://www.youtube.com/watch?v=VIWdP7shhX4
- Python’s “range” builtin: https://www.youtube.com/watch?v=g3WOT98iuTM
I also have a bunch of videos that are about Pandas:
- Retrieving from multi-indexes: https://www.youtube.com/watch?v=wJpnM5J29pc
- Using “cut” in Pandas: https://www.youtube.com/watch?v=C5SdqegjrE8
- Avoiding the “SettingWithCopyError” in Pandas: https://www.youtube.com/watch?v=pObiqWE4oB8
I’m always looking for new topics to address on my YouTube channel; if you have any suggestions, please do reach out to me via e-mail ([email protected]), on Twitter (@reuvenmlerner), or even in a comment on my YouTube channel.
The post Lots of new YouTube videos about Python and Pandas! appeared first on Reuven Lerner.
October 20, 2022
IslandT
Tkinter Tutorial — Create combo box widget
In this tutorial, let us continue with our previous example and add the combo box widget into the previously created top-level Tkinter window widget where that combo box will allow the user to select a slogan from it and then after the user has clicked on the button, both the text’s input from the text box and the selected slogan from the combo box will replace the previous text on the label widget.
import tkinter as tk
from tkinter import ttk

win =  tk.Tk()
win.title("Hello World!")

def showHello():
    #hello.configure(text=txt) # change the text inside the button
    hello_label.configure(text=helo.get() + " " + slogan.get()) # change the text inside the label

hello = ttk.Button(win, text="Hello!", command=showHello) # create a button
hello.grid(column=0, row=0)

hello_label = ttk.Label(win, text="Hello!") # create a label
hello_label.grid(column=1, row=0)

# create a text box widget
helo = tk.StringVar() # create the helo string variable object
entry_text = ttk.Entry(win, width=16, textvariable=helo)
entry_text.grid(column=0, row=1)

# create a hello world combo box
slogan = tk.StringVar()
helo_combo = ttk.Combobox(win, width=16, textvariable=slogan, state='readonly') # the 'readonly' term will stop the user from typing value into the combo box
helo_combo['value'] = ('Hello', 'Hello Again', 'Hellowin') # create the combo box selection values
helo_combo.grid(column=1, row=1)
helo_combo.current(0)

win.mainloop()
The slogan’s StringVar object will get the value that has been selected from the user and shows it on the label widget together with the user input text from the text widget.
The above python program will produce the following output after the user has entered text into the text box widget and made the selection from the combo box widget and clicked on the button.

October 19, 2022
Real Python
Build a Tic-Tac-Toe Game Engine With an AI Player in Python
When you’re a child, you learn to play tic-tac-toe, which some people know as naughts and crosses. The game remains fun and challenging until you enter your teenage years. Then, you learn to program and discover the joy of coding a virtual version of this two-player game. As an adult, you may still appreciate the simplicity of the game by using Python to create an opponent with artificial intelligence (AI).
By completing this detailed step-by-step adventure, you’ll build an extensible game engine with an unbeatable computer player that uses the minimax algorithm to play tic-tac-toe. Along the way, you’ll dive into immutable class design, generic plug-in architecture, and modern Python code practices and patterns.
In this tutorial, you’ll learn how to:
- Create a reusable Python library with the tic-tac-toe game engine
- Model the domain of tic-tac-toe following Pythonic code style
- Implement artificial players including one based on the minimax algorithm
- Build a text-based console front end for the game with a human player
- Explore strategies for performance optimizations
Click the link below to download the complete source code for this project:
Source Code: Click here to download the free source code that you’ll use to build a tic-tac-toe game engine and AI player with Python.
Demo: Tic-Tac-Toe AI Player in Python
By the end of this tutorial, you’ll have a highly reusable and extensible Python library with an abstract game engine for tic-tac-toe. It’ll encapsulate universal game rules and computer players, including one that never loses due to bare-bones artificial intelligence support. In addition, you’ll create a sample console front end that builds on top of your library and implements a text-based interactive tic-tac-toe game running in the terminal.
Here’s what actual gameplay between two players might look like:
Console Front EndGenerally, you may mix and choose the players from among a human player, a dummy computer player making moves at random, and a smart computer player sticking to the optimal strategy. You can also specify which player should make the first move, increasing their chances of winning or tying.
Later, you’ll be able to adapt your generic tic-tac-toe library for different platforms, such as a windowed desktop environment or a web browser. While you’ll only follow instructions on building a console application in this tutorial, you can find Tkinter and PyScript front end examples in the supporting materials.
Note: These front ends aren’t covered here because implementing them requires considerable familiarity with threading, asyncio, and queues in Python, which is beyond the scope of this tutorial. But feel free to study and play around with the sample code on your own.
The Tkinter front end is a streamlined version of the same game that’s described in a separate tutorial, which only serves as a demonstration of the library in a desktop environment:
Tkinter Front EndUnlike the original, it doesn’t look as slick, nor does it allow you to restart the game easily. However, it adds the option to play against the computer or another human player if you want to.
The PyScript front end lets you or your friends play the game in a web browser even when they don’t have Python installed on their computer, which is a notable benefit:
PyScript Front EndIf you’re adventurous and know a little bit of PyScript or JavaScript, then you could extend this front end by adding the ability to play online with another human player through the network. To facilitate the communication, you’d need to implement a remote web server using the WebSocket protocol, for instance. Take a look at a working WebSocket client and server example in another tutorial to get an idea of how that might work.
It’s worth noting that each of the three front ends demonstrated in this section merely implement a different presentation layer for the same Python library, which provides the underlying game logic and players. There’s no unnecessary redundancy or code duplication across them, thanks to the clear separation of concerns and other programming principles that you’ll practice in this tutorial.
Project Overview
The project that you’re going to build consists of two high-level components depicted in the diagram below:
 Tic-Tac-Toe Architecture Diagram
The first component is an abstract tic-tac-toe Python library, which remains agnostic about the possible ways of presenting the game to the user in a graphical form. Instead, it contains the core logic of the game and two artificial players. However, the library can’t stand on its own, so you’re also going to create a sample front end to collect user input from the keyboard and visualize the game in the console using plain text.
You’ll start by implementing the low-level details of the tic-tac-toe library, and then you’ll use those to implement a higher-level game front end in a bottom-up fashion. When you finish this tutorial, the complete file structure resulting will look like this:
Read the full article at https://realpython.com/tic-tac-toe-ai-python/ »
[ Improve Your Python With 🐍 Python Tricks 💌 – Get a short & sweet Python Trick delivered to your inbox every couple of days. >> Click here to learn more and see examples ]
Reuven Lerner
How to propose a winning conference talk
[This blog post is taken from my “Trainer Weekly” newsletter, all about the business, logistics, and pedagogy of corporate training. Given that PyCon US 2023 just opened its call for participation, I thought that this would help people interested in proposing a talk. Bottom line: Go for it!]
If you’re a trainer, then your job is all about explaining complex technical ideas to other people. For this reason, speaking at a conference serves at least two purposes: It gives you a chance to demonstrate and advertise your training skills, and also to practice and improve those skills.
After all, even my largest corporate training will get to a few dozen people at a time. And even my most popular online training will get to a few thousand people. A good conference talk, however, will immediately reach several hundred conference attendees, who are typically the biggest influencers in a given community. Who attends PyCon, after all, if not the most die-hard Python addicts? They’ll return to their home towns, meetups, and companies, and remember you as a person who taught them interesting lessons. That might turn into further speaking gigs, or even (we can hope) paid training gigs.
Today, conference talks are almost always recorded and put on YouTube soon after the conference takes place. Which means that beyond the people who will see your talk live, thousands will see it later on. My “Practical Decorators” talk from PyCon 2019 has been seen more than 34,000 times. That’s vastly more than would see it on my own YouTube channel, which means that I’ve hitched a ride on PyCon’s popularity to advertise myself and boost my visibility.
I’ll add that every time you speak, you’re getting practice speaking, and thus getting better at it. If you’re one of those people who gets sweaty and nervous before speaking in front of an audience, then giving a few talks at conferences (including smaller ones) will be a good cure for that. Over time, you’ll feel more natural in front of an audience, explaining things to them easily and naturally.
But wait: You can’t just waltz onto the stage of a conference and give a talk. You first need to propose a talk and have it accepted. How can you do that?
First: Find conferences at which you’ll want to speak. Most conferences take place each year, so you can anticipate when they’ll send out a CFP (call for proposals), a public request that people suggest talks. Don’t neglect the smaller, regional conferences, where you’re more likely to be able to get something accepted.
Even before the CFP opens, I suggest writing down a list of topics that you might want to speak about. Finding a good topic is a crucial part of getting a talk accepted! Look at previous years’ conferences; avoid the topics that come up every single time.
As a trainer, you have a built-in advantage, because you know where people are having trouble understanding things. What questions do they ask on a regular basis? What knowledge would really help them? Where do people just not “get it”? If you teach on even a somewhat regular basis, you’ll easily find 5-10 topics that fit the bill.
If you aren’t yet training, then go to Stack Overflow, and read through as many questions as you can on the topic you want to teach about. What topics keep coming up, and don’t have a truly great explanation?
Once the CFP opens, it’s time to write your proposal. You’ll need a catchy headline. Yes, tech people like to talk about the power of ideas, and meritocracy, and all of that stuff. That’s great, but we’re still humans, and we go for the shiny, exciting stuff. Yet another talk about Python dictionaries won’t get anyone’s attention. But “The three paradigms for using dictionaries,” or “How dictionaries became lightning fast,” will.
Of course, then you have to deliver: Write an outline of your talk, ideally with timing information. Even if the conference doesn’t ask for this, providing a clear outline, with timing, shows that you’ve given thought to what you want to say, and how you’ll say it. It’ll also force you to think about what you want to say!
For example, here are the title and outline of a talk that was accepted at both PyCon US 2021 and PyCon Israel 2021:
When is an exception not an exception? Using warnings in Python
- Introduction (1 min)
- What are warnings? (2 min)
- Generating a warning (2 min)
- Warning categories (1 min)
- Custom warning categories (2 min)
- Simple filtering (2 min)
- Per-category filtering (2 min)
- Warnings to exceptions (2 min)
- Logging warnings (4 min)
- Warnings to callables (4 min)
Wait at second — did I propose the same talk outline to two conferences? You bet I did! I now have about 6-8 conference talks that I can give at the drop of a hat. I know that it seems weird to submit a talk that you already gave, and which is available on YouTube. But most people won’t watch it on YouTube, and in any event, it’s often great to see a talk given in person, even if you’ve seen it online. After all, haven’t you ever attended a concert after seeing a musician online? Besides, when you give the talk a second time, you can revise and improve it.
Wait again — is it OK to submit more than one talk to a conference? Absolutely. When I see a CFP, I normally propose all of the talks that I haven’t yet given at that venue. After all, who knows which one they’ll want to accept? You might as well give the reviewers more options, rather than fewer. On a very rare number of occasions, they might even allow you to give two talks.
The outline isn’t enough. You also need a short summary, as well as a longer one. The most important thing is to indicate who will benefit from the talk, what they will come out knowing, and how it’ll really help them. Also be sure to indicate the level of the talk.
Conferences often struggle to find good talks on advanced-level topics. So if you can do a good job of explaining something complex in an advanced talk, definitely go for it.
The sad fact is that most conferences have far more proposals than slots. So they’ll need to reject some talks. Indeed, they’ll need to reject most of the talks that are proposed. The more specific you are with your outline, the better and more interesting the title you propose, and the clearer you are about the intended audience and what they’ll learn, will help.
And yet, sometimes even the best speakers and the best talks are rejected. That’s just the way it is.
However: If your talk is rejected, don’t fret. Some conferences (such as PyCon US) offer to tell you why your talk was rejected, and how you can improve it. Some other conferences (such as PyCon Israel) offer to mentor you on the creation of your talk proposals, which is fantastic.
Sometimes, a great talk will be rejected for no good reason. The attributes talk that I gave at PyCon US 2022 was rejected three times by PyCon US. I was sure that they would love it the first time around, but it took me a few edits and years to come up with a phrasing that they liked. And of course, the reviewers are people, too, and you can’t always be sure who will like (and dislike) what.
Many times, a proposal will ask for some proof that you’re actually good at speaking. If you can point to videos (especially conference videos) of yourself, then that’ll be great. Next best would be to point to records of talks you’ve given at user-group meetings and the like. And if you’re a new speaker, be sure to indicate that — many conferences specifically try to include a bunch of new speakers.
If you get a talk accepted, then that’s great. Practice, because this is your chance to show off your training skills to the world. If you’re a trainer, then this is your chance to do a little free advertising: At the start of your talk, tell them you’re a trainer. When you’re done, tell them you’re a trainer. You want to give lots of good information, and teach well, but you want people to say, “Hmm, that was a great talk — maybe I can invite that trainer to my company!”
My first PyCon talks were all rejected. Then I got one accepted. And now, I can generally (not always!) get talks accepted at all major Python conferences, which is a great feeling — not just because I enjoy teaching, but because you never know who will see what, and will lead to new training gigs for you.
Finally, don’t restrict yourself to proposals on topics that you know solidly, although that’s probably not a bad way to go at first. I often try to give talks on topics that I’m 75% familiar with. That forces me to learn more, to gain depth, and to add content to the courses that I’ll end up giving at companies.
What do you think? Has this inspired you to propose conference talks? (I hope so!) If not, then what is holding you back?
Speaking at a conference is a great way to learn new things, to gain experience as a public speaker, and to show people how great you are as a public speaker. Even if you don’t get a talk accepted, you’ll almost certainly learn something in the process — and if you keep trying, you will eventually get accepted.
The post How to propose a winning conference talk appeared first on Reuven Lerner.
IslandT
wxPython Tutorial — Create the wxPython child class object
Before I start, if you guys happen to know the creator of wxPython please do ask him this question: Why are you using the term wxPython instead of WxPython? I just feel curious about that!
Alright, after a few articles about Tkinter it is time to write the first wxPython tutorial and in this simple tutorial I am going to create a child class object from wxPython class where this object will be used later in all the tutorial articles about wxPython.
And here is how to create the child class of wxPython.
import wx

class DerivedApp(wx.App):

    def OnInit(self):
        the_frame = wx.Frame(None, -1) # create the top-level window
        the_frame.Show(True)
        return True
According to the wxPython website:-
OnInit will usually create a top window as a bare minimum. Unlike in earlier versions of wxPython, OnInit does not return a frame. Instead, it returns a boolean value that indicates whether processing should continue (True) or not (False).
I personally think that OnInit will get called after the user has created the child class object as shown in the below two lines of code!
wxapp = DerivedApp() # create the child class object
wxapp.MainLoop() # this loop will continue running until you close the top-level window
After the program has entered the main loop the top-level window will appear on the screen!

Phew, although it is simple, trust me, this is the method I use to learn Python programming language one bit at a time!
Tkinter Tutorial — Create Text box Widget
In this article let us continue with the previous example by adding a text box widget with a width of 16 at column 0, row 1 position within the Tkinter window, which simply means the second row. This text widget will receive a text from a user and after the user has cliked on the button the string var object will get the text’s entry from the user and replace the old text with the latest one within the label widget.
import tkinter as tk
from tkinter import ttk

win =  tk.Tk()
win.title("Hello World!")

def showHello():
    #hello.configure(text=txt) # change the text inside the button
    hello_label.configure(text=helo.get()) # change the text inside the label

hello = ttk.Button(win, text="Hello!", command=showHello) # create a button
hello.grid(column=0, row=0)

hello_label = ttk.Label(win, text="Hello!") # create a label
hello_label.grid(column=1, row=0)

helo = tk.StringVar() # create the helo string variable object
entry_text = ttk.Entry(win, width=16, textvariable=helo)
entry_text.grid(column=0, row=1)

win.mainloop()
As you can see the program is almost identical to the previous one except the label widget will not get the text from the button but instead will get it directly from the user input through the text box!
Talk Python to Me
#386: Realtime Web Apps and Dashboards with H2O Wave
Python's data science and data visualization capabilities are certainly one of the reasons for Python's meteoric rise over the past 10 years. But often thens visuals have been corralled into notebooks used by data scientists themselves or into static web pages. Recently, a host of excellent dashboard build and hosting frameworks have come along to turn these visuals into interactive apps for everyone. On this episode, we'll talk about H20 Wave. One of these excellent dashboard frameworks. We have Martin Turoci from H2O.ai here to tell us about Wave.<br/> <br/> <strong>Links from the show</strong><br/> <br/> <div><b>Martin Turóci on Twitter</b>: <a href="https://twitter.com/unusual_code" target="_blank" rel="noopener">@unusual_code</a><br/> <b>H20 Wave</b>: <a href="https://wave.h2o.ai" target="_blank" rel="noopener">wave.h2o.ai</a><br/> <b>H20 Wave Source</b>: <a href="https://github.com/h2oai/wave" target="_blank" rel="noopener">github.com</a><br/> <b>H20 Widgets</b>: <a href="https://wave.h2o.ai/docs/widgets/overview" target="_blank" rel="noopener">wave.h2o.ai</a><br/> <b>Hydrogen Torch</b>: <a href="https://docs.h2o.ai/h2o-hydrogen-torch/v1.2.0/" target="_blank" rel="noopener">docs.h2o.ai</a><br/> <br/> <b>PyCharm H20 Wave Plugin</b>: <a href="https://plugins.jetbrains.com/plugin/18530-h2o-wave" target="_blank" rel="noopener">plugins.jetbrains.com</a><br/> <b>Testing with Playright episode</b>: <a href="https://talkpython.fm/episodes/show/368/end-to-end-web-testing-with-playwright" target="_blank" rel="noopener">talkpython.fm/368</a><br/> <b>Hacktoberfest</b>: <a href="https://hacktoberfest.com" target="_blank" rel="noopener">hacktoberfest.com</a><br/> <b>Watch this episode on YouTube</b>: <a href="https://www.youtube.com/watch?v=mTYz6WGocWQ" target="_blank" rel="noopener">youtube.com</a><br/> <b>Episode transcripts</b>: <a href="https://talkpython.fm/episodes/transcript/386/realtime-web-apps-and-dashboards-with-h2o-wave" target="_blank" rel="noopener">talkpython.fm</a><br/> <br/> <b>--- Stay in touch with us ---</b><br/> <b>Subscribe to us on YouTube</b>: <a href="https://talkpython.fm/youtube" target="_blank" rel="noopener">youtube.com</a><br/> <b>Follow Talk Python on Twitter</b>: <a href="https://twitter.com/talkpython" target="_blank" rel="noopener">@talkpython</a><br/> <b>Follow Michael on Twitter</b>: <a href="https://twitter.com/mkennedy" target="_blank" rel="noopener">@mkennedy</a><br/></div><br/> <strong>Sponsors</strong><br/> <a href='https://talkpython.fm/foundershub'>Microsoft</a><br> <a href='https://talkpython.fm/sentry'>Sentry Error Monitoring, Code TALKPYTHON</a><br> <a href='https://talkpython.fm/assemblyai'>AssemblyAI</a><br> <a href='https://talkpython.fm/training'>Talk Python Training</a>
Python Bytes
#306 Some Fun pytesting Tools
<p><strong>Watch the live stream:</strong></p> <a href='https://www.youtube.com/watch?v=O5OyphLaDU8' style='font-weight: bold;'>Watch on YouTube</a><br> <br> <p><strong>About the show</strong></p> <p>Sponsored by <a href="http://pythonbytes.fm/foundershub2022"><strong>Microsoft for Startups Founders Hub</strong></a>.</p> <p><strong>Brian #1:</strong> <a href="https://github.com/zupo/awesome-pytest-speedup"><strong>Awesome pytest speedup</strong></a></p> <ul> <li>Neyts Zupan</li> <li>A checklist of best practices to speed up your pytest suite.</li> <li>as a talk at <a href="https://www.youtube.com/watch?v=uvkSOaFYsLo">Plone NAMUR 2022</a></li> <li>Measure first</li> <li>Then make sure (all items have explanations) <ul> <li>Hardware is fast <ul> <li>use a faster computer</li> <li>also try a self-hosted runner <ul> <li>seriously, a dedicated computer (or a few) for making test runs faster might be worth it. CI resources are usually slower in cloud than local, and even expensive VM farms are often slower. Try local </li> </ul></li> </ul></li> <li>Collection is fast <ul> <li>utilize <code>norecursedirs</code> and specifying the location of the tests, either on the command line or with <a href="https://docs.pytest.org/en/7.1.x/reference/reference.html#confval-testpaths"><code>testpaths</code></a></li> </ul></li> <li>PYTHONDONTWRITEBYTECODE=1 is set <ul> <li>might help</li> </ul></li> <li>Built-in pytest plugins are disabled <ul> <li>try <code>-p no:pastebin -p no:nose -p no:doctest</code></li> </ul></li> <li>Only a subset of tests are executed <ul> <li>Especially when developing or debugging, run a subset and <a href="https://pypi.org/project/pytest-skip-slow/">skip the slow tests</a>.</li> </ul></li> <li>Network access is disabled <ul> <li><a href="https://pypi.org/project/pytest-socket/"><code>pytest-socket</code></a> can make sure of that</li> </ul></li> <li>Disk access is disabled <ul> <li>interesting idea</li> </ul></li> <li>Database access is optimized <ul> <li>great discussion here, including using truncate and rollback.</li> </ul></li> <li>Tests run in parallel <ul> <li><a href="https://pypi.org/project/pytest-xdist">pytest-xdist</a> or similar</li> </ul></li> </ul></li> <li>Then keep them fast <ul> <li>monitor test speed</li> </ul></li> </ul> <p><strong>Michael #2:</strong> Strive to travel without a laptop</p> <ul> <li><a href="https://panic.com/prompt/"><strong>Prompt from Panic</strong></a> for SSH on iThings</li> <li><a href="https://github.dev"><strong>github.dev</strong></a> for an editor on iPad</li> <li>Push to branch for continuous deployment</li> <li>BTW, Apple could just make M1 iPads boot to macOS rather than chase silly multi windowing systems (stage manager, etc, etc)</li> </ul> <p><strong>Brian #3:</strong> <strong>Some fun tools from the previous testing article</strong></p> <ul> <li><a href="https://github.com/sharkdp/hyperfine">hyperfine</a> for timing the whole suite</li> <li><code>pytest</code> <code>--``durations 10</code> for finding test times of slowest 10 tests <ul> <li>leave the <code>10</code> off to find times of everything, sorted</li> </ul></li> <li><a href="https://pyinstrument.readthedocs.io/en/latest/home.html">pyinstrument</a> for profiling with nice tree structures <ul> <li>and <a href="https://pyinstrument.readthedocs.io/en/latest/guide.html#profile-pytest-tests">how to use it with pytest</a></li> </ul></li> <li><a href="https://pypi.org/project/pytest-socket/">pytest-socket</a> disables network calls with <code>--disable-socket</code>, helping to find tests that use network calls.</li> <li><a href="https://github.com/pytest-dev/pyfakefs">pyfakefs</a>, a fake file system that mocks the Python file system modules. “Using pyfakefs, your tests operate on a fake file system in memory without touching the real disk.”</li> <li><a href="https://github.com/apps/blueracer-io">BlueRacer.io</a></li> </ul> <p><strong>Michael #4:</strong> <a href="https://github.com/dosisod/refurb"><strong>Refurb</strong></a></p> <ul> <li>A tool for refurbishing and modernizing Python codebases</li> <li>Think of it as suggesting the pythonic line of code.</li> <li>A little sampling of what I got on Talk Python Training <ul> <li>file.py:186:25 [FURB106]: Replace <code>x.replace("\t", " ")</code> with <code>x.expandtabs(1)</code></li> <li>file.py:128:17 [FURB131]: Replace <code>del x[y]</code> with <code>x.pop(y)</code></li> <li>file.py:103:17 [FURB131]: Replace <code>del x[y]</code> with <code>x.pop(y)</code></li> <li>file.py:112:39 [FURB109]: Replace <code>not in [x, y, z]</code> with <code>not in (x, y, z)</code></li> <li>file.py:45:5 [FURB131]: Replace <code>del x[y]</code> with <code>x.pop(y)</code></li> <li>file.py:81:21 [FURB131]: Replace <code>del x[y]</code> with <code>x.pop(y)</code></li> <li>file.py:143:9 [FURB131]: Replace <code>del x[y]</code> with <code>x.pop(y)</code></li> <li>file.py:8:50 [FURB123]: Replace <code>list(x)</code> with <code>x.copy()</code></li> </ul></li> <li>You don’t always want the change, can suppress the recommendation with either a CLI flag or comment.</li> </ul> <p><strong>Extras</strong> </p> <p>Michael:</p> <ul> <li>Back on <a href="https://pythonbytes.fm/episodes/show/54/pyannotate-your-way-to-the-future"><strong>episode 54</strong></a> in 2017 we discussed python apps in systemd daemons. <ul> <li>Multiprocessing allows for a cool way to save on server memory</li> <li>Do the scheduled work a multiprocessing.Process</li> <li>Here’s <a href="https://python-bytes-static.nyc3.digitaloceanspaces.com/glances-view.png"><strong>an example from Talk Python Training</strong></a></li> </ul></li> <li>Completely rewrote <a href="https://twitter.com/TalkPython/status/1580691498416615426"><strong>search UI for Talk Python courses</strong></a></li> <li><a href="https://youtu.be/9K--N8frWq0"><strong>Google analytics is now illegal</strong></a>? </li> <li><a href="https://www.jetbrains.com/fleet/"><strong>Fleet</strong></a> is <em>finally</em> in public preview</li> <li>I’ll be on <a href="https://blog.jetbrains.com/pycharm/2022/10/webinar-django-in-pycharm/"><strong>a JetBrains/PyCharm webcast</strong></a> Thursday.</li> </ul> <p><strong>Joke:</strong> <a href="https://twitter.com/PR0GRAMMERHUM0R/status/1578943360705781762"><strong>Tests pass</strong></a></p>
October 18, 2022
Malthe Borch
Mitigating Username-Attacks on Digital Identity Logins
In Denmark, we've had a digital national identity service in operation since 2010, used for example to get access to secure e-mail and government online services.
It was revamped last year, in October 2021, introducing a new login mechanism to improve security.
The new login mechanism (MitID) is a three-step process:
- Input username and continue.
- Open app.
- Review and swipe.
Unlike the original system, in the revamp of 2021, the user is not prompted to open the app.
In principle, this is a considerable improvement since the user is actively participating in the login flow. In the previous system, the user instead required a password in addition to the username. And passwords tend to be weak, for one reason or another.
Notice however, that a login-session can be opened simply by knowing the username.
The service is now facing criticism after it has been discovered that a malicious actor can block a user from using the service if the username follows some template such as <firstname>.<lastname> (or whatever other means of guessing it).
Basically, after N failed attempts to login using a valid username, the account is suspended until manual intervention.
Needless to say, this is not acceptable for the user, nor is it scalable for the operator. But the first point is really the interesting one: a digital identity service should always allow the real user to login!
The trouble is of course not new. If multiple sessions are initiated at roughly the same time, which one is the right one? The most simple control available is to simply deny all attempts, but this includes the real user. Waiting for some amount of time to elapse is not a cure because the malicious actor can simply repeat the process.
The fundamental problem here is that a more or less arbitrary number of malicious login-sessions can be opened at any time for a given username. The internet is not a friendly place and distributed attacks are feasible. Traditional techniques such as blocking IPs are not adequate today.
The real user must somehow pair the real login attempt with the app, disambiguating between the login attempts by the malicious actor.
There are lots of ways to devise such a mechanism. We want one that adapts to the situation. If there's just one login-session, we don't need any mitigation, but if there are multiple sessions, we want an effective means of discarding the bad ones, leaving just the single, real one.
Inspired by Apple ID, we'll use a verification model based on two-digit numbers, but expand to a matrix of 16 choices, ordered by value for convenience.
- 09
- 13
- 17
- 26
- 29
- 32
- 41
- 50
- 58
- 62
- 64
- 77
- 81
- 84
- 95
- 96
The idea is that the user will take a certain action using the app based on the numbers shown on the screen.
For example, pick out a sequence of numbers:
- 84
- 09
- 26
- 58
If we require a specific ordered sequence of 4 elements, we get a total of 43,680 combinations. Adding just two more gives us 5,765,760 combinations.
No matter the number of bad login-sessions attempted at any given time, we can always provide such a sequence to disambiguate, making it exceedingly unlikely that a malicious actor gets through.
The new logic kicks in only when the user opens the app. At this time, the system knows the number of concurrent login-sessions. We'll limit the validity of a login-session to a short amount of time, for example 30 seconds.
- If the number of sessions is 1, we'll revert to the normal behavior.
- Otherwise, determine an appropriate number of items to choose from.
- Each login-session will show a sequence with this many items.
- The user will choose the items from the right sequence, selecting each number in the given order.
This system can be trivially implemented to run at scale using a key/value store.
PyCoder’s Weekly
Issue #547 (Oct. 18, 2022)
#547 – OCTOBER 18, 2022
View in Browser »

ChatterBot: Build a Chatbot With Python
Chatbots can help to provide real-time customer support and are a valuable asset in many industries. When you understand the basics of the ChatterBot library, you can build and train a self-learning chatbot with just a few lines of Python code.
REAL PYTHON
Writing Robust Tests for Data & Machine Learning Pipelines
This deep article talks about why some kinds of tests break more frequently than others and how to set the appropriate granularity of your test suites.
EUGENE YAN
Migrating Postgres From Heroku to Crunchy Bridge
Developers of a growing business were looking to migrate Postgres. They wanted a new vendor at least as good at Heroku, with new features and developer tools. They tested Amazon RDS and several others. Find out why they chose Crunchy Bridge for their cloud Postgres. Read the case study →
CRUNCHY DATA sponsor
Using LaTeX in Python
Python has great support for LaTeX: in Jupyter, in symbolic math tools, and in third party libraries. Learn about how easy it is to get started.
JOHN LOCKWOOD
Discussions
Python Jobs
Content Operations Manager (Anywhere)
Senior Full Stack Engineer (Python) - Remote - Full Time (Dallas, TX, USA)
Senior Software Engineer (Python, Remote) (Boston, MA, USA)
Senior Pipeline TD (Python) - Remote or On Site (Redmond, WA, USA)
Software Engineer III (.Net/Python) - Remote (Alpharetta, GA, USA)
Articles & Tutorials
Providing Multiple Constructors in Your Python Classes
In this video course, you’ll learn how to provide multiple constructors in your Python classes. To this end, you’ll learn different techniques, such as checking argument types, using default argument values, writing class methods, and implementing single-dispatch methods.
REAL PYTHON course
The Ultimate Guide to Sets in Python
“The set class is one of the key data structures in Python. It is an unordered collection of elements without duplicates. It represents, to a certain degree, a mathematical set, and many of the common mathematical operations for sets exist in Python.”
JACOB FERUS
Deepgram Is the Preferred Speech-to-Text API of Python Developers

Engineers from companies like NASA, Spotify & Volley chose Deepgram’s speech-to-text API to automatically transcribe their audio with understanding features like summarization, topic detection and language detection. Make the most of your audio data and get 200 hours of free transcription →
DEEPGRAM sponsor
Type Annotation via Automated Refactoring
Jimmy’s team at Carta decided they wanted to add type annotations to their large code base, but doing so manually would have taken a very long time. This post shows you how they built automated refactoring tools to add type annotations to their code.
JIMMY LAI
Python’s Type Hinting: Friend, Foe, or Just a Headache?
You can use type hinting to increase code readability, but you must do it wisely. Type hints can make things better, or they can be misleading and decrease code readability. Marcin offers suggestions on how to use type hints for clearer code.
MARCIN KOZAK • Shared by Marcin
Accepting Files in Django
Maybe your app needs to handle files from users like profile pictures. Accepting files from others is tricky to do safely. See the tools that Django provides to manage files safely.
MATT LAYMAN
Decorator Shortcuts
“When using many decorators in code, there’s a shortcut you can use if you find yourself repeating them. They can be assigned to a variable just like any other Python expression.”
NED BATCHELDER
Watch the Iron Analyst [2022] - Powered by Bright Data. Python at It’s Best
Seven data analysts and engineers showed off their Python coding skills analyzing a mystery data set. They put their knowledge of Python, Pandas and Streamlet to the test as they clean, analyze, and create a spectacular visualization or dashboard.
BRIGHT DATA sponsor
13 Ways to Scrape Any Public Data From Any Website
There are many libraries for scraping and parsing from web content out there. This guide shows you several different techniques and why you would choose from among them.
DMITRIY ZUB
10 Python Mini Automation Projects
Automate some common tasks, such as: sending email, converting PDF to audio with text-to-speech, get weather information, and seven more.
HAIDER IMTIAZ
Projects & Code
Events
Weekly Real Python Office Hours Q&A (Virtual)
October 19, 2022
REALPYTHON.COM
PyData Bristol Meetup
October 20, 2022
MEETUP.COM
PyLadies Dublin
October 20, 2022
PYLADIES.COM
MadPUG
October 20 to October 21, 2022
MEETUP.COM
Karlsruhe Python User Group (KaPy)
October 21, 2022
BL0RG.NET
Chattanooga Python User Group
October 21 to October 22, 2022
MEETUP.COM
Happy Pythoning!
This was PyCoder’s Weekly Issue #547.
View in Browser »
[ Subscribe to 🐍 PyCoder’s Weekly 💌 – Get the best Python news, articles, and tutorials delivered to your inbox once a week >> Click here to learn more ]
Juri Pakaste
Better diff hunk headers with Swift
When you run git diff — or look at diffs in at least Fork — on a modified Swift project you see things like this:
@@ -251,7 +251,7 @@ extension AppUITests {
         let container = app.scrollViews["scroll"]
         XCTAssertTrue(container.waitForExistence(timeout: 2))
-        XCTAssertTrue(container.buttons["Restore"].exists)
+        XCTAssertTrue(container.buttons["Restore Purchases"].exists)
         XCTAssertTrue(container.buttons["View Subscriptions"].exists)
     }
While staring at a bunch of these today I realized just how unhelpful that line with @@s and extension is. The name of the extension where these lines lives is not the most relevant context; the name of the function is.
This article on improving diff output for a bunch of other languages was helpful. I'll adapt its guidance for Swift here.
Step 1: Diff driver
Define a diff driver in your $HOME/.gitconfig. The xfuncname configuration specifies a regular expression that is used to match a line you want to see in the hunk header after the @@ bit.
[diff "swift"]
    xfuncname = ^[ \t]*((struct|class|actor|func|extension)[ \t].*)$
Step 2: Global git attributes
If you don't have a global git attributes file configured, set one up:
git config --global core.attributesfile ~/.gitattributes
Step 3: Configure the swift driver for Swift files
Edit the ~/.gitattributes file to make Git use your newly defined diff driver for Swift files. Add the following line:
*.swift diff=swift
After these changes, the above diff will look like this:
@@ -251,7 +251,7 @@ func testButtons() {
         let container = app.scrollViews["scroll"]
         XCTAssertTrue(container.waitForExistence(timeout: 2))
-        XCTAssertTrue(container.buttons["Restore"].exists)
+        XCTAssertTrue(container.buttons["Restore Purchases"].exists)
         XCTAssertTrue(container.buttons["View Subscriptions"].exists)
     }
That's a lot more helpful.
Andre Roberge
pandas' SettingWithCopyWarning: did I get it right?
I am just beginning to learn pandas and am looking to provide some automated help. From what I read, it appears that SettingWithCopyWarning is something that confuse many people. Is the following correct?
df = pd.DataFrame([[10, 20, 30], [40, 50., 60]],
                  index=list("ab"),
                  columns=list("xyz"))
df.loc["b"]["x"] = 99
# What is SettingWithCopyWarning ?
what()
# Can I get more specific information for what I just did?
why()
# What about if I tried to use indirect chaining.
# There are two possibilities
series = df.loc["b"]
series["x"] = 99
where()
why()
# What if I do things in a different order
series_1 = df["x"]
series_1.loc["b"] = 99
where()
why()
# What if I had multiples data frames?
df2 = df.copy()
series = df.loc["b"]
series["x"] = 99
where()
why()
PyCon
PyCon US 2023 Launches!
Our conference in Salt Lake City was a success, and we’re looking forward to returning in 2023. Planning is already underway, and today we’re excited to announce the launch of our conference website, along with Call for Proposals, and our sponsorship program!
Just like the 2022 edition, our team will be hosting the event in person with an online component. The conference will take place in Salt Palace Convention Center, from April 19th to April 27th, 2023. The program will be filled with tutorials, talks, sprints, summits, and keynotes, with the theme of “By the community, For the community”.
PyCon US 2023 Website is live!
2023 is a special anniversary edition for PyCon US, we will be celebrating the 20th anniversary of PyCon US. The first PyCon originated in 2003 in the United States, and now PyCons are being held worldwide in over 44 countries.
For our design inspiration, we looked back to the past 20 years of PyCons and incorporated elements from the different years, forming a mosaic. Scroll over to see which year each design piece represents. The emerald green and white are the traditional 20th anniversary colors.
PyCon US 2023 website and navigation have been refreshed and revamped, making it more mobile-friendly, and allowing you to switch between the dark and light mode. Depending on which mode you’re viewing, you’ll see either a snake sleeping under a crescent moon at night, or a snake up and about under the sun. Thanks to the brilliant team from Marketing Can for designing and Kabu Creative for implementing the website!
Head over to the PyCon US 2023 website for details about the conference and more information about our sponsorship program.
PyCon US Call for Proposals is now open!
PyCon US 2023’s Call for Proposals has officially opened for Talks, Tutorials, Posters, and Charlas. We are excited to gather in person again in Salt Lake City, UT, where all of our speakers will present their topics in person at the Salt Palace Convention Center. PyCon US is made by you, so we want you and your ideas at PyCon US!
Please make note of the important deadline for submissions:
- All proposals are due December 9, 2022 AoE
We need beginner, intermediate, and advanced proposals on all sorts of topics. We also need beginner, intermediate, and advanced speakers to give said presentations. You don’t need to be a 20-year veteran who has spoken at dozens of conferences. On all fronts, we need all types of people. That’s what this community is comprised of, so that’s what this conference’s schedule should be made from.
For more information on where and how to submit your proposal, visit the Proposal Guidelines page on the PyCon US 2023 website.
Sponsorship Has Tremendous Impact
Sponsors are what make PyCon US possible and the Python Software Foundation possible. PyCon US is the main source of revenue for the PSF, the non-profit behind the Python language and the Python Packaging Index, and the hub for the Python community.
PyCon US is the largest and longest-running Python gathering globally, with a diverse group of highly engaged attendees, many of whom you won’t find at other conferences. We’re excited to be able to provide our sponsors with opportunities to connect with and support the Python community. You’ll be face-to-face with talented developers, job recruits, and customers, access a large and diverse audience and elevate your visibility and corporate identity within the Python community.
Check out our full menu of benefits, including new ones for 2023!
What you can expect when you sponsor PyCon US and the PSF:
Reach - access to 1500+ attendees interested in your products and services and generate qualified leads.
Recruiting - access to qualified job candidates. If you’re hiring, there’s no better place to find Python developers than PyCon US.
Brand strength - being part of the biggest and most prestigious Python conference in the world and supporting the nonprofit organization behind the Python language.
Networking with attendees in-person to create connections and provide detailed information about your products and services.
12 months of benefits - Reach the Python community during PyCon US and beyond, with options for recognition on Python.org, PyPI.org, and more.
Because of the generous support of our sponsors, the Python Software Foundation is able to continually improve our support of Python and its community. Read more about the PSF here and in our most recent Annual Impact Report. You can help us ensure the Python ecosystem thrives for years to come. Apply to sponsor PyCon US and the PSF today!
Head over to the Sponsorship Application page to learn more about the 2023 PSF sponsorship program and sign up to sponsor.
If you have any questions about sponsoring PyCon US and the PSF, please contact us at [email protected].
As we get closer to the event, the conference website is where you’ll find details for our call for proposals, registration process, venue information, and everything PyCon US related! Follow us here on the PyCon US Blog and @PyCon on Twitter so you won’t miss a thing.
Real Python
Python Basics: Numbers and Math
You don’t need to be a math whiz to program well. The truth is, few programmers need to know more than basic algebra.
Of course, how much math you need to know depends on the application you’re working on. In general, the level of math required to be a programmer is lower than you might expect.
Although math and computer programming aren’t as correlated as some people might believe, numbers are an integral part of any programming language, and Python is no exception.
In this video course, you’ll learn how to:
- Create integers and floating-point numbers
- Use arithmetic expressions, math functions, and number methods
- Format and display numbers in strings
- Create complex numbers
This video course is part of the Python Basics series, which accompanies Python Basics: A Practical Introduction to Python 3. You can also check out the other Python Basics courses.
Note that you’ll be using IDLE to interact with Python throughout this course. If you’re just getting started, then you might want to check out Python Basics: Setting Up Python before diving into this course.
[ Improve Your Python With 🐍 Python Tricks 💌 – Get a short & sweet Python Trick delivered to your inbox every couple of days. >> Click here to learn more and see examples ]
eGenix.com
PyDDF Python Herbst Sprint 2022
The following text is in German, since we're announcing a Python sprint in Düsseldorf, Germany.
Ankündigung
Python Meeting Herbst Sprint 2022 in
Düsseldorf
Samstag, 22.10.2022, 10:00-18:00 Uhr
Sonntag, 23.10.2022, 10:00-18:00 Uhr
Atos Information Technology GmbH, Am Seestern 1, 40547 Düsseldorf
Informationen
Das Python Meeting Düsseldorf (PyDDF) veranstaltet mit freundlicher Unterstützung der Atos Information Technology GmbH ein Python Sprint Wochenende.Der Sprint findet am Wochenende 22./23.10.2022 in der Atos Niederlassung, Am Seestern 1, in Düsseldorf statt.Folgende Themengebiete sind als Anregung bereits angedacht:
- Arbeiten mit Clusterfuzz
Anmeldung, Kosten und weitere Infos
Alles weitere und die Anmeldung findet Ihr auf der Meetup Sprint Seite:
WICHTIG: Ohne Anmeldung können wir den Gebäudezugang nicht vorbereiten. Eine spontane Anmeldung am Sprint Tag wird daher vermutlich nicht funktionieren. Also bitte unbedingt mit vollen Namen bis spätestens am Freitag, 21.10., über Meetup anmelden.
Teilnehmer sollten sich zudem in der PyDDF Telegram Gruppe registrieren, da wir uns dort koordinieren:
Über das Python Meeting Düsseldorf
Das Python Meeting Düsseldorf ist eine regelmäßige Veranstaltung in Düsseldorf, die sich an Python-Begeisterte aus der Region wendet.
Einen guten Überblick über die Vorträge bietet unser PyDDF YouTube-Kanal, auf dem wir Videos der Vorträge nach den Meetings veröffentlichen.Veranstaltet wird das Meeting von der eGenix.com GmbH, Langenfeld, in Zusammenarbeit mit Clark Consulting & Research, Düsseldorf.
Marc-André Lemburg, eGenix.com
IslandT
Tkinter Tutorial — Changes the text in a label
If you have followed my previous Tkinter tutorial which is to change the text within a Button once the user has clicked on it then in this tutorial I will create a label widget on the right side of the Button widget and instead of changing the text within the Button, I will change the text within the label widget!
import tkinter as tk
from tkinter import ttk

win =  tk.Tk()
win.title("Hello World!")

def showHello(txt):
    #hello.configure(text=txt) # change the text inside the button
    hello_label.configure(text=txt) # change the text inside the label

hello = ttk.Button(win, text="Hello!", command=lambda: showHello("Hello Again")) # create a button
hello.grid(column=0, row=0)

hello_label = ttk.Label(win, text="Hello!") # create a label
hello_label.grid(column=1, row=0)

win.mainloop()
Basically, the python program above is the same as the previous one except this time I have created a label widget in which the original text of that label will get replaced once a user has clicked on the Button widget which will call the showHello function to change the text within the label widget.
PyBites
Technology and Mindset with new PDM Coach Hugh Tipping
Listen now:
This week we welcome Hugh Tipping, our newest Pybites Developer Mindset (PDM) Coach, to the podcast!
These 34 minutes are packed full of inspiration and insight into Hugh’s motivations as a coach.
Hugh shares his thoughts on many of the concepts that we actually address within PDM so if you’ve been wondering what it’s like, this is a great one to listen to.
- Building your portfolio
- Blogging
- “Overcoming” Imposter Syndrome
- Navigating public feedback
- Stoicism
- Community in coding
- Creativity and coding
You can follow Hugh here:
Books Mentioned:
Hugh: Cal Newport – Deep Work
Hugh: Cal Newport – So Good They Can’t Ignore You
Julian: Cal Newport – Digital Minimalism
Bob: Chad Fowler – The Passionate Programmer
Matthew Wright
Finding and analyzing free stock index data with Python and EDGAR
A stock index is just a list of stocks. But an index is a special list because investors use it to make investing decisions. An index is constructed via rules about stocks to include, how much to include, and when to include (or remove it). Finding this data, especially for more obscure indexes, can be difficult. This is especially the case if you want to find this data for free. This article will show you one technique to find stock index information using free data. I’ll do all this with standard Python tools – all code included.
We will use pandas, lxml, matplotlib, and a little elbow grease.
What is a stock index?
A stock index is a bit more than just a list of stocks. We want three pieces of information: the list, the weights, and a date that the index changes.
List
The rules to pick stocks in an index can be somewhat complicated. Each index has some guidelines for selecting stocks and explains who makes the decisions on index inclusion. Most indexes can only change their constituents (a name for the members of the index) four times per year. For example, consider an index that contains the top 100 stocks by market capitalization for an exchange. As stocks go up and down in price, or as companies merge with other companies, it may be necessary to remove some and add others to the list.
Weights
You can think of the index as a list of weights. Each stock in the index will have a weight, and the sum of the weights will be 1. An index can be equal weighted: it can contain 100 equally weighted stocks having a weight of 0.01 per stock. Usually indexes use market capitalization for weighting. Market capitalization is the total value of the outstanding shares in the market. The higher market cap stocks will have a bigger weight than the smaller ones. Rebalancing is the act of recalculating the weights and adding or removing stocks from the list.
History
The index rebalance happens on a certain date, usually once per quarter. Any analysis of historical index data requires a history of index weights and constituents.
In terms of ease to obtain this data, the easiest to find is the list. But the weights and historical data can be a bigger challenge to find.
Index examples
Some common stock indexes that many people have heard of in the United States are the Dow Jones Industrial Average (a.k.a. “The Dow”), the S&P 500, and the Nasdaq 100. There are many more indexes, including indexes in other countries, like the FTSE 100 on the London Stock Exchange.
The news media will often report on the daily performance of the Dow when discussing the market. If you aren’t a finance person, you may not know that practically no one in finance cares about the Dow. For historical reasons, the media often says things like “the market was up 300 points today”. Usually we are interested in percentage point changes of the S&P500. The Dow is a bad index to use for investors for a few reasons, which we will show in this article.
The S&P 500 is a well known index maintained by S&P Global. The stocks in the index are from 500 US companies, and they are roughly the 500 largest by market capitalization. Companies move in and out of the index based on a set of rules created by S&P. Once a quarter, the index is rebalanced. The index currently has 503 stocks in it (as of time of writing) because three of the 500 companies have 2 types of common stock, and both symbols are included in the index. If you want to know more details about how S&P constructs and maintains their indexes, here’s a detailed document describing the rules.
Side note, I will choose to use the term indexes instead of indices for the plural of index, even though in this context indices would be appropriate. You will see both used in a financial context, but I find indexes to be more comfortable.
Getting this data for free
S&P makes their money by providing market data, including the most current data about the indexes that they maintain. While you can pretty easily find the current stocks that are in a popular index like the Dow or S&P 500, finding the historical values that are in the index, as well as their weights, can be a challenge. S&P would rather just sell you this data. If you work at a large bank or hedge fund, your company probably pays S&P (or a competitor) a fair amount of money for a database of index values, weights, and the dates for each of these values.
It turns out that you can pretty closely approximate this data for free, if you’re willing to put in the work to find it and clean it up.
To do that, we’ll use Python and various Python libraries to access the SEC’s EDGAR system. You can read all about what EDGAR and the SEC is and how to setup your environment to read EDGAR data in this article. However, I’ll cover some of the details here as well.
How do we find index data in EDGAR?
The approach that we’ll take to find the elements of an index is to look for an Exchange Traded Fund (ETF) that tracks the index. One of the main reason indexes exist is so that investors can measure their investing success against what “the market” does. If you decided to buy 10 stocks and hold them for one year, at the end of that year, how would you know if you did a good job of picking stocks? One way is to compare your performance to the performance of a stock index.
Over the years, many investors learned that outperforming the index was really difficult, and just buying all the stocks in the index was much easier. You won’t beat the index, but you will also not underperform it (except for fees). But buying all 503 stocks is difficult and expensive, so the financial industry offers a solution in the form of an ETF. The ETF is a special fund that contains all the stocks in the index. Since ETFs are listed securities, the SEC requires them to make regular filings. The filings are in the EDGAR database.
If you want to own the S&P 500 index, there are many ETFs that track it. The most common one is SPY, although there are many others, and the others tend to have lower fees.
For this article, since we want to make some of the manual steps later a little easier, we will use the Dow Jones Industrial Average. It is an inferior index for investing, but since it has only 30 stocks, it serves well for an example. You can find ETFs using a screener tool like this one. Just search for Dow Jones as the index provider, and you’ll find DIA. Here’s the result page for it
What filings are available for ETFs?
You can go into EDGAR and search for all the filings using their search form. Here are the results for DIA.
The SEC requires a filing called N-PORT that contains the portfolio investments for an ETF. This is a quarterly report. At the time of writing the most recent report is dated 2022-07-31 (but was filed on 2022-09-23).
Let’s take a look at what this report looks like. I’ll go through this without a ton of explanation (you can refer to the earlier article for details).
import requests
import json
from lxml import etree

import pandas as pd

website = "example.org" # your website
email = "[email protected]" # your email

headers = {"User-Agent": f"{website} {email}"}

# get the XML document directly (note, this is not the html version linked to above, but the underlying xml doc)
nport = requests.get("https://www.sec.gov/Archives/edgar/data/1041130/000175272422213777/primary_doc.xml", headers=headers)

nport.raise_for_status()

print(nport.content[:100]
b'<?xml version="1.0" encoding="UTF-8"?><edgarSubmission xmlns="http://www.sec.gov/edgar/nport" xmlns:'
# turn the xml above into an lxml document
doc = etree.fromstring(nport.content)
Parsing out the data
Now I’ll make things look really easy here. In reality I had to manually inspect a few examples of the N-PORT data to figure out the structure. I also took a look at the filing instructions supplied by the SEC, as well as the technical specs for the xml. You can pull up the raw xml to see the structure, and you can dig into the specs if you want to learn more. I learned that the investments are all located in the invstOrSec section of the document. Using lxml, we can make an XPath expression to select only those values.
investments = doc.xpath("//nport:invstOrSec", namespaces={'nport':'http://www.sec.gov/edgar/nport'})
investments[0].xpath("nport:name", namespaces={'nport':'http://www.sec.gov/edgar/nport'})[0].text
'Honeywell International Inc'
You can see the first element is for Honeywell. I then found a nice code snippet to use that would convert an lxml document into a simple Python dict for easier manipulation.
# from https://gist.github.com/jacobian/795571
def elem2dict(node):
    """
    Convert an lxml.etree node tree into a dict.
    """
    result = {}

    for element in node.iterchildren():
        # Remove namespace prefix
        key = element.tag.split('}')[1] if '}' in element.tag else element.tag

        # Process element as tree element if the inner XML contains non-whitespace content
        if element.text and element.text.strip():
            value = element.text
        else:
            value = elem2dict(element)
        if key in result:


            if type(result[key]) is list:
                result[key].append(value)
            else:
                tempvalue = result[key].copy()
                result[key] = [tempvalue, value]
        else:
            result[key] = value
    return result

data = [elem2dict(i) for i in investments]

print(len(data))
data[0]
30
{'name': 'Honeywell International Inc',
 'lei': 'ISRPG12PN4EIEOEMW547',
 'title': 'Honeywell International Inc',
 'cusip': '438516106',
 'identifiers': {'isin': {}},
 'balance': '5706213.00000000',
 'units': 'NS',
 'curCd': 'USD',
 'valUSD': '1098217753.98000000',
 'pctVal': '3.858904435656',
 'payoffProfile': 'Long',
 'assetCat': 'EC',
 'issuerCat': 'CORP',
 'invCountry': 'US',
 'isRestrictedSec': 'N',
 'fairValLevel': '1',
 'securityLending': {'isCashCollateral': 'N',
  'isNonCashCollateral': 'N',
  'isLoanByFund': 'N'}}
Further analysis with pandas and matplotlib
Now you can see that the first investment has a few interesting fields, including the name, the cusip (a standard identifier we’ll talk about in the future), the balance of shares (balance and units – NS means Number of Shares) and the percentage of the total investment (pctVal). We can make a pandas DataFrame of this data for some further analysis.
df = pd.DataFrame(data)
Note that in the data above, the numbers are passed in as text, so let’s convert balance, valUSD, and pctVal into numbers. If you would like an overview of converting data in pandas, check out this article.
for c in ['balance', 'valUSD', 'pctVal']:
    df[c] = pd.to_numeric(df[c])

df[['name', 'cusip', 'balance', 'units', 'pctVal']]
                                    name      cusip    balance units  \
0            Honeywell International Inc  438516106  5706213.0    NS
1                      Cisco Systems Inc  17275R102  5706213.0    NS
2                         Salesforce Inc  79466L302  5706213.0    NS
3                                Dow Inc  260557103  5706241.0    NS
4                      Johnson & Johnson  478160104  5706213.0    NS
5                        McDonald's Corp  580135101  5706213.0    NS
6                 UnitedHealth Group Inc  91324P102  5706213.0    NS
7   International Business Machines Corp  459200101  5706213.0    NS
8                                  3M Co  88579Y101  5706213.0    NS
9                               NIKE Inc  654106103  5706213.0    NS
10          Walgreens Boots Alliance Inc  931427108  5706213.0    NS
11                              Visa Inc  92826C839  5706213.0    NS
12               Procter & Gamble Co/The  742718109  5706213.0    NS
13                        Microsoft Corp  594918104  5706213.0    NS
14                          Chevron Corp  166764100  5706213.0    NS
15                    Walt Disney Co/The  254687106  5706213.0    NS
16                           Walmart Inc  931142103  5706213.0    NS
17                      Coca-Cola Co/The  191216100  5706213.0    NS
18                             Amgen Inc  031162100  5706213.0    NS
19                    Home Depot Inc/The  437076102  5706213.0    NS
20                            Intel Corp  458140100  5706213.0    NS
21           Goldman Sachs Group Inc/The  38141G104  5706213.0    NS
22            Verizon Communications Inc  92343V104  5706213.0    NS
23                         Boeing Co/The  097023105  5706213.0    NS
24                       Caterpillar Inc  149123101  5706213.0    NS
25                             Apple Inc  037833100  5706213.0    NS
26                 Travelers Cos Inc/The  89417E109  5706213.0    NS
27                        Merck & Co Inc  58933Y105  5706213.0    NS
28                   JPMorgan Chase & Co  46625H100  5706213.0    NS
29                   American Express Co  025816109  5706213.0    NS

       pctVal
0    3.858904
1    0.909688
2    3.689679
3    1.066888
4    3.499200
5    5.280680
6   10.874146
7    2.622395
8    2.872023
9    2.304195
10   0.794398
11   4.252895
12   2.785204
13   5.628956
14   3.283858
15   2.127350
16   2.647658
17   1.286636
18   4.961878
19   6.033974
20   0.728031
21   6.684611
22   0.926129
23   3.194233
24   3.974996
25   3.258394
26   3.182002
27   1.791305
28   2.313017
29   3.088166
Just from inspection, you might see a few things you can learn about this index, but let’s visualize the data a bit to illustrate a point or two about it. One way to do this is to just show a pie chart of both the pctVal and balance columns. Let’s make a function to do this which we’ll use later for comparing with another index.
from matplotlib import pyplot as plt

def plot_index(df, name, sort='pctVal'):
    fig, axes = plt.subplots(1,2, figsize=(12,8))
    df = df.sort_values(by=sort, ascending=False)
    fig.suptitle(f"Shares vs % of Total for {name}")
    axes[0].pie(df['balance'])
    labels = df['name'].copy()
    labels.iloc[min(25, len(labels)):] = ''
    axes[1].pie(df['pctVal'], labels=labels, rotatelabels=True)

plot_index(df, "Dow Jones Industrial Average")
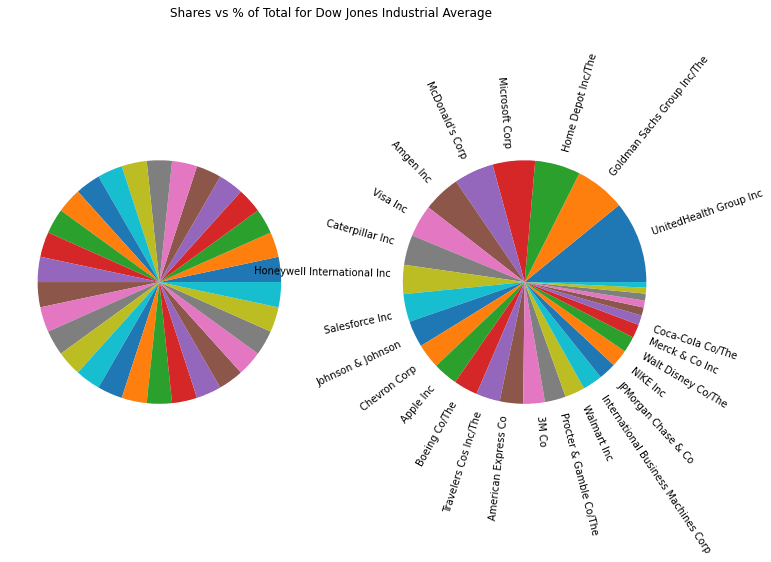 Shares and % of total value for shares in DIA
Comparing indexes
Let’s now go ahead and grab the Nasdaq 100 index. The ETF QQQ tracks the Nasdaq 100, and so we can grab a recent N-PORT filing for it just like we did for DIA. I’ll do this all in one go, just repeating the steps from above, but with a recent filing for QQQ.
def get_nport_values(url):
    nport = requests.get(url, headers=headers)
    nport.raise_for_status()
    doc = etree.fromstring(nport.content)
    investments = doc.xpath("//nport:invstOrSec", namespaces={'nport':'http://www.sec.gov/edgar/nport'})
    data = [elem2dict(i) for i in investments]
    df = pd.DataFrame(data)
    for c in ['balance', 'valUSD', 'pctVal']:
        df[c] = pd.to_numeric(df[c])
    return df

# recent nport document for QQQ
url = "https://www.sec.gov/Archives/edgar/data/1067839/000175272422184608/primary_doc.xml"
df_n100 = get_nport_values(url)
plot_index(df_n100, 'Nasdaq 100')
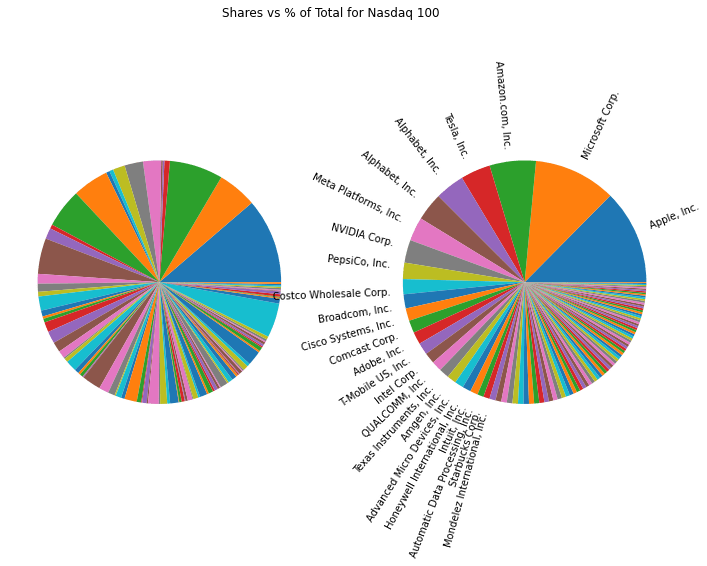 The shares and percent of total value for QQQ
Share counts
These two sets of pie charts do a good job of showing you the difference between these two types of indexes. It’s pretty clear that the Dow is equally weighted by shares. You see this on the left pie chart for DIA. Each slice is the same size. In the Nasdaq 100, the share sizes don’t especially line up with the percentage of the total value. In some cases (such as Tesla) a large slice of total value is a small slice of the total shares. This is because Tesla has a large share price, but not as many shares outstanding as Amazon, for example.
Now, I’ll make a little side note that equally weighted indexes aren’t inherently bad. Some investors may want an equal weighted index to prevent too much of the investment being in only the largest companies. The main problem with the Dow is that it has only 30 stocks in it and it equally weights by shares, not market cap. It also doesn’t represent the entire market well, which is how the new media uses it, unfortunately.
Percentage of value
Look at the top three holdings in the Dow by value and the bottom three, and do the same for the Nasdaq 100.
df.sort_values(by='pctVal').head(3)[['name', 'pctVal']]
                            name    pctVal
20                    Intel Corp  0.728031
10  Walgreens Boots Alliance Inc  0.794398
1              Cisco Systems Inc  0.909688
df.sort_values(by='pctVal').tail(3)[['name', 'pctVal']]
                           name     pctVal
6        UnitedHealth Group Inc  10.874146
21  Goldman Sachs Group Inc/The   6.684611
19           Home Depot Inc/The   6.033974
df_n100.sort_values(by='pctVal').head(3)[['name', 'pctVal']]
              name    pctVal
83  DocuSign, Inc.  0.108177
41      Okta, Inc.  0.128520
34    Splunk, Inc.  0.134234
df_n100.sort_values(by='pctVal').tail(3)[['name', 'pctVal']]
                name     pctVal
17       Apple, Inc.  12.578838
67   Microsoft Corp.  10.918983
10  Amazon.com, Inc.   6.142787
If you don’t follow the stock market, this might not be obvious, but Apple, Microsoft, and Amazon have much larger market capitalizations than DocuSign, Okta, and Splunk. But why is UnitedHealth group 10% of the Dow, when Intel is only 0.72 % ? UnitedHealth has a stock price of around $500, but Intel has a price around $25. However, their market capitalizations are ~ $479B and $105B respectively. A price weighted index is very different from a market cap weighted index because it depends somewhat arbitrarily on price.
Where do we go from here?
We’ve now just scratched the surface with using the EDGAR data to understand what is in an index. There is a lot more useful data in EDGAR about each of the stocks in the index. But to access it, we will need to map the value in the N-PORT report back to a stock ticker. You’ll notice that we have a name and a CUSIP, but not a ticker. We’ll tackle that problem next.
The post Finding and analyzing free stock index data with Python and EDGAR appeared first on wrighters.io.
October 17, 2022
Python Morsels
What does // mean in Python?
Python's // operator performs "floor division" (a.k.a. "integer division"). It always rounds down the result to the nearest integer while dividing.
Table of contents
The / operator
The / operator is the division operator in Python.
When / is used between two numbers, you'll always get the exact (as exact as Python can manage) result back:
>>> 5 / 2
2.5
>>> 5 / 2
2.5
Unlike some programming languages, / in Python does not act any differently when used between integers; in Python 3 that is.
In Python 2, division between two integers would would the result downward to the nearest integer:
>>> 5 / 2  # Python 2
2
>>> 5 / 2  # Python 2
2
But in Python 3, division between two integers always returns a floating point number with the exact result:
>>> 4 / 2
2.0
>>> 4 / 2
2.0
The // operator between integers
The // operator is the …
Read the full article: https://www.pythonmorsels.com/integer-division/
Real Python
A Practical Introduction to Web Scraping in Python
Web scraping is the process of collecting and parsing raw data from the Web, and the Python community has come up with some pretty powerful web scraping tools.
The Internet hosts perhaps the greatest source of information on the planet. Many disciplines, such as data science, business intelligence, and investigative reporting, can benefit enormously from collecting and analyzing data from websites.
In this tutorial, you’ll learn how to:
- Parse website data using string methods and regular expressions
- Parse website data using an HTML parser
- Interact with forms and other website components
Note: This tutorial is adapted from the chapter “Interacting With the Web” in Python Basics: A Practical Introduction to Python 3.
The book uses Python’s built-in IDLE editor to create and edit Python files and interact with the Python shell, so you’ll see occasional references to IDLE throughout this tutorial. However, you should have no problems running the example code from the editor and environment of your choice.
Source Code: Click here to download the free source code that you’ll use to collect and parse data from the Web.
Scrape and Parse Text From Websites
Collecting data from websites using an automated process is known as web scraping. Some websites explicitly forbid users from scraping their data with automated tools like the ones that you’ll create in this tutorial. Websites do this for two possible reasons:
- The site has a good reason to protect its data. For instance, Google Maps doesn’t let you request too many results too quickly.
- Making many repeated requests to a website’s server may use up bandwidth, slowing down the website for other users and potentially overloading the server such that the website stops responding entirely.
Before using your Python skills for web scraping, you should always check your target website’s acceptable use policy to see if accessing the website with automated tools is a violation of its terms of use. Legally, web scraping against the wishes of a website is very much a gray area.
Important: Please be aware that the following techniques may be illegal when used on websites that prohibit web scraping.
For this tutorial, you’ll use a page that’s hosted on Real Python’s server. The page that you’ll access has been set up for use with this tutorial.
Now that you’ve read the disclaimer, you can get to the fun stuff. In the next section, you’ll start grabbing all the HTML code from a single web page.
Build Your First Web Scraper
One useful package for web scraping that you can find in Python’s standard library is urllib, which contains tools for working with URLs. In particular, the urllib.request module contains a function called urlopen() that you can use to open a URL within a program.
In IDLE’s interactive window, type the following to import urlopen():
>>> from urllib.request import urlopen
The web page that you’ll open is at the following URL:
>>> url = "http://olympus.realpython.org/profiles/aphrodite"
To open the web page, pass url to urlopen():
>>> page = urlopen(url)
urlopen() returns an HTTPResponse object:
>>> page
<http.client.HTTPResponse object at 0x105fef820>
To extract the HTML from the page, first use the HTTPResponse object’s .read() method, which returns a sequence of bytes. Then use .decode() to decode the bytes to a string using UTF-8:
>>> html_bytes = page.read()
>>> html = html_bytes.decode("utf-8")
Read the full article at https://realpython.com/python-web-scraping-practical-introduction/ »
[ Improve Your Python With 🐍 Python Tricks 💌 – Get a short & sweet Python Trick delivered to your inbox every couple of days. >> Click here to learn more and see examples ]
Mike Driscoll
PyDev of the Week: Matthäus Chajdas
This week we welcome Matthäus Chajdas (@NIV_Anteru) as our PyDev of the week! Matthäus is a core developer of Pygments, a generic syntax highlighter that is used in many websites, wikis, and more! Matthäus also works on Liara, a static site generator.
You can find out what else Matthäus is doing by checking out his website. Let's spend some time to get to know Matthäus better!
Can you tell us a little about yourself (hobbies, education, etc):
I'm an architect at Advanced Micro Devices, better known as AMD, living n Munich and working on soft- and hardware. I had a relatively straightforward path to the "tech industry": I studied computer science in Erlangen, got a Ph.D. in computer science in Munich, and went to work in the field. Over the years I've picked up a few things about hardware development which put me into my current position. Working on the boundary between hardware and software has been quite interesting, especially as hardware has none of the properties you typically enjoy as a programmer: Hardware takes years to "compile" and you can't change it once shipped, so dealing with that has been quite an experience.
Outside of work, and when not giving lectures at some university, I enjoy taking a walk, bike, or, on days the weather doesn't play along, read a book. Anything to let the mind wander around a bit!
Why did you start using Python?
That's a really good question. I've been browsing a bit through my archives in the hope that I could find my very first project, but the earliest I can find is a tool to generate OpenGL bindings by doing some text and XML processing. I do recall using Python before that for what you'd call "command line tools" these days -- i.e. simple things like transcoding all FLAC to MP3 -- because I was (and still am) terrible at using Bash and .BAT.
What other programming languages do you know and which is your favorite?
I've been using a lot of languages over time -- mostly C++, but also C#, Go, TypeScript, and recently I've also tried Rust. It's really hard to pick a favorite though as a lot depends on the goals and the ecosystem/frameworks you can use. I really like C++ and I've certainly put my 10.000 hours into it, and given I'm still not annoyed I'd pick C++ as the favorite "non-Python" language.
However, there's really not much overlap in the projects where I'd pick C++, so there's no risk that I'll stop using Python anytime soon. Long-term I hope that Python will provide a way to produce "ahead of time" compiled binaries which will allow Python to be a viable alternative in performance/energy-sensitive areas.
What projects are you working on now?
In my spare time, I mostly work on Pygments and occasionally on my static blog generator, Liara. There are also a bunch of "unsorted" projects I hack on for (home) automation, small services, and so on, but none of this is a focused project effort. You can find some of them scattered all over my GitHub account but there's really nothing remotely as noteworthy as Pygments 🙂
Which Python libraries are your favorite (core or 3rd party)?
That's a really hard question as I've used many excellent libraries over the years. If I had to name a few favorites, I'd go with the following set: For web development, Django, which I've used a lot over the years and it never let me down, as well as Flask which I used for many smaller projects. On the database side, which for some reason I always end up having to work with, it's SQLAlchemy: It saved me countless hours when I needed to persist some data in a database. For any kind of data science project, it'll be the trinity of NumPy, Pandas and Matplotlib. I don't know how I would have gotten any research done in the past few years without them.
Finally, I'd like to "honorably mention" Jupyter and the associated ecosystem. It's been great to see the widespread use of Jupyter notebooks and their integration into editors like Visual Studio Code. In recent years, I've moved increasingly away from prototyping things in Python scripts and went to Jupyter directly, oftentimes ending up shipping the notebook as the final product.
There's also plenty to like in the standard library; I'll just point out two modules that I end up using in nearly every project: argparse and itertools.
How did you get started with the Pygments package?
That's a fun story. I was rewriting my blog to use Liara, and I really wanted to use Pygments to syntax highlight some HLSL (a programming language used in graphics.) Unfortunately, the Pygments project was dormant at the time and nobody was merging a PR to add HLSL, so I figured I'll give it a shot and fork it if nobody else wants to do things. Right about then Georg contacted me and asked if I would mind maintaining the parent project instead, and the rest is history!
What are the top 3 things you have learned while working on Pygments?
- Regex are hard
- You can never test enough
- You do get used to having several hundred thousands of projects depend on you not messing up every time you hit the release button
Is there anything else you’d like to say?
Something dear to my heart: Be performance conscious! Energy is the limiting factor today and even more so in the future. As a developer, you need to be aware of how to profile & optimize as we can't afford inefficient applications. Our software can end up being used by hundreds of thousand of people and every second of life & CPU time is valuable!
Thanks for doing the interview, Matthäus!
The post PyDev of the Week: Matthäus Chajdas appeared first on Mouse Vs Python.
IslandT
Tkinter Tutorial — Create an action button which will change the text in that button
In this Tkinter tutorial let us create a button with Tkinter and then create a function that will change the text of the button once it has been called after the user clicks on that button.
First of all, let us understand the concept of the Tkinter widget staying within the top-level window first. You can think of all the Tkinter widgets are actually wrapped around by that single top-level window object at this moment. Thus every time you create a widget within an object you will need to include the parent object as well, in this case, the top-level window object which is ‘win’ in this case.
hello = ttk.Button(win, text="Hello!", command=lambda: showHello("Hello Again"))
Next, you can specify the position of the button on the window object by using the grid method where in this case the button will be placed on column number 0 and row number 0. The grid method used the cell concept to place the widget within the main window.
hello.grid(column=0, row=0)

In order to call the method and passed some parameters into it, you will use the lambda command within the Button’s constructor as shown below.
command=lambda: showHello("Hello Again")
The original text of the button is ‘Hello’ which is in the text parameter inside the Button constructor.
text="Hello!"
Next, you will need to create a function that will be called by the button once a user has clicked on that particular button. The function will need to be created before the button or else the program will not be able to recognize the function within that button.
def showHello(txt):
    hello.configure(text=txt) # change the text inside the button
Once the user has clicked on that button the “Hello Again” string will get passed into the above function which will then replace the original text of the button with this latest one!
At last, don’t forget to import the ttk module into your python program because this class is needed to create the Tkinter’s button.
from tkinter import ttk
Below is the entire Tkinter program used to create the Tkinter Button and the function which will be called by the button if the user has clicked on that particular button.
import tkinter as tk
from tkinter import ttk

win =  tk.Tk()
win.title("Hello World!")

def showHello(txt):
    hello.configure(text=txt) # change the text inside the button

hello = ttk.Button(win, text="Hello!", command=lambda: showHello("Hello Again"))
hello.grid(column=0, row=0)

win.mainloop()
The program starts as follows:

After the user has clicked on the button the text within that button will get replaced by the showHello function as follows:

So do you think Tkinter is simple and easy to learn? Leave your comment below this post!