Make your old fence look like new
If you want to prolong your fence’s lifespan and spare yourself glares from neighbors, you’ll need to stay on top of maintenance. Staining a fence every few years can prevent warping and rot; the stain permeates into the wood, rather than sitting on the surface like paint does, so you don’t get unsightly peeling.
With a little hard work, doing this job yourself will save you the cost of hiring a local fence-staining professional. Learn how to apply a lasting stain to your wooden fence with just a few supplies and some easy-to-follow steps.
Difficulty: 2/5
Time: 3–4 days
Tools and Materials Needed:
Power washer
Moisture meter (optional)
Wood stain
Drop cloths
Painter’s tape
Sandpaper
Wood filler
4-inch stain brush
2-inch stain brush (optional)
Large paint tray
Set of ladders
9-inch roller with a three-quarter-inch nap (optional)
4-inch roller with a three-quarter-inch nap (optional)
Roller pole (optional)
Spray painter (optional)
1. Check the Forecast
If you have a weekend off, it might seem like the perfect opportunity for you to tackle that long-overdue task of rejuvenating your old yard fence. However, there shouldn’t be any rain forecast for at least 24 hours after the job is complete—you don’t want unsightly water spots that ruin the integrity of the stain.
You should also pay attention to the temperature. Cold or high humidity levels make it tough for the stain to dry thoroughly, and scorching hot days can dry the stain out too quickly, leading to uneven lap marks and an untidy finish.
2. Select the Best Stain
The stain you select depends on the type of wood your fence is made from and the finish you’re looking for.
Opacity
Solid stains work well for hiding imperfections in the grain and provide strong UV ray protection, but are prone to chipping.
Transparent stains show the wood grain and often contain a sealant for moisture protection, but they don’t have great UV ray protective qualities.
Semi-transparent stains offer a good middle ground.
Base
Quick-drying water-based stains are suitable for hardwoods, as their lower viscosity means they absorb better into the small pores and clean up easily. Be aware, however, that the hardest woods like walnut, cherry, and mahogany don’t absorb stains well, and the prep work is significant.
Oak and ash absorb most types of stains because they have larger pores. Highly absorbent pine and cedar softwood fences do better with an oil-based stain to prevent a blotchy and uneven finish.
3. Clean the Fence

Cutting corners with prep work can lead to problems with stain applications, a reduction in durability and longevity, and even cause mold, mildew, and rot.
Using a power washer or a spray nozzle attached to a garden hose is the easiest and most effective way to clean the fence. This will remove dirt, mildew, and peeling wood. Starting on a lower pressure (around 800 PSI) is better to ensure you don’t overly weather the wooden slats during the process, and don’t go above 1,500 PSI. Be slow and methodical, passing the power washer over each board to remove stains, discoloration, and debris.
If your fence has extensive damage or severe sun bleaching, you could add sodium hypochlorite to your power wash or a diluted bleach mixture (75% water and 25% bleach).
4. Allow the Fence to Dry
Don’t apply the stain until the fence is completely dry. Damp slats lead to the stain not adhering properly. Most stain manufacturers recommend that the moisture content of the wood is not over 15%. It typically takes up to 48 hours for the fence to dry out fully after washing.
New wood often contains a lot of moisture and needs time to cure and dry out. Depending on the type of wood and your local climate, you might need to wait one to six months before staining a new fence. If you apply water to the wood and it beads, this is a sign it’s still too wet. When the water absorbs straight into the wood, this is an indication it’s dry enough, but testing with a moisture meter provides confirmation.
5. Protect the Surrounding Area
Use drop cloths and painter’s tape to protect nearby furniture, plants, grass, paving, and driveways—you don’t want to splatter anything with hard-to-remove stain. For a neat finish, use painter’s tape to protect any fencing hardware.
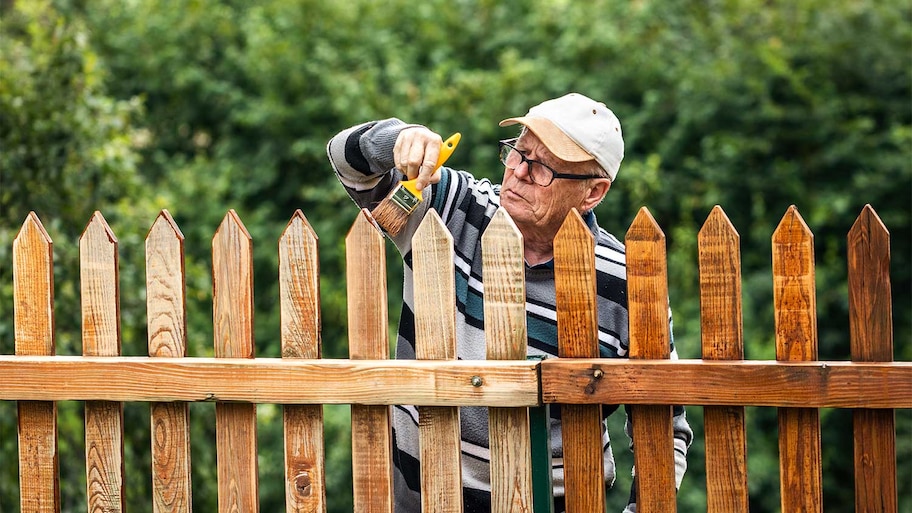
6. Apply the Stain
Most homeowners apply the stain using brushes or rollers, but paint sprayer application also works. Pouring some of the stain from the can into a paint tray makes it easier to load up the brush, and you’ll need one if you’re using a roller. You may also need a set of ladders or a roller pole for taller privacy fences.
Using a Brush
This might be the slowest technique, but it offers the best control. A 4-inch brush helps provide a neat finish and good coverage, but you may also want a 2-inch size for touch-ups and small details around hardware.
A natural bristle brush typically works best for oil-based stains and a synthetic one for water-based varieties. Natural bristles hold more stain than synthetic ones, so you won’t have to load up as often. But if the wood surface is very rough, a synthetic brush is a better choice because the bristles are less likely to break off.
Coat horizontal slats from left to right and vertical slats from top to bottom. Try to always complete an entire slat before taking a break to prevent lap marks from forming. And don’t forget to stain each slat’s top and bottom edges!
Using a Roller
A roller with a three-quarter-inch nap works best on rough wooden surfaces like fences. Opt for a 9-inch wide roller for good coverage and a 4-inch wide variety for harder-to-reach, intricate areas.
Using a Paint Sprayer
Spray painting is a fast way to apply the stain, but mastering the technique is tricky, you’ll need to buy or rent the sprayer, and it can be messy. The resulting over-spray also means you’ll need to purchase more stain than you would if you were using a brush or roller. Be extra careful about covering the surrounding area, and don’t use this technique when there are high winds.
Spray in the direction of the wood grain and work your way back up to cover half of the area you just sprayed again on the following stroke. Adopting this technique helps prevent lap marks.
Practice your technique on a less visible section of the fence to get a feel for the quantities you want to spray. If you apply too much, there will be lots of runs and too little creates a patchy finish.
7. Let the Stain Dry
Depending on the wood, the type of stain, and the application method, you might need to apply a second coat. This helps produce a more even finish or a greater depth of color. If the fence is new and you're happy with the coverage or plan to add a sealant on top, a second coat usually won’t be necessary.
Don’t decide until the stain is fully dry—only then will you spot all lap marks or patchy spots and get a feel for the final color.
Given the cost of the fence’s stain is around $0.30 to $0.60 per square foot, it’s well worth the extra time and investment for a tidy, long-lasting job.
8. Apply Sealer for Additional Protection
A high-quality, well-applied stain is often enough to protect your fence for at least a few years. However, you may decide to add a coat of sealer on top once the stain is fully dry. Some homeowners looking for a natural wood finish chose just to seal their fences rather than staining them first. However, although sealers provide excellent waterproofing qualities, they don’t penetrate the wood the way a stain does, and their UV protective qualities aren’t as good.