Category Archives: Education

Educational articles around best practices, how to’s, etc.

WordPress General Meetup Notes – Podcasting with WordPress

Thanks all who could make it last night to our monthly meetup. Here are my notes and links from the presentation.

Podcasting

Assume you have a website running WordPress. If not, that’s step one!

Preperation

Luck favors the prepared!

Script

  • This can just be an outline, major beats
  • Use Google Doc, share show notes with your co-hosts or guests
  • Don’t forget to thank the sponsors

Questions

  • Do your research
  • Know what you’re taking about – Cunningham’s Law
  • Build trust
  • Ask your interviewee to pronounce their name, product, etc.
  • Be unique! https://maximumfun.org/podcasts/bullseye-with-jesse-thorn/
  • Be engaging – don’t ask questions that can be answered with a yes or no
  • Keep it positive! You can frame your questions with a slightly negative spin, but don’t be downcast.
  • Assume nothing – set the stage
    • Common terms like “mortgage” don’t need to be explained sure, but sub-prime mortgage?
    • Remember folks can’t see what you see! – Describe succinctly

Record

  • Audio is important!
  • Good quality Mic
  • no background noise
  • no echo (use a blanket!)
  • Keep things consistent (Between folks being recorded)
  • Don’t record remote audio, share the local file!
  • Use a clap to sync audio
  • Go slow!

Edit

Publish

Market

  • Spread the word
  • Invite guest speakers from the field
  • Engage with audience
  • Give them a way to contact you
  • incorporate feedback and give shout outs
  • Be genuine

Plugins

Other links

Chris’ Favorite podcasts

E-commerce, digital items, and SSL certificates

So, you want to create an online marketplace for your goods or services. What do you need to know? At this month’s meetup we covered the basics of e-commerce.

For the presentation, I setup a demo site on my laptop using MAMP. I suggest setting up a development site so you don’t mess with your existing site.

To keep things simple I’m going to talk about e-commerce in for key areas

  • Storefront
  • Inventory
  • Payment
  • Orders/Shipping

What do do. First, setup a site. Pick a theme. For the demo I used the eStore theme on the WordPress.org theme directory. You can filter for themes that are tagged for commerce!

For the purpose of the demonstration I chose the WooCommerce plugin. Why?

  • It’s popular – 3 million installations
  • Owned by Automattic (previously WooThemes)
  • Great reputation
  • Flexible ecosystem

Once installed, WooCommerce walks you through the process of setting up the basics of your store. Once setup, and depending on the kinds of items  you’ll want to sell you may need to set up attributes, shipping, categories and other settings. You can do this at any time, but if you what you need to set up (like t-shirt sizes and colors) you should do this first. Then, start start adding Products!

During the presentation I roughly followed the handy guide for getting started from WooCommerce.

Payment Processing

And then there’s payment processing. This is one of the trickier aspects of e-commerce. For most people WooCommerce can do what they need 90% of the time. Even with built-in payment process solutions like PayPal and Stripe. However, There are a few things to consider.

Know your audience! What will they be more likely to use? You don’t need a thousand options if most folks your serve have an Amazon account.


What about digital items?

Tips for selling digital products with WooCommerce

SSL Secure Sockets layer

If you’re using a payment processor most handle the transaction and then return the visitor to the site. However, with some, like Stripe, you can perform the entire transaction “on site” (or the appearance of on-site). You’ll need a SSL certificate for it to work at all. You also are storing personal information (name, phone, address). Keeping as much information being sent over the wire secure is a good idea.

So, what does having a SSL certificate mean? It means that all communications between a user on their device and your website is encrypted. Think of it as a secret handshake between the two computers that prevents anyone seeing the information being sent (like over that open Wi-Fi at the local coffee shop!) during transmission.

There are many ways to add an SSL certificate. The easiest way, but potentially the most costly is to contact your hosting company. Bluehost and others companies offer it as an add-on – sometimes free, sometimes at a cost.

You can also setup other options, but they require a little technical know-how and time to implement.

  • Let’s encrypt! – https://letsencrypt.org
  • Cloudflare – https://www.cloudflare.com/plans/

Other reasons to have an SSL certificate

It builds trust. When people see that your site is secure they are more likely to trust the site and complete their transaction. Recently more modern browsers alert users when the site is not using an SSL certificate. Having a certificate ensures that your visitor won’t see conceding message about your site not being secure. Finally, Google rankings are slightly improved for sites that have an SSL certificate over those who do not.

Learn more about WooCommerce at WordPress.tv

WordPress General Meetup Notes – Page Builders

In October Alex Miller gave an introduction to page builders. These are plugins that can drastically change how you manage content in your WordPress site. From drag-and-drop layout options, easy galleries and more.

I took down a few notes, which try to cover some of the larger points Alex made through the evening. Feel free to drop a note below if you have any questions or feedback.

  1. Why use page builders?
    1. One reason is that it keep folks from messing up things they shouldn’t be messing with!
    2. It also makes it easy to update content without out having to be a design/layout genius.
  2. Only going to cover WordPress.org page builders – ones that are freely available
  3. Live Composer – https://wordpress.org/plugins/live-composer-page-builder/
    1. Cons
      1. bunch of clutter in the sidebar you can’t remove
      2. navigating tools in live view are a little cumbersome
      3. pre-populates text fields
      4. lots of toolbars, confusing
    2. Pros
      1. lots of tools
      2. can bring up standard WP editor in visual mode
  4. Site origin – https://wordpress.org/plugins/siteorigin-panels
    1. Cons
      1. limited layout options for ‘rows’ (like only bottom margin for each row)
    2. Pros
      1. no clutter in sidebar
      2. easy-to-use visual editor
      3. import/export layouts
    3. Beaver builder – https://wordpress.org/plugins/beaver-builder-lite-version/
      1. Cons
        1. no prebuilt templates for free version
        2. limited media ‘modules’ (called widgets in other page builders)
        3. no gradient support in column/row settings for backgrounds
        4. some default padding/margin are a little weird
      2. Pros
        1. limited modules are really easy to use
        2. responsive design break points can be set per module
  5. General notes on page builders
    1. Once you commit to a visual editor, switching (or going without) will be work – there’s not a lot of cross-migration between these competing tools.
    2. Uninstall might not keep your content!
    3. Beaver builder and site origin does add html and thankfully no shortcodes! Live editor is all inside their plugin – hard to salvage underlying content
    4. Think about what you need. Do you need a page builder (landing page) or just custom post types and ACF?
  6. Beaver builder is #1 pick
    1. good usability, flexibility, and support

WordPress General Meetup Notes – Contributing to the WordPress Community

In September our very own Jen Swisher, the lead organizer for WordCamp St. Louis 2017 shared how you can contribute to the WordPress community. It’s not just about code or design, but there are many ways to get involved. Quite frankly, we need your help!

Check out Jen’s presentation below and join us at our next monthly meetup and get involved!

WordPress General Meetup Notes – WordCamp Recap and Intro to WordPress

This month at our general meetup we talked about our recent WordCamp and what we can do better next year. If you weren’t able to attend the meetup, but did attend WordCamp, please leave a note on what we can do better next year in the comments section.

Speaking of WordCamps, don’t forget to check out other nearby events. Oklahoma City is in July, Nashville in September, and  Cincinnati in October!

At our meetup we spent the rest of the evening talking about the basics of WordPress.  We shared a few resources I’ve shared below. It was a free-form conversation and we touched on a few big points and delved into a few nitty-gritty details (like importing content) as well.

One of the first things we discussed was the difference between WordPress.org and WordPress.com. The .org version is the self-hosted, you-can-do-anything version of WordPress. This flexibility comes at a cost. You have to set up your own hosting solution (where WordPress lives) and are responsible for testing, upkeep of WordPress, and maintaining your plugins and themes. However, it is by far the most rewarding way to use WordPress as the potential for adaptation and customization is limitless.

The other version of WordPress is the .com version. This version is hosted by a for-profit company (Automattic). They maintain WordPress, plugins, and themes. However, you are limited to a smaller selection of customization options, and on their free tier have other limitations (like ads being shown on your site).

From there the conversation went into talking more about the .org version. We discussed where to find themes (WordPress.org) and plugins (WordPress.org) and how to find themes and plugins that were well-maintained and supported.

We also reviewed the Codex, the “Mother Brain” of the WordPress community. The Codex is an encyclopedia of information about every bit of WordPress. From child themes, to specific functions, it covers it all. Any time you want to learn how to do something in WordPress (especially on the geeky side of code) start with the Codex.

Another great resources is WordPress.tv. Those WordCamps I mentioned earlier? Nearly every session from every WordCamp is recorded and shared there. If you want to know more about CSS or eCommerce, there are plenty of videos to peruse – for free by folks who know their stuff. Here’s one of the first videos you should start with. Matt Mullenweg, founder of Automatic and WordPress, gave a great overview of where WordPress is at, and where it is going, last year at the first WordCamp US event.

If WordPress.tv isn’t your cup of tea, and you live in the St. Louis region, you can also get access to the thousands of videos on the education site lynda.com. More info is on the St. Louis County Library site.

One of the questions was on managing WordPress projects. Something I hope we can talk about at an upcoming meetup. For now, I think Lucas Lima (a local St. Louisian) gave a great talk last year about this very topic.

A book recommendation along the lines of working with clients was my choice pick, You’re My Favorite Client by Mike Monteiro.

That was it for the eventing – a lot to digest I’m sure. If you’ve reached the end and still want more, view past topics on our Meeup.com page or peruse the archives here on stlwp.org. OR, if you’re really adventurous, join us at an upcoming meetup!

Photo by Armando Torrealba – licensed under Creative Commons

Quick WordPress Optimizing Tips

Last week I sat in on this great A List Apart: On Air event titled  “Designing for Performance” It was their first online-only panel with four great presenters. Along the way I picked up a few tips and tricks I wanted to share with you all.

Here’s a few quick things you can do to improve the performance of your WordPress site.

Introduction

Before we begin, if your site is accessible from the web, punch in its URL into one of the following tools (or both!).

Make a note of the scores you’re given. We’ll compare them at the end.

Use a caching solution

The first thing you can do? Install a caching plugin or setup an in-memory cache. For folks on shared hosts (Bluehost, Hostgator, etc) the easiest (and often only) option will be going with a plugin. My plugin of choice is WP Super Cache.  Why this one in particular? It’s been around for ages, is super easy to use while still being customizable, and it’s authors include Donncha O Caoimh and Automattic. A pretty good pedigree if you ask me.

If you don’t want to do much mucking around, just install the plugin and turn on caching. This will allow your site to serve static version of your pages. This make your site quicker as WordPress (and the PHP/MySQL behind the scenes) doesn’t have generate a new page for each visitor.

Advanced options that I like to use are in the screenshot below. I like to make sure I enable  compressing pages as less data has to get tossed around. “Don’t catch pages for known users.” is handy if you’re an individual editor (or have a small team). This tells WordPress to alway serve up a new page to folks who are logged in to your site. This way you always see your updates without having to clear the cache.

WP_Super_Cache_Advanced

Compress your theme’s images

Let’s say you’re building a theme from scratch, using a child theme, or even just uploading a nice crisp PNG for your site’s header image. In each case WordPress  will use images within the theme to display common elements – like that header image. When these elements appear on every page your site has to serve up that image to every viewer, every time.

One way to speed up your site is to make sure you compress these common images as much as possible. This doesn’t mean degrade their quality with heavy compression like jpg images, but to remove as much metadata and use more advanced compression algorithms as possible.

Side note: Another big win for leveraging smaller images is to make sure you’re not uploading giant images to only have them displayed at small sizes. That’s a whole ‘nother post on its own!

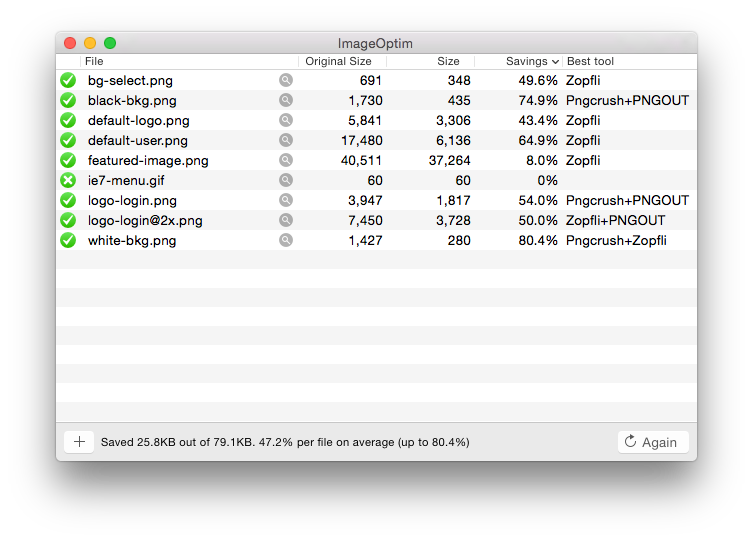
How do you do this? Grab an application like ImageOptim or RIOT.

With either of these apps you can drag and drop in your images and let the tool do its magic. This includes background images, header images, or even icons used across your navigation and widgets.

Here’s an example of a recent optimization from a theme I optimized. This is using ImageOptim. Either tool uses a whole suite of tools behind the scenes to make the best optimization quickly and with great results. imageoptim-example

I saved a whopping 47% on average in this theme. In the case of my background tile image I saved a whole 80%. Not to bad. (Here’s another example with less impressive, but still good, results.)


Set up a caching rule

Even with something like WP Super Cache in place you still might need to set up some rules about static content. Static content is things like images, documents, multimedia files, etc.

For these files, WordPress delivers the file for a visitor every time. Even if they leave and come back five minutes later!

The easiest way to do this is to modify your .htaccess file and add a few rules for static content. The .htaccess file tells your site to give folks a locally cached version of the file and to ‘expire’ the item in the cache after so many minutes. This greatly helps in the loading of those (newly optimized) theme images I mentioned in the last tip, and any other files visitors consume on a regular or repeat basis.

I’m going to direct you to this post that has the handy steps on caching static content.


Minify your CSS

You’re using a child theme, right? Or maybe a custom theme built from a starter framework? Once your site is ready for production you can shrink your CSS files to make things a little quicker.

Minifying your CSS takes the human-readable version of your CSS file, with all it’s great inline comments and indents, and strips all that junk out. The computer doesn’t need any of that!

Now you’ll want to keep an un-minifed version around for future changes. Take a copy of your style.css file in your theme directory and rename it. Call it style-original.css or something and set it aside.

Now, copy and past the content of your style.css file into a tool like CSS Minifier or CSS Compressor. These tools will strip out any comments or spaces (making your file pretty much unreadable by humans) and reduce the file size (and therefore load times) of your CSS.

Copy the minified CSS back into style.css and save. If you have to make new updates down the road (always in your dev environment first, right?) you can re-load your human-readable CSS file, make your edits, and minify again.

On a few sites I manage I was seeing upwards of 60% file size savings. When were talking about mobile devices in not-so-good coverage areas that could be the difference between your site loading and a visitor leaving.


Conclusion

This is just a few things you can do quickly to improve the performance of your site. Making your site load quickly for visitors make them more likely to hang around and helps with your search rankings.

How much of an impact does it make? Remember those tests I asked to your run at the beginning of this post? Here’s a before and after (totally unscientific) comparison to a site I manage. I ran the default tests from webpagetest.org. Just using these tips made one score go from a C to a B and another from an F to a B!

webpagetest-beforewebpagetest-after

If you have tips or tricks you use to make your site’s a little quicker, let me know in the comments below. Thanks for visiting and I hope to see you at one of our upcoming meetups!

Photo by _chrisUK – Licensed under Creative Commons

December General Meetup Notes – WordPress Custom Post Types with Nile Flores

December’s General Meetup was lucky enough to have Nile Flores present on Custom Post Types.  Here’s Nile’s presentation.

Nile is a professional web designer and developer from Centralia, Il about an hour east of St. Louis. She covers it all, WordPress, design, SEO and more.
She’s a very active member of the WordPress community and a co-organizer of WordCamp St. Louis.  We thank Nile and everyone who came out for helping to make it yet another great meetup.
For our January meetup we’re going to be talking about theme structure and creating custom themes. Join us!

November 2014 General WordPress Meetup Notes – “How to Get in Trouble with CSS”

I put together some notes from our General Meetup last month. Thanks for everyone who braved the cold and came out. I had a blast putting this together and am looking forward to Nile’s presentation later in December.

Box Model

First, let’s talk about the Box Model. The best way to approach CSS is to understand that all it does is apply rules to the boxes that make up our webpages.

All HTML elements are containers or boxes. I demonstrated this by using the 3D view in Firefox. (Right-click on any webpage, and select “Inspect element”. The 3D view is the cube icon in the top right of the inspector pane.

CSS, or Cascading Style Sheets, allow you to define the style of those boxes. Everything from the fonts being used inside, to images, borders, padding, margins, colors, even how text behaves alignment, size, orientation, etc.

Rules

You make these changes this by defining ‘rules’ to those boxes or elements in your CSS.

So let’s say we have an element. It’s a simple div and I want to give it some rules.

<div>
<p>Some text inside that’s a paragraph.</p>
</div>

First give element a name – either an ID or a class.

That element name is called a selector in CSS parlance. We’re saying, for each element named X select

<div class=''demoDiv">
<p>Some text inside that’s a paragraph.</p>
</div>

I can apply rules to that selector in a few different ways.

Three ways to define CSS (There are more, say with JS)

Here they are from worse to best

Inline

<div class=''demoDiv" style="background-color:green;">

In the <head>


In a separate file (also referenced in the head)

<link rel="stylesheet" media="all" href="demoStyle.css">

Why is this the best? You separate the presentation from structure (HTML) from content (in the case of WordPress, what’s in your database). You also can have both documents open side by side. You also don’t have to scroll up and down and up and down. And most importantly, because of CASCADING!

Here’s two examples of valid CSS rules being applied to a class and an ID respectfully.

.demoDiv {
rule:options;
rule:options;
}
#demoDiv {rule:options;rule:options;}

Difference between a class and an ID

See that “.” and that “#” – that tells us if something is either a class or an ID.

Does it make sense to identify multiple elements by the same ID? I think not. That’s what classes are for – to classify similar elements.

Cascading

The name Cascading is important! It’s how the browser determine which rules to actually apply. There are many factors at play, and that’s ok. There’s some logic to it al.

We’re going to talk about specificity and inheritance

At this point I’m going to let someone far smarter than I explain it. Check out this article on Smashing Magazine.

The order you put your elements and their styles in your style.css don’t matter.

However it’s best practice to do high-level or ‘global’ settings at the top of your sheet, and put comments in as you go for the various sections.

At the top have global attributes like body, p, a, h3, etc.

Then sections:

  • header
  • navigation
  • sidebar
  • etc.

Order does matter in your rules!

One thing that does matter is the last rule of  a type will over ride the previous.

Example:

background-color: #000;
background: #FFF url(image.jpg) 0 0 no-repeat;

The color (should the image fail to load) will be white because it came last in this set of rules

Ok, what about WordPress!?

Let’s take a look at a CSS file from a theme like Twenty Fourteen

First, inspect and find an element in the stylesheet (using Chrome dev tools)

Child Themes

Even if you want to do nothing but tweak a few styles to an existing theme, USE A CHILD THEME. It’s easy.

If you assume you’re using Twenty Fourteen:

  1. Make a folder in your wp-content/themes/ directory. Give it a unique name.
  2. Create a file called “style.css”
  3. Edit header info to reference the parent theme.
  4. Activate your child theme.
  5. Edit CSS in that child theme’s style.css file to change (overwrite) the parent theme’s rules.

CSS Preprocessors

CSS Preprocessors were touched on at the very end of the night. Basically things like SASS and LESS allow you to define variables to your rules. When you’re ready to publish the preprocessor will render valid CSS from those variables.

Example:

@col-red: #f00;
@col-blue: #00f;
@font-family: Arial, sans-serif;
@font-s: 12px;
@font-m: 14px;@font-l: 16px;
h1 {color: @col-blue; 
font: @font-l @font-family;}
.blockQuotes {color: @col-blue; 
font: @font-m @font-family;
}

Preprocessors also allow for math functions to compute sizes across your entire stylesheet.

@base-size: 10px;
.small {
font-size: @base-size;
}
.medium {
font-size: @base-size * 1.2;
}
.large {
@_large: @base-size * 1.5;
font-size: @_large;
line-height: @_large + 4;
}

A few good reference articles:

  • http://alistapart.com/article/why-sass
  • http://blog.millermedeiros.com/the-problem-with-css-pre-processors/
  • http://blog.blakesimpson.co.uk/read/37-less-sass-the-advantages-of-css-preprocessing-explained

Additional Resources:

https://developer.mozilla.org/en-US/docs/Web/CSS

Photo by Mikel via Flickr – Licensed under Creative Commons

WordCamp 2015

In case you haven’t heard, WordCamp 2015 is officially scheduled to take place Saturday March 14th and Sunday 15th at Washington University.

While we’re having the event in the same space as this year, the organizing team has some exciting new ideas that we’re going to be working hard over the next 16 weeks to bring to the WordCamp.

While we’ll still be posting news on this site, if you want to subscribe to the WordCamp specific mailing list, head over the 2015.stlouis.wordcamp.org, or follow the organizers on Twitter at @WordCampSTL.

See you all next March!

August 2014 General WordPress Meetup Notes

We had a great turnout this month – even with the Cards game happening just a few blocks down the street. Thanks to everyone who came out!

Main Event

The main topic of the night was covering some handy tools that help you keep tabs on your WordPress site. We covered Uptime Robot, Infinite WP, and Google Analytics.

Uptime Robot

Screen Shot 2014-09-03 at 9.56.48 PMThis handy website lets you know when your site is down. When a site is down that means that visitors aren’t able to see the site and won’t know why! By using Uptime Robot you can setup alerts to be notified via email or SMS when your site is inaccessible.

This is a free service and you can track up to 50 sites! They don’t have to be WordPress sites at all – this works for any site you’re interested in tracking. The service is hosted, so there isn’t even an installation process. Just sign up, add your sites, set how frequently your site should be checked and wait!

It’s also super handy if you have multiple sites across clients. You can know before they do when a site is having an issue. You can quickly figure out what’s going on, and let your clients know preemptively!

Infinite WP

Screen Shot 2014-09-03 at 9.58.41 PM

Infinite WP makes managing plugins and theme updates across multiple separate WordPress installations a breeze. You install a simple client on your web host, a plugin on each of your sites, and away you go!

Infinite WP will let you know when your sites have an update available and you can update by site (all plugins at once), by plugin (this plugin on all sites where its installed), or even piece mail – one at a time. There are a ton of add-ons for Infinite WP that extend it’s capabilities even further.

A recent update also brings easy backups to your sites. So your workflow could be something like:

  1. Get a notification of an update via Infinite WP
  2. Backup your Dev/Test site.
  3. Update your Dev/Test site to make sure things are hunky-dory.
  4. Backup your Production site(s).
  5. Update your Production site(s) without leaving your beach chair.

All of that without leaving Infinite WP.

Google Analytics

Screen Shot 2014-09-03 at 10.05.20 PM

We could have easily spent multiple evenings covering the various ways you can leverage Google Analytics it’s that powerful. In a nutshell Google Analytics allows you to keep track on how visitors get to your site, what they do on your site, and some demographic information like geographic location and what browser it uses. It becomes even more powerful when you get into developing campaigns and set goals for your visitors.

Say for example you’re promoting a big event or a new item in your store. You can send out emails, tweets, and Facebook updates with a specific URL that will tell you, in Google Analytics, which outlet lead to that person arriving at your site, and what percentage of visits turned into ‘conversions’ – someone did something you wanted them to do like sign up for a newsletter or buy something.

Google has some great resources on getting started with Google Analytics. Integration with WordPress is a snap with numerous Google Analytics plugins. My particular fave is Google Analytics for WordPress by Joost de Valk.

Bonus Tools

A few other tools that were mentioned in the similar vein that we didn’t get to spend a lot of time on are listed below. Take a look and you might find a handy addition to your utility belt.

IFTTT – Hook up WordPress to hundreds of other services all with simple to create ‘recipes’. Want your Instragram photos to automatically publish to your blog? Easy peasy .
 

Piwik – Don’t like Google? Want to host your own analytics? Pwiki’s your solution.

Woopra – A real-time analytics package. See who’s on your site right this minute. Some say better than Google Analytics!

Next Month

In September we have the talented Gregory Ray taking us through the best practices and dark art secrets of Hardening WordPress. Join Gregory and the gang on Wednesday, September 17th at Lab1500.

Photo by Dean Gugler – Licensed under Creative Commons