
Challenging
Only DIY if you know what you're doing
48 hours
1 to 2 days
What you'll need:
TOOLS
- 17 2-by-6-inch by 8-foot wall studs
- 1 4-by-4-inch by 8-foot pine board
- 1 1-by-6-inch by 6-foot pine board
- 2 ½-inch pocket screws
- 2 ½-inch brad nails
- 1 ¼-inch brad nails
- 4-inch SPAX wood nails
- Orbital sander
- Miter saw
- Drill with ⅛-inch countersink bit, ¼-inch bit, and 1-inch Forstner bit
SUPPLIES
- Tape measure
- Clamps
- Regular kreg jig
- Wood glue
- Sandpaper
- Finishing stains or paint
- Sealer
Rip the Pine Boards
If you want a higher-end look, kick off this project by ripping the rounded edges off of the 2-by-6-inch boards. If you can, rip all the boards at the same time to ensure the cuts are consistent at 5 inches wide. Rip enough off one side of the boards to remove only the rounded edges, and then rip the other rounded side off the 2-by-6-inch boards with your table saw set at 5 inches.
Make the Table Legs
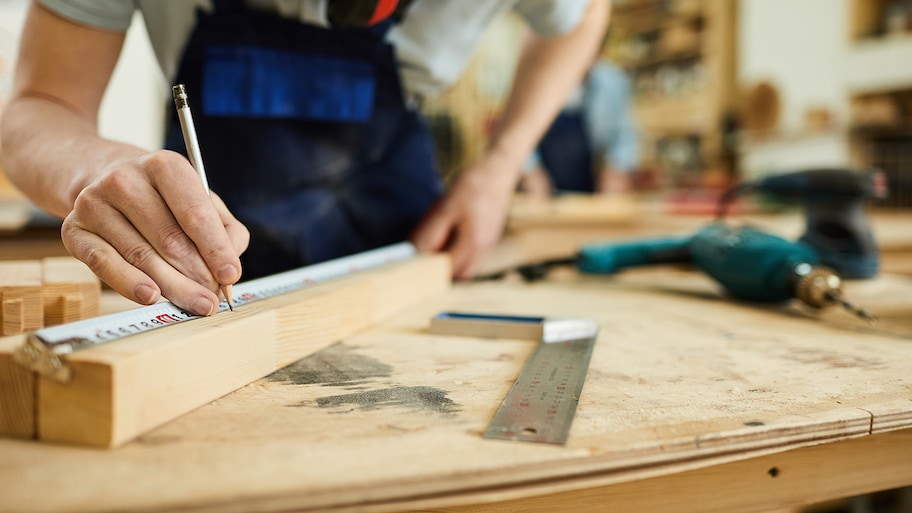 Photo: SeventyFour/iStock/Getty Images
To make the four table legs, take two flattened 2-by-6-inch boards and cut them into eight 21 3/4-inch pieces. Next, drill 1 1/2-inch pocket holes at one end of each of the eight pieces. In this step, you will take two pieces at a time and laminate them together to create four legs. When laminating, ensure the pocket holes at the outer edges face outward.
Use plenty of wood glue and clamp the boards together so that the outer edges are flush. Secure the pieces with 2 ½-inch brad nails and repeat for the remaining legs.
Form Upper and Lower Base
Next, you’ll make two identical bases: One that sits on the floor and another that supports the tabletop. To create the first base, cut your 2-by-6-inch boards to create two pieces at 30 inches in length each and another piece that measures 50 1/2 inches long. These three boards will form an “I,” with the 50 1/2-inch piece centered between the other boards.
Attach the middle piece to the other boards with wood glue and 2 1/2-inch pocket screws through pocket holes. Repeat this step to create the second base.
Cut Boards and Add Pieces to Bases
Use your miter saw to cut two 2-by-6-inch boards to 68 1/2 inches long with the saw set at a 45-degree angle. Make these cuts at both ends of each board. Next, cut eight 2-by-6-inch boards to 12 inches long with the miter saw at a 45-degree angle. These cuts will only be made on one end of each board.
Secure the 68 1/2-inch boards to the top of the center of each assembly with wood glue and 2 1/2-inch brad nails. The boards will hang over the edge by about 4 inches on each side. Then, attach the 12-inch-long pieces on either side of the 68 1/2-inch boards with wood glue and brad nails. These pieces will sit about ½ inch short of the boards they sit on top of.
Attach Blocks
Flip each base assembly upside down. Then, cut two 4 1/2-inch by 5-inch blocks and attach them to the underside of the extensions with wood glue and brad nails.
Add Foot Pads
Cut seven 1-by-6-inch boards into 5-inch-long pieces. With the lower base still flipped over, use wood glue and brad nails to attach the foot pads to the bottom of the base. Place one in the center of the longest board (the middle of the “I”) and one at the ends of each 30-inch board and two on the extensions.
Build Leg Assemblies
The next step is to unclamp your table legs and cut two 4-by-4-inch boards to 7 inches long. Glue and clamp two legs to a 4-by-4-inch piece, ensuring the pocket holes of the legs are facing the inside of the upper left piece and the outside of the lower right piece. Then, screw 4-inch SPAX screws into the outside and inside holes and into the inner 4-by-4-inch piece. Repeat this step with the second set of legs.
Secure Table Legs to the Base
 Photo: very_ulissa/ Adobe Stock
Now that you’ve joined the table legs together, it’s time to add them to the lower base of the table. Take each set of table legs and position them so that they are perpendicular to the lower base assembly. There should be about 6 1/2 inches between the outside of each leg and the edge of the board. With the 4-by-4-inch brace closest to the base assembly, secure the table legs with wood glue and 2 1/2-inch pocket screws.
Attach the Upper Assembly
Using wood glue and 2 1/2-inch pocket screws, attach the upper assembly piece to each set of upright legs. The table leg assemblies should be perpendicular to the upper base before putting the screws in place.
Cut Angle Braces
To start this step, cut four 4-by-4-inch boards to 10 inches long. Set your miter saw to 31.6 degrees and place a 4-by-4-inch board with its end up against the miter saw fence. The board should sit perpendicular to the fence. Grip the 4-by-4-inch board and apply pressure downward, then slowly cut through it.
Release the saw trigger and wait until the blade has completely stopped before removing the board. Next, set the same board with the long end against the miter saw fence to cut the other angle. Repeat this step for the remaining wedge pieces.
Add the Wedges
Center the 4-by-4-inch wedges on the 2-by-6-inch feet, with the longest side of the wedge facing outward. Use wood glue to secure the wedges to the feet, then hammer your 2 1/2-inch brad nails into each piece until the wedges are properly in place. Once you’re happy with the result, repeat this process with the remaining wedges.
Assemble the Tabletop
Now it’s time to put your tabletop together. Drill 1 1/2-inch pocket holes into the edges of the 74-inch boards, and then attach each board edge-to-edge using wood glue and 2 1/2-inch pocket screws. Next, cut the end boards so that they fit flush with the outside edges of the 74-inch boards.
Your end boards should measure about 40 inches long and 5 inches wide. Secure them to the 74-inch boards with wood glue and 2 1/2-inch pocket screws.
Attach the Table Legs
Place the tabletop face down on a flat surface with the pocket holes facing up. For this step, you’ll need another set of hands to help you assemble the legs upside down and attach them to the bottom of the tabletop. Together, center the legs by leaving 5 inches on each side lengthwise and 7 1/4 inches from the width of the top. Secure the legs with the 4-inch SPAX wood screws and voilà—you have a functioning farmhouse table!
Apply Finishing Touches
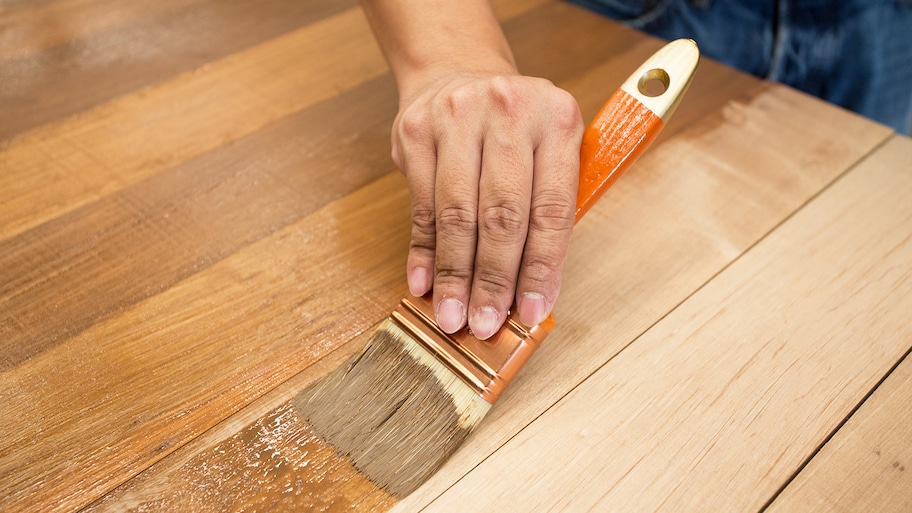 Photo: Tatomm/ iStock/Getty Images
Once your table is in one piece, you can apply the finishing touches of your choice, including paint or a specific stain and sealant. Whether you choose to paint or stain the table, you’ll need to sand the wood first using an orbital sander. If you’re painting, apply a coat of primer after sanding to ensure the first coat of paint goes on smoothly.
When selecting a stain, it helps to buy a few options and try them out on a spare piece of wood before applying one to the entire table. When you’ve chosen the final color, pour the stain on the wood and use a brush or cloth to evenly spread it on the surface, moving along the grain of the wood. When the stain is dry and you’re happy with the color, apply a sealant to protect it from wear and tear.