
Simple
Flex your DIY muscles. This job requires some planning, but if you work slowly and follow all instructions, you can complete your installation successfully. All of the required hand tools are widely available and simple to use.
48 hours
This project will take about two days in a 120-square-foot room.
What you'll need:
TOOLS
- Tape measure
- Hammer or power drill
- Utility knife
- Hand or laser level
- Tin snips
- Pencil
- Chalk line
- Leveling string
- Ladder
SUPPLIES
- Safety glasses
- Work gloves
- Ceiling panels
- Wall molding
- Main beams
- Cross tees
- Suspension wire
- Hooks
- Nails or screws
Check Your Local Building Codes
Before you purchase a drop ceiling, contact your local building authority. Depending on the state where you live, you may need a building permit before starting your project. Some municipalities even require you to submit your drop ceiling designs in advance.
You can also ask your local authority about any minimum ceiling height requirements when you reach out. Most drop ceiling styles require at least 4 inches of clearance from the structural ceiling of a room to allow access above, so you’ll need to verify whether a drop ceiling is feasible in your space.
Measure Your Room and Purchase Drop Ceiling Materials
With your measuring tape, take measurements along each wall in the space where you’ll be installing your ceiling. You can use these measurements to plan out your ceiling project on a sheet of grid paper.
As you plan your layout, keep in mind that you can cut your ceiling panels. That means you can choose to design your layout with border panels of the same width on opposite sides of the room rather than to leave a single odd-sized row at the end.
With your measurements in hand, you’ll have an installation plan and know how much material to purchase. No matter what style of drop ceiling you choose, you’ll end up following the same basic steps for installation. Your options come down to size and look.
Standard sizes include a 2-foot-by-two-foot square panel option or a two-foot-by-four-foot rectangular option. Styles range from the basic white fiberboard panels seen in office spaces to beautiful decorative ceilings made from plastic, metal, or wood. Unpack your panels at least 24 hours before installation so they can acclimate to the temperature and humidity of your space.
Cut Your Border Panels
If you plan to have even borders, you can do some simple math to determine how to cut your border panels:
For the length of a border panel: Divide the room's width by the length of a single panel and add the remainder to the length of the panel.
For the width of a border panel: Divide the room's length by the width of a single panel and add the remainder to the width of the panel. Then divide by two again.
Don your safety glasses and protective gloves before you make any cuts. Always cut your panels face up using a sharp utility knife. Cutting through the backside may damage the visible surface. Some types of drop ceiling panels require special cutting procedures, so check the manufacturer instructions that come with your product.
Create Your Ceiling Perimeter
Keeping any local regulations in mind, choose a height for your ceiling—using a hand level and pencil, place marks on the walls around the room at your desired height. You can also use a laser level for simplicity. Snap a chalk line to connect your pencil marks into a level perimeter.
Position and Attach the Wall Molding
Wall molding, also called wall angles, consists of L-shaped rails that attach to the wall, forming the perimeter of the grid that supports your ceiling panels. Wall molding attaches to your main beams and cross-tees, which form the rest of the gridwork.
Locate studs using a stud finder. You'll nail or screw your wall molding to your wall studs along the perimeter line. Install each section of wall molding, so it butts up against the end of the sections next to it. Use tin snips to cut corner sections to length at a 45-degree angle. Some drop ceiling products include clip-on corner pieces to hide these joints.
If your walls are stone or concrete, use the appropriate fasteners that come with your ceiling. Alternatively, you can substitute your wall molding with the main beam that runs from the ceiling joist closest to the wall. Main beams should be installed perpendicular to your joists.
Hang Your Main Beams With Suspension Wires
 Photo: peuceta / Adobe Stock
This is the most important step in your drop ceiling installation, so carefully follow any instructions that come with your product.
First, use your installation plan from step two to mark the position of your main beams where they’ll rest on your wall molding. Stretch and attach pieces of leveling string between opposite marks as a guide.
Next, find your joists with a stud finder. At the end of your first string, install a hook in the ceiling joist directly above where the first main beam and cross tee will intersect. Move down the line and install a hook at each intersection, repeating the process along each string.
Cut a length of suspension wire for each hook that’s 12 inches longer than the distance between ceiling levels. Fasten the wire to each hook, then stretch it taut with your pliers and bend it at a right angle where it crosses the string.
Slide each wire through one of the small round holes in each main beam. You may need to cut the first main beam to ensure there’s a hole where the first cross tee will be. Always put cut ends of main beams on a wall molding.
Install the Cross Tees
Once your main beams are hung, you'll complete the grid with your cross tees. First, measure and cut your border tees, so they match the size of your border panels. Place the cut ends on your wall molding and connect the uncut ends to the nearest main beam. From there, you'll insert your uncut cross tees in line with the border cross tees until you reach the opposite wall.
Connect tees by snapping them into precut openings along your main beams. Each time you connect two grid elements, you should hear an audible click to indicate a proper connection.
Install the New Drop Ceiling Tiles
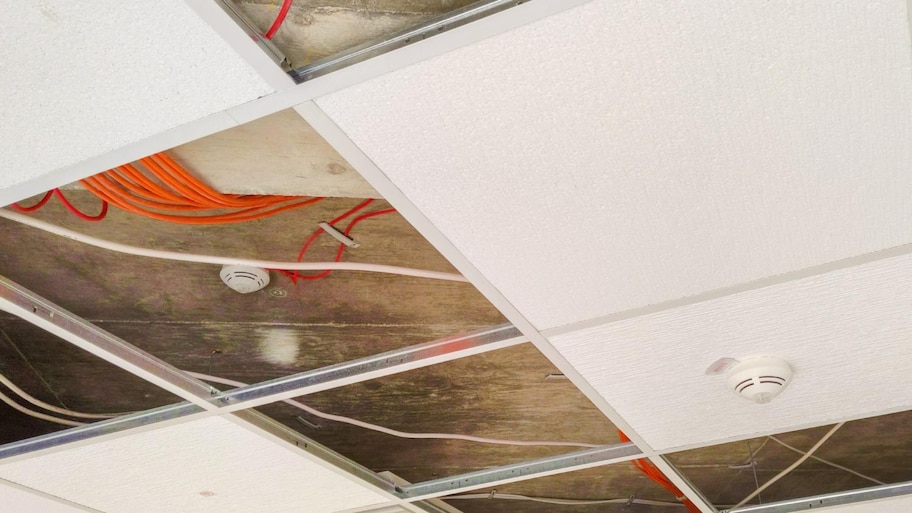 Photo: jm_ny / Adobe Stock
To put your ceiling panels in place, start at the center of the ceiling grid to help force loose gridwork into alignment as you work toward the edges. Most drop ceiling designs require no hardware to secure ceiling panels. Simply tilt each panel and slide it through a grid opening at an angle, carefully lowering it into place.
If you need to make cuts for lighting or other required openings, do so with the panel facing up just as you cut your border panels.