Topics
The Gallery block allows you to easily add multiple photos and automatically arrange them attractively. You can control the number of columns and the size of the images. The Gallery block can be added to a page by clicking on the Add Block button.

Alternatively, you can type /gallery and press enter.

Detailed instructions on adding blocks can be found here.
Block Toolbar
Each block has its own block-specific controls that allow you to manipulate the block right in the editor.

Three main options on the Gallery Toolbar
- Transform to / Change Block Type
- Change Alignment
- More options.
You can transform or change the block to another block including the Group block, Image block, and Column block. If you find that a gallery display of your images is not the right fit, you can change the block types to the Image block with the Transform button. Then every image from your gallery will be added as a single image block in your post.
Change Alignment
- Align left – Make the block align-center
- Align center – Make the block alignment centered
- Align right – Make the block align-right
- Wide width – Increase the width of the block beyond the content size
- Full width – Extend the block to cover the full width of the screen.
“Wide width” and “Full width” alignment need to be enabled by the Theme of your site.
Adding Images
When you add a gallery block, you’re given two options, Upload and Media Library.

Upload allows you to upload a new image or multiple images to the Gallery block and your media library. While Media Library lets you select from previously uploaded images in your Media Library. You can also drag & drop multiple images at the same time from your explorer or finder window into the gallery block.
Removing images
You can remove images from your gallery after adding images by selecting the image in the gallery and either using your keyboard to delete the image or selecting the three dot menu and selecting “Remove Image”. You can always add the image back later.
Moving Images

In the block toolbar, there are movers so you can choose the order of your images exactly as you’d like.
Replace Images

You can replace images in your gallery with the edit/pen icon, this will allow you to upload or select another image from your library.
Caption Images

You can caption your images individually by editing the “Add caption” section. You can also caption the overall gallery.
Add alternative text for Images

For each image in the gallery, you can add alternative text to help with accessibility. This option can be found in the sidebar settings under Image Settings.
Customize individual images
Thanks to changes with WordPress 5.9, you can now style each image in your Gallery in the same you would an individual block. This means, you can do the following:
- Add links to each image.
- Crop each image to your liking.
- Add image filters.
You can see each of these options in the block toolbar when you have selected an individual image:

Here’s a video showing how you can set different image filters, either based on the image filters your theme provides or a custom one you set:
You can also choose between two different style options in the block sidebar:

More Options
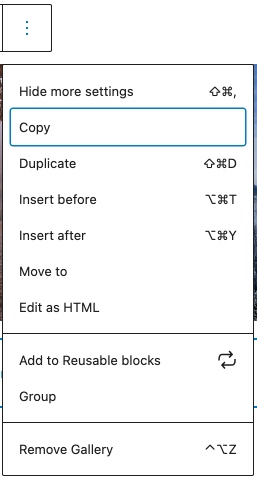
Hide Block Settings
The Hide Block Settings option hides (or shows) the Block Setting panel in the editor’s sidebar.
Copy
Copy can be used to copy a selected block and then you can paste it wherever you want in the editor.
Duplicate
Duplicate can be used to duplicate selected block.
Insert Before
Insert a new block before the selected block(s).
Insert After
Insert a new block after the selected block(s).
Move To
If you select Move To, you will get a blue line inside your content, you can then use the arrows to move that line up and down to where you want the selected content to be moved into, hitting return on your keyboard at that point moves the block to that position.
Edit as HTML
The Edit as HTML option allows you to modify the HTML code of the embed block.
Add to Reusable blocks
Using the Add to Reusable blocks option lets you add the selected block to a list of reusable blocks, so you can use them on other posts or pages as well.
Group
Select the Group option if you want to create a group of blocks and treat them as a unit. You can for instance add a common background color or other blocks to the group.
Remove Block
With the Remove Block option, you can delete the selected block from your content.
Block Settings
Every block has specific options in the editor sidebar in addition to the options found in the block toolbar. If you do not see the sidebar, simply click the ‘cog’ icon next to the Publish button.
Columns

You can choose how many columns your Gallery block will have. You can select between 1 column and 8 columns. Keep in mind that you can only select as many columns as you have images.
This means that if you add 4 images, you’ll be given the option for a maximum of 4 columns. This number will increase as you add more images until you reach the maximum of 8. Even if you add more images to the Gallery, you will not be able to add more than 8 columns.
Your images will automatically arrange themselves to look good no matter how many columns you select. Try changing the setting and see what you like best. To change the setting you can either manually enter the number of columns you want or visually change the number by using the tool to drag the number up and down.
Crop All Images

You can select whether or not you’d like all of your images to be cropped in your Gallery block. This option is useful if you have images of varying sizes and shapes. Cropping them will make the images in each row of the gallery the same size. You can toggle this option on and off to see which way you prefer.
Link to
You have 3 options for linking the images in your gallery: Attachment Page, Media File, and None. This determines what happens when your visitors click on the images in your gallery. Keep in mind that you can also add custom links for each image if you’d like.
Attachment Page
This will lead anyone who clicks on your image to your site’s attachment page. This is an informational page about your image, which includes the image, the caption, the image description, and a comment field.
Media File
When a visitor clicks on the image, the image file will be displayed in the original size in a new browser window.
None
This makes your images unclickable, so they don’t link to anything at all.
Image Sizes
The Image Size setting allows you to select from Thumbnail, Medium, Large and Full Size.
- Thumbnail: Displays a small thumbnail-sized version of your image on the page/post. Note, by default the Thumbnail size is a square, so some cropping of your original image may occur.
- Medium: Displays a medium-sized version of your image on the page/post. This is a good size to use with Left/Right alignments, as it leaves sufficient space for legible text to either side.
- Large: Displays a large-sized version of your image on the page/post. Note: WordPress will determine the width of the content column of your theme, and display the largest possible image for that space.
- Full Size: Displays a full-sized version of your image on the page/post. Note: WordPress will determine the width of the content column of your theme, and display the largest possible image for that space. If your original image is larger than this column width, the full size of the image may not be displayed.
Note: For these images sizes to apply your Theme needs to support those choices.
Advanced

HTML anchor allows you to do “page jumping” to that specific gallery. Page jumping, also sometimes referred to as anchor links, is where you click a link and instantly get moved somewhere further up or down a long page.
To enable this, you put an HTML Anchor in your gallery, and create a link that jumps to the anchor.
The advanced tab also lets you add a CSS class to your block, allowing you to write custom CSS and style the block as you see fit.
Changelog
- Updated 2021-12-21
- Updated all screenshots for 5.9 with higher resolution.
- Added in context related to the refactor.
- Updated 2021-02-02
- Updated the 5.5 video with 5.6 gifs
- Updated all screenshots with 5.6
- Added details to Advanced block settings options
- Updated out of date contents
- Updated 2020-10-05
- Updated the video
- Updated 2020-09-14
- Updated 5.5 screenshots
- Updated Block toolbar new features
- Updated Block settings new features
- Updated 2020-06-18
- Added ‘Link back to blocks’ to the top of the page
- Updated 2020-04-24
- Added Drag & Drop multiple images to the Gallery block
- Added video to change the background color as group block
- Added updated UI displays for WordPress 5.4
- Added “More Options” to the Block Toolbar section and updated the existing once to fit other block descriptions.
- Reorganized the post into 3 sections: How to add gallery and images, Block Toolbar and Block Settings.
- Converted all reusable blocks to regular blocks.
- Created 2019-03-07
Was this article helpful? How could it be improved?
You must be logged in to submit feedback.