For a comfortable space any time of year
Why do we insulate our homes? Insulation helps regulate the temperature inside a home, especially during winter and summer. Essentially, the better insulated a home is, the more energy efficient it becomes.
If insulating your home helps you live comfortably, why should you insulate your garage if it’s not technically a living space?
In this how-to guide, we’ll cover everything from garage insulation benefits, types of insulation, safety tips and step-by-step insulation tips.
Difficulty: Medium (3/5)
This job may require the removal and reinstallation of drywall, which can be difficult.
Total Project Time: Anywhere from two hours to multiple days
This all depends on how much insulation you want to do. You can insulate a garage door in about two hours, but insulating an entire garage can take several days if you need to remove and reinstall drywall.
Cost: Approximately $1,500–$8,000
It typically costs $0.50 to $1.25 per square foot to insulate a garage. This cost will likely double if a professional is being hired to do the job.
The price will also vary depending on additional factors including:
The type of insulation used
Detached vs attached garage
The size of the garage
How much of the garage is being insulated (walls, ceiling, garage doors)
Tools
Utility knife
Measuring tape
Staple gun
Staples
Materials
Insulation of choice (more on that below)
Low-expanding spray foam
Drywall
A garage door insulation kit
Retainer pins
Benefits of Insulating a Garage
Homes are insulated for several reasons. Most importantly, insulation helps regulate the temperature inside of a house. A well insulated home is also an energy efficient home, meaning that you won’t have to spend as much on heating and cooling. Insulating your garage may help bring energy costs down even further.
While you don’t have to insulate your garage, there are several other reasons it may be a good idea. Consider insulating your home if you can relate to any of the following scenarios:
You spend a lot of time in your garage throughout the year
You store valuable items in your garage that could break or deteriorate in extreme temperatures
You plan to transform your garage into a game room or general hang-out spot
You’re concerned about keeping your car in tip-top shape
You have an attached garage with a shared wall to your home
Types of Insulation
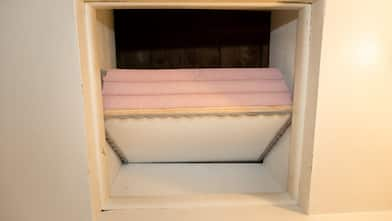
When you think of insulation, the first thing that probably comes to mind is that cotton-candy-looking fluffy stuff (that’s fiberglass—and you definitely don’t want to eat it). Though fiberglass is the most commonly used type of insulation, it’s not the only type.
Consider the following pros and cons to determine which type of insulation is best for your garage.
1. Fiberglass

Fiberglass insulation is one of the most commonly used types of insulation due to its affordability and ease of installation.
However, while it may be easy to install, it may not be the right choice for your home due to its inability to get into tight crevices or to fit properly around obstructions like electrical wiring.
Fiberglass pros
Affordable
Cancels outdoor noise
Naturally fire retardant
Does not attract insects
Fiberglass cons
Can be tricky to install
Can be prone to moisture and mold
Can be a health hazard
Can be difficult to get full coverage around odd spaces and electrical
2. Cellulose

Cellulose insulation is a type of loose-fill insulation with paper and wood pieces. This type of insulation is blown or sprayed into the wall interior.
Cellulose pros
Does not attract insects
An eco friendly option (made with recycled materials)
Easily shapes around odd spaces and electrical
Cellulose cons
Not fire resistant
Can be prone to moisture and mold
Loose fill can move as it settles, creating air pockets
3. Rigid Foam

Rigid foam insulation is a type of solid, petroleum-based foam insulation. Like fiberglass, rigid foam insulation comes in blocks or sheets as opposed to being blown in like cellulose loose fill. Unlike fiberglass, however, these sheets are easier to customize and fit around odd spaces and electrical.
Rigid foam pros
Better coverage than fiberglass around odd spaces and electrical
Does not settle and create air pockets like loose fill cellulose
Does not attract insects
Better at protecting against moisture and mold than other types
Rigid foam cons
More expensive than other options
Not eco-friendly or made of recycled materials like cellulose and fiberglass
May need to be installed by a professional
4. Spray Foam

Spray foam insulation is a plastic-based foam that is sprayed into interior walls.
Spray foam pros
Water resistant and mold deterrent
Does not attract insects
Lasts longer compared to other insulation types
More soundproof than other options
Spray foam cons
Requires skilled application by a professional
Made with plastic, not eco-friendly
Can leave air pockets
Can shrink as it settles
Garage Door Insulation
While you’re insulating your garage walls, don’t forget about your garage doors. Insulating your garage doors can really help to regulate temperatures and filter noise from outside.
Not sure if your garage doors are already insulated? Take a look at the inside of your garage door—if you can see the garage door design, then there is no insulation.
Garage door insulation pros
Helps prevent serious dents and damage to garage doors
Helps to make garage door movement less noisy
Garage door insulation con
Temperature regulation may be more difficult if you are regularly opening the garage doors for vehicles
Safety Tips
If you’re taking the DIY approach to insulation installation, follow these important safety tips before you get started.
Wear gloves, long sleeves, and pants to prevent your skin from coming in contact with the insulation as it can cause irritation.
For optimal protection against dust and particles, also consider wearing a facemask and eye coverage.
Make sure the space you’re working in is well-ventilated during installation.
Preparation
Before you begin your garage insulation project, it’s important to have a plan of attack.
1. Choose Your Insulation Type
Choose the insulation type you would like to use from the list above. When choosing an insulation type, remember that you will need to remove the drywall in your garage completely to install material like fiberglass and rigid foam. With a spray-based insulation, you may be able to simply cut a hole in the drywall and spray inside. However, keep in mind that this method may leave gaps and spaces.
It may be best to contact a local contractor who can help you make the best choice.
2. Measure the Space
Once you’ve decided on an insulation type, measure the wall space in your garage so you know how much insulation you will need to purchase.
3. Gather Your Gear
Next, gather the gear you’ll need to get the job done. Refer to the tools and materials section above to get an idea of what you’ll need.
4. Air Sealing and Weather Stripping
Insulating your garage won’t go very far if there are still air gaps to the outdoors. Use a window and door insulating foam spray to seal any cracks or gaps that may be letting in outside air. Before using, check the label to make sure it’s a low-expanding foam.
How to Insulate a Garage
Use these basic instructions to insulate your garage walls, ceiling, and doors. If more help and assistance is needed, it may be best to contact a local contractor who can help you get it right the first time around.
How to Insulate Garage Walls
Step 1: Remove the drywall. To insulate the walls, you need to be able to get inside. Depending on your skill level with removing and installing drywall, you may need to bring in a professional to help.
If you don’t want to remove the drywall completely, another option is to cut a hole in your drywall and opt for a spray-based insulation like cellulose or spray foam.
Step 2: Install the insulation. Now it’s time to put your protective gear on and get to insulating! No matter the type of insulation you’re using, it’s important to insulate between the studs, not over them. You will need the face of the stud to re-install drywall.
If using fiberglass or cellulose, cut out any excess material with a utility knife and staple the insulation all the way down the side of the stud.
Step 3: Reinstall the drywall. Once your insulation is securely in place, it’s time to cover it up with drywall. Need help? Use these basic drywall installation tips or bring in an experienced professional.
How to Insulate a Garage Ceiling
Step 1: Remove the drywall. Depending on your garage, there may be drywall or another ceiling material that needs to be removed to get to the framing. If you will be using spray-based insulation, you may be able to simply cut a hole in the ceiling instead of removing it entirely.
Step 2: Cut and measure insulation before installing it. Once the ceiling has been removed, you can then measure the space between framing and pre-cut the insulation before installing it. Since you’ll be on a ladder, it’s much more difficult to just trim away any excess insulation.
Step 3: Install the insulation. Similar to wall insulation, place the insulation between the joists. Then, staple the insulation to the sides of the joists, not the face.
Step 4: Reinstall the drywall. Once the insulation is securely in place, finish the job by reinstalling the drywall.
How to Insulate Garage Doors
The easiest way to insulate your garage doors is with a kit, like the Reach Barrier Garage Door Insulation Kit. For the best results, simply follow the kit instructions step by step.
If you’re insulating your garage doors without a kit, use these steps to get the job done:
Step 1: Measure and mark the door panels. Before you insulate your garage door, you need to know how much space you’re working with, especially if you’re using batting insulation. Measure each rectangle panel and move on to the next step.
Step 2: Install retainer pins. To keep the batting in place, install two retainer pins per each panel. These usually have adhesive backing, so it is easy to install and minimal tools are required.
Step 3: Cut the insulation batting. Now that you have the correct measurements, cut the batting to fit in each panel.
Step 4: Put the insulation in place. Place the batting centered in each panel. Push the batting against the panel until the retainer pin has poked through. Use the retaining cap on the retainer pin to hold the insulation in place.