Data scientists frequently use Jupyter Notebooks to do their work. Whether you are loading or processing data, analyzing data, using data to train a model, or perform other tasks of the data science workflow, notebooks are usually key.
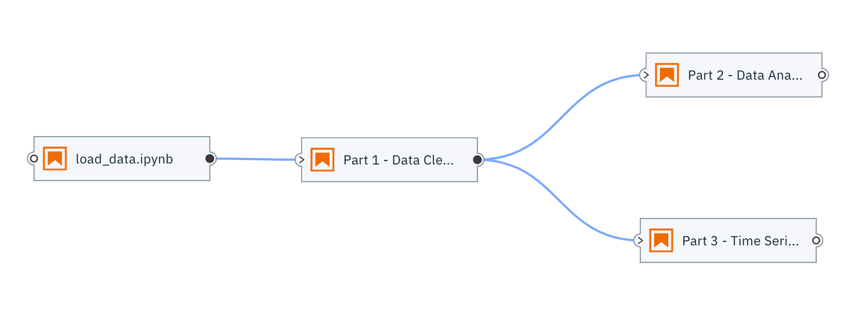
Let’s say you create a set of notebooks that load, cleanse, and analyze time-series data, which is made available periodically. Instead of running each notebook manually (or performing all tasks in a single notebook, which limits reusability of task specific code), you could create and run a reusable machine learning pipeline like the following:
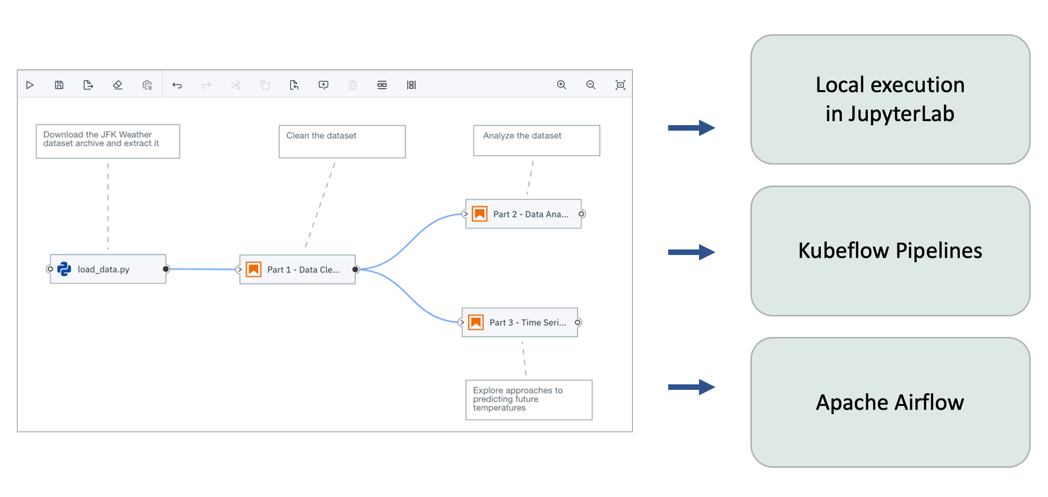
With the open source Elyra project, you can do this in JupyterLab, Apache Airflow, or Kubeflow Pipelines.
Quick Intro to Jupyterlab and Elyra
JupyterLab extensions make it possible for anyone to customize the user experience. Extensions provide new functionality, like a CSV file editor or a visualization, and integrate services (like git for sharing and version control) or themes.
Elyra is a set of AI-centric extensions for JupyterLab that aim to simplify and streamline day-to-day activities. Its main feature is the Visual Pipeline Editor, which enables you to create workflows from Python notebooks or scripts and run them locally in JupyterLab, or remotely on Kubeflow Pipelines or Apache Airflow.
Assembling a pipeline
You will use the Visual Pipeline Editor to assemble pipelines in Elyra. The pipeline assembly process generally involves:
- creating a new pipeline
- adding Python notebooks or Python scripts and defining their runtime properties
- connecting the notebooks and scripts to define execution dependencies

Create a pipeline
To create a new pipelines in Elyra, open the Pipeline Editor from the Launcher.

Adding Python notebooks and scripts to the pipeline
You can add Python notebooks and scripts to the pipeline by dragging them from the JupyterLab File Browser onto the canvas.

Each notebook or file is represented by a node that includes an input port and an output port.

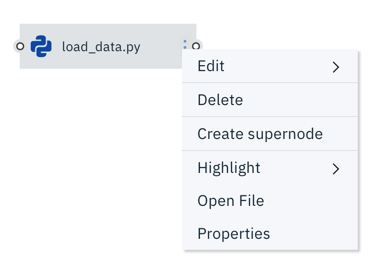
You can access Node runtime properties via the context menu. These node runtime properties define the execution environment (Docker image) in which the notebook or script is run during remote execution, as well as input (file dependencies and environment variables) and output files.
Optionally, you can associate nodes with comments to describe their purpose.

Defining dependencies between notebooks and scripts
Dependencies between notebooks or scripts are defined by connecting output ports (on the right side of a node) to input ports (on the left side of a node).

Dependencies are used to determine the order in which the nodes will be executed during a pipeline run.
The following rules are applied:
- circular dependencies are not allowed
- if two nodes are not connected (directly or indirectly), they can be executed in parallel
- if two nodes are connected, the node producing the inputs for the other node is executed first
There are some distinct differences between how pipelines are executed in JupyterLab and on a third-party workflow orchestration framework, such as Kubeflow Pipelines.
Running pipelines in JupyterLab
You can execute pipelines in JupyterLab as long as the environment provides access to the pipeline’s prerequisites. For example, the kernels that notebooks are associated with must already be installed, just like required packages (if they are not installed in the notebooks).

Running pipelines in the JupyterLab environment should be possible if:
- you are assembling a new pipeline and are testing it using relatively small data volumes
- the pipeline tasks don’t require hardware resources in excess of what’s available
- the pipeline tasks complete in an acceptable amount of time, given existing resource constraints
In the JupyterLab environment:
- Nodes are executed as a sub-process in the JupyterLab environment and always processed sequentially.
- Output files (like processed data files or training artifacts) are stored in the local file system and can be accessed using the JupyterLab File Browser.
- Processed notebooks are updated in place, meaning their output cells reflect the execution results.
- Python script output, such as messages sent to STDOUT or STDERR, are displayed in the JupyterLab console.

Elyra currently does not provide a pipeline-monitoring capability in the JupyterLab UI aside from a message after processing has completed. However, the relevant information is contained in the JupyterLab console output.
To learn more about how to create a pipeline and run it in JupyterLab take a look at the Running notebook pipelines in JupyterLab tutorial.
Running pipelines on Kubeflow Pipelines
While running pipelines locally might be feasible in some scenarios, it’s rather impractical if large data volumes need to be processed or if compute tasks require special-purpose hardware like GPUs or TPUs to perform resource-intensive calculations.
You can configure Elyra to access secured and unsecured Kubeflow Pipelines instances by defining a runtime configuration. Once configured, the selected configuration is used to run the pipeline.

The main difference between local pipeline execution and execution on Kubeflow Pipelines is that with Kubeflow Pipelines each node is processed in an isolated Docker container, allowing for better portability, scalability, and manageability.
The following chart illustrates this for two dependent notebook nodes.
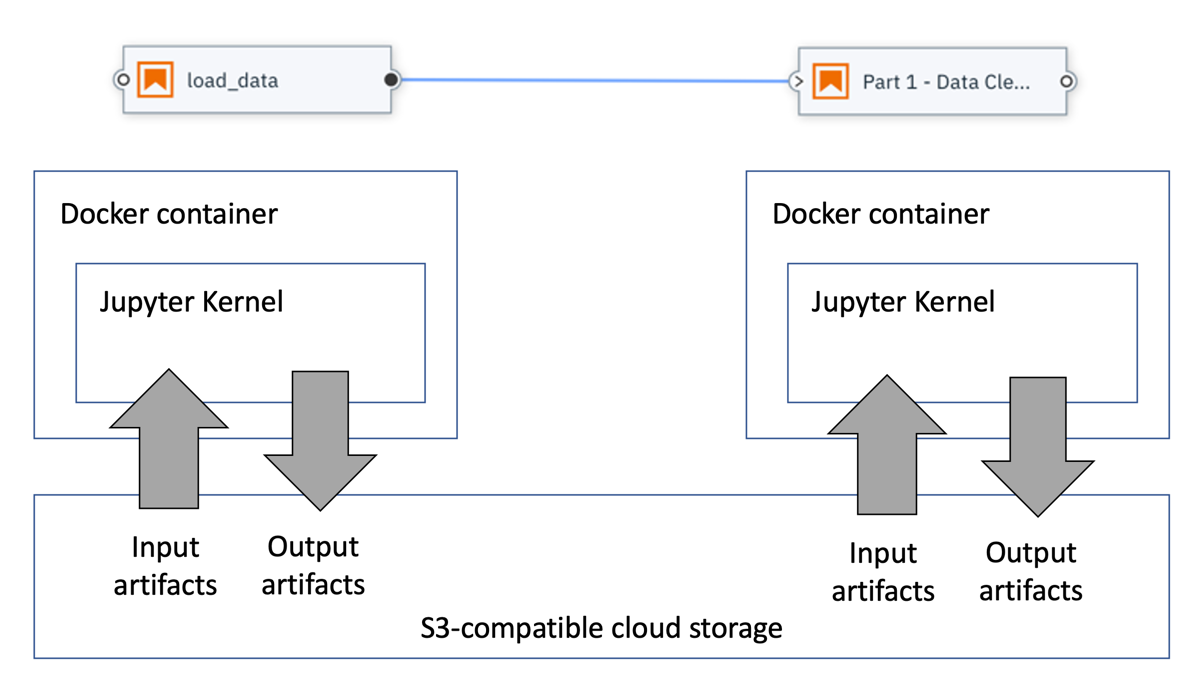
Data is exchanged between nodes using S3-compatible cloud storage. Before a notebook or Python script is executed, the declared input file dependencies are automatically downloaded from cloud storage into the container. After processing has completed the declared output files are automatically uploaded from the container to cloud storage.
Since Elyra is not yet a mature project, it currently relies on the Kubeflow Pipelines UI for pipeline execution monitoring.

You can find additional details, along with step-by-step instructions, in the Running notebook pipelines on Kubeflow Pipelines tutorial.
Ways to try Elyra and pipelines
The referenced tutorials are a great way to get started with pipelines. If you are looking for a more complex example this COVID-19 time-series pipeline might fit the bill.
If you’d like to try out Elyra and start building your own pipelines, you have three options:
- Use a sandbox environment hosted on the cloud
- Use Elyra Docker images
- Install JupyterLab and Elyra on your local machine
Kubeflow Pipelines is not included in any of the Elyra installation options.
Running Elyra in a sandbox environment on the cloud
You can test drive Elyra on mybinder.org, without having to install anything. Follow this link to try out the latest stable release or the latest development version (if you feel adventurous) in a sandbox environment.

The sandbox environment contains a getting_started markdown document, which provides a short tour of the Elyra features:

A couple of things to note:
- Performance can sometimes be sluggish since this is a shared environment.
- The sandbox environment is not persistent and any changes you make will be lost when it is shut down.
If you have Docker installed on your machine, consider using one of the Docker images instead.
Running Elyra Docker images
The Elyra community publishes ready-to-use Docker images on Docker Hub, which have JupyterLab and the Elyra extension pre-installed. Docker images are approximately one GB in size are tagged as follows:
elyra/elyra:latestis the latest stable releaseelyra/elyra:x.y.zhas thex.y.zrelease installedelyra/elyra:devis automatically built each time a change is committed.
Once you’ve decided which image to use (elyra/elyra:latest is always an excellent choice because you won’t miss out on the latest features!), you can spin up a sandbox container as follows:
docker run -it -p 8888:8888\
 -v ${HOME}/jupyter-notebooks/:/home/jovyan/work\
 -w /home/jovyan/work\
 elyra/elyra:latest jupyter lab
Open your web browser to the displayed URL and you are ready to start.
To access the notebook, open this file in a browser:
        file:///home/jovyan/.local/share/jupyter/runtime/nbserver-6-open.html
    Or copy and paste one of these URLs:
        http://4d17829ecd4c:8888/?token=d690bde267ec75d6f88c64a39825f8b05b919dd084451f82
     or http://127.0.0.1:8888/?token=d690bde267ec75d6f88c64a39825f8b05b919dd084451f82

The caveat is: In the sandbox mode, you cannot access existing files (such as notebooks) on your local machine and all changes you make are discarded when you shut down the container.
Therefore, it’s better to launch the Docker container like so, replacing ${HOME}/jupyter-notebooks/ and ${HOME}/jupyter-data-dir with the names of existing local directories:
docker run -it -p 8888:8888\
 -v ${HOME}/jupyter-notebooks/:/home/jovyan/work\
 -w /home/jovyan/work\
 -v ${HOME}/jupyter-data-dir:/home/jovyan/.local/share/jupyter\
 elyra/elyra:latest jupyter lab
This way all changes are preserved when you shut down the container, and you won’t have to start from scratch when you bring it up again.
Installing Elyra locally
If your local environment meets the prerequisites, you can install JupyterLab and Elyra using pip, conda, or from source code, following the instructions in the installation guide.
Closing thoughts
Elyra is a community-driven effort. We welcome contributions of any kind: bug reports, feature requests, and, of course, pull requests. You can reach us in the community chatroom, the discussion forum, or by joining our weekly community call.