Custom Fonts
Choosing a font is a great way to add a unique look to your site. You can use the Global Styles and Customize Fonts features to easily change the fonts that appear on your blog or site in a few clicks — no coding required.
💡
To change your fonts, you will use either Global Styles or Customize Fonts, depending on which theme you are using.
- If you are using one of these themes, use the Global Styles option in the WordPress Block editor.
- For other themes, you can customize the fonts used on your site through My Site → Appearance → Customize → Fonts.
Changing Fonts with Global Styles
Use Global Styles to change the font of your site on any of these themes.
- In your dashboard, click on Pages.
- Click on the Add New button, or click on an existing page title to open it in the WordPress Editor.
- If adding a new page, select your preferred layout or the default Blank layout.
- In the editor, click the Global Styles button. It’s the “Aa” button located between the Settings icon and the green Jetpack button.
- Click the drop-down under Headings or Base Font to see what font options are available.
Fonts are set in pairs, one for headings and the other for the base font.
- Heading Font: Choose a font to use for all of the headings on your blog. Common examples of heading text include post and page titles, widget titles, comment headers, and headlines inside posts and pages.
- Base Font: Choose a font to use for the main body text and for the menus on your blog.
In the Global Styles menu, click Publish to save your new font pairings, or Reset to revert the changes.
Publishing your changes in the Global Styles menu will not publish the specific page you are working on.
Adjusting Font Size
The Block Editor provides options for changing the font size within individual blocks.
To change the heading font size, select a different heading (H1, H2, etc) in your heading block.

Paragraphs, buttons, and other text blocks have a Typography option in the Block Settings where you can change the size of the text to a Preset size, or type in a custom font size.
✅
If you don’t see the Block Settings menu on the right side of your screen, click the cog icon next to your “Update” or “Publish” button to open the menu.

💡
You can change the global default font sizes with custom CSS, a feature available in the WordPress.com Premium plan or higher.
Changing Fonts in the Customizer
Many themes have options to change the font by going to My Site → Appearance → Customize. If there are no font options there, check to see if your theme supports the Global Styles method of changing fonts.
- From My Site(s) go to Appearance → Customize.
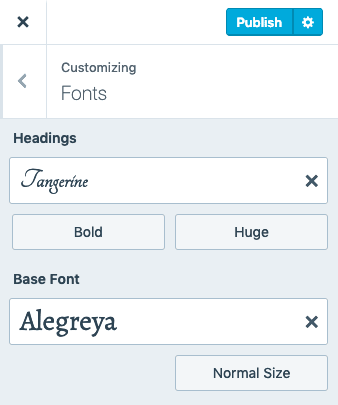
- Click on the Fonts option in the Customizer.
- Click the drop down under Headings or Base Font to see what font options are available.

Fonts are set in pairs, one for headings and the other for the base font.
- Headings: Choose a font to use for all of the headings on your blog. Common examples of heading text includes post and page titles, widget titles, comment headers, and headlines inside posts and pages.
- Base Font: Choose a font to use for the main body text and for the menus on your blog.
Each time you change a font, the live preview refreshes so you can see how that font will look on your blog.
Adjusting Font Size and Style
Font style – To adjust the style of your heading fonts, click the option below and to the left of the font. The available styles will vary depending on the font you have chosen.
Font size – To adjust the size of either your heading or your base fonts, click the size option below and to the right for each selected font and select a size from the dropdown menu.
💡
You can change the global default font sizes with custom CSS, a feature available in the WordPress.com Premium plan or higher.
Saving Fonts
Once you are satisfied with your font selections, Publish your site, or Save Draft if you want to continue to customize your site before publishing it.
Changing Fonts
Once you’ve selected your custom fonts, you can change them as many times as you want.
To change the custom fonts you use, go to Appearance → Customize → Fonts and select a different Header or Base Font. Or, you can switch back to your Theme’s default font by clicking the X to the right of the custom font name.
Once you are satisfied with your changes to the fonts, click Publish or Save Draft to continue customizing your site.

📌
It may take a few minutes for your fonts to show up on your blog or site after you save them. You may also want to clear your browser’s cache to be sure you’re viewing the latest version of your site.
Resetting Fonts
To reset your fonts to the theme’s defaults, you can do so by clicking the X next to your current font.
- Go to My Site → Appearance → Customize
- Click Fonts.
- Click the X next to the custom font to reset the font to the theme’s default.
- Click Save Changes.
Using Custom Fonts
On the WordPress.com Business plan or higher, you can use a plugin that installs more fonts on your site. There is a wide range of plugins that will allow you to add your own fonts to your site. So when reviewing plugins, check the ratings, the number of positive comments, and the type of support you can expect from the Plugin Developer. If you decide not to use a plugin after testing it, make sure to deactivate/delete it to keep your plugin list clean.
💡
Not sure which font to choose? Get some ideas with this post on nine free and elegant cursive fonts.
Frequently Asked Questions
Can I add more fonts?
You can install additional fonts if you have a WordPress.com Business or eCommerce plan, through use of a plugin. For other plans, it is not possible to add fonts beyond our curated collection.
Can I connect a Typekit.com account to my WordPress.com site?
It is not possible to connect an outside Typekit.com account to a WordPress.com site or blog.
Will the fonts display in my language?
If you have selected a non-Latin language for the blog under Settings → General, then all of the custom font’s characters will be loaded. If you have selected a Latin language such as English, Italian, Portuguese, or Spanish, then only a smaller subset of the font will be loaded. If some characters aren’t displaying correctly on your blog, please check the language settings first to make sure you have selected the language you are writing in and then go to your Customizer → Fonts and re-save the font to make it update to your new language setting.
How can I tell if the font I want to use is supported for my language?
The best way to check if a particular font will display properly in any given language is to try that font in the Customizer and see if the font changes from the theme default. Currently, no Asian languages are supported, and Cyrillic is supported in most, but not all, font families. Wider language support is an area that will continue to grow and improve in the future.
Why does a different font briefly appear before my chosen font appears?
This is called Flash of Unstyled Text (FOUT). On slower connections, text is displayed in the theme’s default font first. This way, people can start reading your content before your custom font loads, instead of waiting while looking at a blank page. This might mean that there’s a flash of a different font before the page finishes loading, but overall this is better for viewers on slower connections than seeing a blank screen. If you don’t want this to happen, you can add this CSS code to your site using the CSS Editor in Appearance → Customize → Additional CSS (Premium plan and above only): .wf-loading body {
visibility: hidden;
}
Versatile plans and pricing
-
Free

Best for students
-
Personal

Best for hobbyists
-
Premium

Best for freelancers
-
Business

Best for small businesses
Still confused?
Help us improve:
We're always looking to improve our documentation. If this page didn't answer your question or left you wanting more, let us know! We love hearing your feedback. For support, please use the forums or contact support form. Thanks!
