Security » Two-Step Authentication
Your WordPress.com site is your home on the internet, and you want to keep that home safe. Hopefully, you’ve already chosen a unique and hard-to-crack password for your account. To add another layer of home security, you can enable two-step authentication.
What is Two-Step Authentication?
Two-step authentication is a method of securing accounts requiring that you not only know something (a password) to log in but also that you possess something (your mobile device or a physical key). The benefit of this approach to security is that even if someone guesses your password, they need to have also stolen your possession in order to break into your account.
At WordPress.com, we offer two-step authentication via mobile device and physical security key. We first verify your mobile device by sending a code via one of a couple of methods. Once you’ve verified your mobile device, you can also add authentication that uses a physical key instead.
Once you’ve set up two-step authentication, any time you log in with your password, we send a new code to your device which you must input, or you have to plug in your physical key before logging in. It adds a small extra step to the login process but makes your account much more secure.
Setup with an Authenticator App
To set up two-step authentication via an authenticator application like Google Authenticator, Authy, or Duo on your device, you’ll need to start in a desktop browser.
First, go to your Two-Step Authentication settings page at WordPress.com.
Or, you can reach Settings by clicking on your profile image from the WordPress.com home page:

Next, click the “Security” link in the navigation on the left-hand side of the screen:

Then, click on Two-Step Authentication and then Get Started.

Here you’ll be prompted to select your country and to provide your mobile phone number (without country code and spaces or dashes). After doing so, click Verify Via App.

Next, scan the QR code presented with your authenticator app. A six-digit number will appear in the authenticator app. Enter it in the field provided and click Enable.

Lastly, you’ll be prompted to print backup codes. Don’t skip this step, as it’ll be your only way to log back into your account without staff assistance should your device go missing!
Please Note: If your web browser is set to block pop-up windows, you may need to temporarily disable this feature as it will prevent the window with your backup codes from opening.
Click All Finished.
At this point, your site is enabled for two-step authentication. A follow-up step allows you to confirm that your backup codes work by entering one of the printed codes.
Setup with SMS Codes
If you’re unable to set up two-step authentication using an authenticator app, you can also set it up to work via SMS messages. To do so, set up your phone number as described above, but then click Verify via SMS.
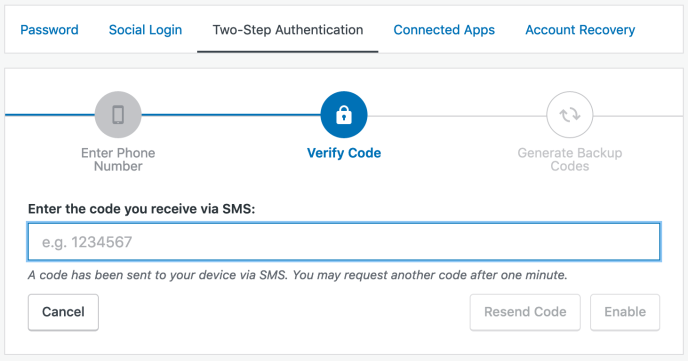
Within a few moments, you should receive a text message that includes a 7-digit number. Enter this number in the blank provided and click Enable.
From this point forward, you can print and verify backup codes as documented above. Your account is now protected by two-step authentication.
Smartphone apps that block automated calls might also block our messages.
Security Key Authentication
WordPress.com supports login verification with physical security keys using the WebAuthn standard.
Instead of typing in a code you get via SMS or an app like Google Authenticator after entering your password, you plug in a physical key. You then press a button on that key to complete verification and log in. Without that physical key it is impossible for anyone to log into your account, even if they know the password.
Requirements
- Have a computer with a USB port and the latest version of a compatible browser like Chrome, Firefox, Opera, or Edge.
(Note: Currently Chrome and Firefox have the best overall support for this, so we recommend using these browsers for the most consistent experience.) - Have a key that plugs into a USB port and works with FIDO2, like Yubico’s YubiKey or Google’s Titan Key (devices using the older FIDO U2F standard should also still work). Please check your specific key’s support documentation for more information on the types of devices and browsers your key supports.
Add a Key
Note: you need to follow the steps above to enable two-step authentication via SMS or an authenticator app before you can add a security key.
After setting up two-step authentication with an app or SMS, you’ll see the option to add a security key. Click on Register key.

We allow you to register multiple keys so you can name your key to distinguish it from others you might add in the future. Type in a unique name and click Register key.

At this point, plug your key into a USB port on your computer and, depending on the type of key, either press the button or tap the gold disc on the key.

If you’re successful, you will see a message on the screen and the key will now be listed in the Security Key section.

Once this is set up, you won’t be able to access your account without your key, so treat it the same way as you would the keys to your home or your car – keep it safe!
Also consider adding a second key as a backup option and keep it somewhere that you will be able to find it should something happen to your primary key. To add additional keys, just click Register Key again.
Remove a Key
Should you want to remove a security key you added before (for example if a key was lost or no longer works), you can disconnect that key from your account.
Go to the Two-Step Authentication page in your profile settings, click the Trash icon next to the key, and click Remove Key in the confirmation message that will appear.

Logging In
The login process varies slightly from the usual process once you have two-step authentication enabled. Regardless of whether you used the Google Authenticator method or the SMS method to enable two-step authentication, you’ll start by logging in as usual with your username and password.

Next, you’ll be prompted to enter the verification code that was sent to your device.
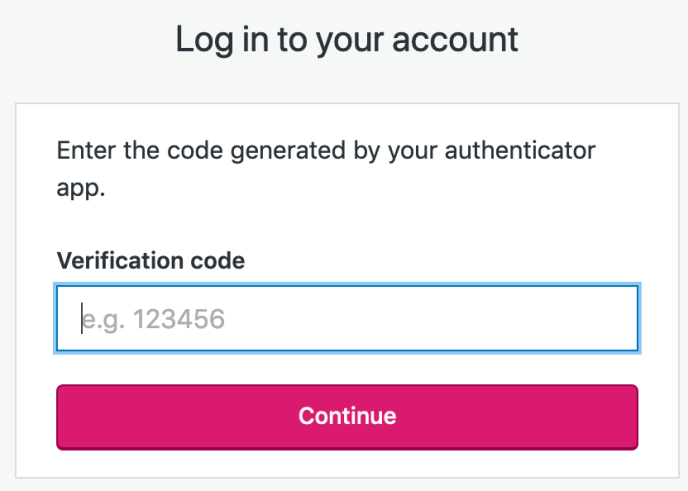
If you set up two-step authentication with an authenticator app, open the app on your device and provide the six-digit number listed for the account. If you’re using SMS for two-step authentication, we’ll send you a text message with a six-digit number. Once you’ve entered the code, you’ll be logged in and ready to blog.
If you have a security key configured, you’ll see a prompt asking whether you want to verify using your key, or your authenticator app/SMS. To verify using your key, click Continue with security key.
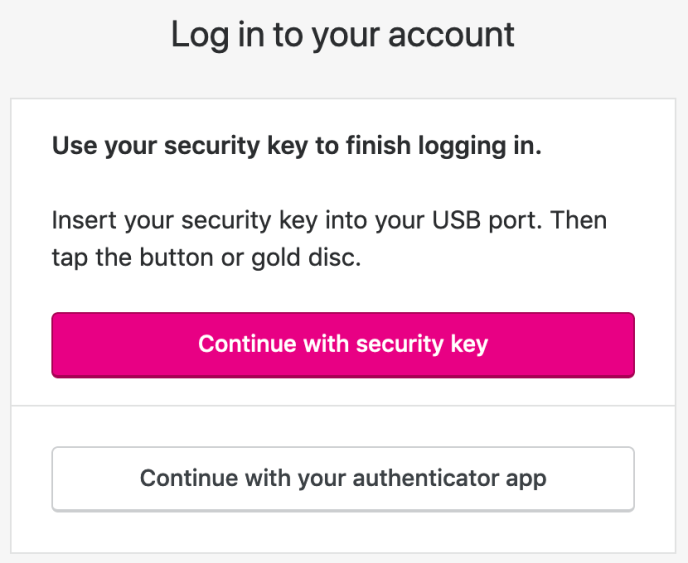
Next you’ll see a prompt to connect your key. Plug the key into a USB port on your computer and, depending on the type of key, either press the button or tap the gold disc on the key to finish logging in.

Note: If you take too long to verify, the verification request will be cancelled and an error message will appear. Just click Continue with security key again to restart the verification.
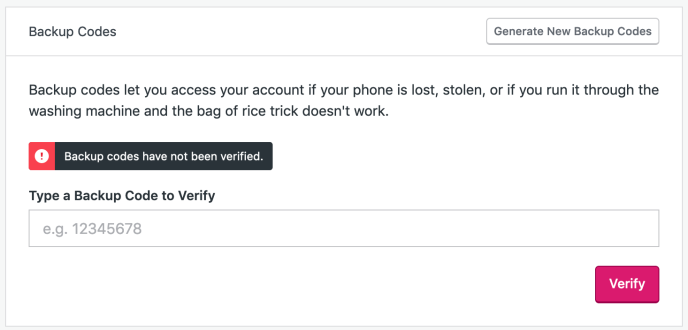
Backup Codes
We don’t want you to lose access to your WordPress.com account—you’ll still need to be able to log in if it’s is lost, stolen, you’re locked out for any reason, or your device needs to be wiped clean (which will delete Google Authenticator).
To make sure you’re never locked out of your account, you can generate a set of ten one-time-use backup codes. We recommend that you print out the backup codes and keep them in a secure place like a wallet or document safe. (Don’t save them on your computer. They’d be accessible to anyone using your machine.)
Generating backup codes is essential and must be done. If you ever need to use a backup code, just log in like you normally would, and when asked about the login code enter the backup code instead.
At the end of the setup process for Two-Step Authorization, you’ll be given the option to generate backup codes:

Print out the codes—don’t just save it—and confirm that you’ve done that. Then click All Finished! to close that screen.
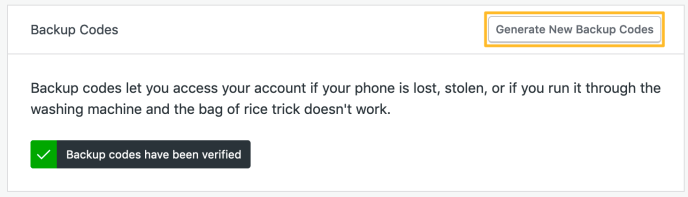
If you lose your list of backups or it’s compromised, you can generate a new set of codes. For added security, this will disable any previously-generated codes.
You can only generate the backup codes from a desktop browser. For example, Safari on iOS will not display the backup codes. Additionally, if your web browser is set to block pop-up windows, you will need to temporarily disable this feature as it will prevent the window with your backup codes from opening.
Application-Specific Passwords
There may be some apps that connect to your WordPress.com account that don’t yet fully support two-step authentication. The most common are Jabber apps used to subscribe to WordPress.com blogs. For these apps, you can generate unique passwords for each application (e.g., you can have a different password on your phone and your tablet). You can then disable individual passwords and lock applications out of your account to prevent others from accessing your sites.
To generate application-specific passwords, head back to Two-Step Authentication and then down to “Application Passwords”:

Give the application a name—you’re the only one who will see this name, so call it whatever you’d like—and click “Generate Password.” WordPress.com will create a unique 16-character password that you can copy and paste the next time you log in to your account on that device. The application will remember this password so you don’t need to.
Your Security page will maintain a list of all the applications for which you’ve generated passwords. If any of your devices are lost or stolen, or you simply wish to revoke access for a particular application, you can visit this page at any time and click “X” to disable the password and prevent the app from accessing your account:

Disable Two-Step Authentication
We don’t recommend disabling two-step authentication, as it’s much less secure, even if you believe your password is very strong. But if you insist, you can disable the feature by going to your Two-Step Authentication page.
The page will show that the feature is enabled, and you can click the Disable Two-Step Authentication button. This will prompt you to enter a code to confirm that you still have access to the device you originally used to set up two-step authentication. If you’re using an authenticator app, open it and provide the code it lists. If you’re using SMS, you’ll be sent a code to use. (This code is different from the code you used to log in to your account. You can also use one of your backup codes for this step.)
Click Disable after entering the code and your account will no longer be protected by two-step authentication.

Note: A security key cannot be used to disable two-step authentication – this can only be done using a code received via SMS, your authenticator app, or a backup code.
Moving to a New Device
If you are planning on switching to a new device, and you have enabled two-step authentication, you will want to take the following steps to avoid being accidentally locked out of your user account.
If you are using an authenticator app to generate verification codes:
- Print a set of backup codes for your user account by following the steps here. DO NOT SKIP THIS STEP.
- On your new device, install the authenticator app.
- Disable the two-step authentication link with your old device by following the steps here.
- Set up your user account to link to your new device by following the steps here.
- If you are prompted to enter your verification code, use a code from your list of backup codes. Backup codes are one-time use only.
- You can now uninstall the authenticator app from your old device.
If you are using the WordPress.com mobile app to manage and publish to your site:
- Create a new application-specific password by following the steps here.
- Enter your new application password when using this app on your new device.
If you are using SMS to receive authentication codes, you will not need to update your settings unless you are also changing to a new phone number. In that case, you will want to set up a new recovery number prior to disconnecting your old SMS number by following the steps here.
If You Lose Your Device
If you lose your device or security key, accidentally remove the authenticator app, or are otherwise locked out of your account, the only way to get back in to your account is by using a Backup Code.
To use a backup code, fill in your login details like you normally would. When asked about the login code enter the backup code instead. Remember: backup codes are only valid for one time each so be careful when using them.
Versatile plans and pricing
-
Free

Best for students
-
Personal

Best for hobbyists
-
Premium

Best for freelancers
-
Business

Best for small businesses
