
Planet Python
Last update: October 07, 2021 04:41 PM UTC
October 07, 2021
Python for Beginners
Generators in Python
Do you know about functions in python? If you answered yes, let me take you through an interesting concept of generator functions and generators in python. In this article, we will look at how generators are defined and used in a program. We will also look at how a generator is different from a function using some examples.
What is a function?
In python, a function is a block of code that does some specific work. For example, a function can add two numbers, a function can delete a file from your computer, a function can do any specific task you want it to do.
A function also returns the required output value using the return statement. An example of a function is given below. It takes two numbers as input, multiplies them and returns the output value using the return statement.
def multiplication(num1, num2):
    product = num1 * num2
    return product


result = multiplication(10, 15)
print("Product of 10 and 15 is:", result)
Output:
Product of 10 and 15 is: 150What is a generator function?
A generator function is similar to a function in python but it gives an iterator-like generator to the caller as output instead of an object or a value. Also, we use yield statements instead of return statements in a generator function. The yield statement pauses the execution of the generator function whenever it is executed and returns the output value to the caller. A generator function can have one or more than one yield statements but it cannot have a return statement.
We can define a generator function in a similar way to functions in python but we cannot use a return statement. Instead we use the yield statement. Following is an example of a generator function that returns numbers from 1 to 10 to the caller.
def num_generator():
    for i in range(1, 11):
        yield i


gen = num_generator()
print("Values obtained from generator function are:")
for element in gen:
    print(element)
Output:
Values obtained from generator function are:
1
2
3
4
5
6
7
8
9
10
What are generators in Python?
Generators in python are a type of iterators that are used to execute generator functions using the next() function. To execute a generator function, we assign it to the generator variable. Then we use the next() method to execute the generator function.
The next() function takes the generator as input and executes the generator function till the next yield statement. After that, execution of the generator function is paused. To resume the execution, we again call the next() function with the generator as an input. Again, the generator function executes till the next yield statement. This process can be continued till the generator function’s execution gets finished. This process can be understood from the following example.
def num_generator():
    yield 1
    yield 2
    yield 3
    yield 4


gen = num_generator()
for i in range(4):
    print("Accessing element from generator.")
    element = next(gen)
    print(element)
Output:
Accessing element from generator.
1
Accessing element from generator.
2
Accessing element from generator.
3
Accessing element from generator.
4

Process finished with exit code 0
In the above output, you can observe that each time the next() function is called, the element from the next yield statement is printed. It shows that each time when the next() function is called, the generator function resumes its execution.
If we try to call the next() function with the generator as input after the generator function has finished its execution, the next() function raises StopIteration exception. So, It is advised to use the next() function inside a python try except block. Moreover, we can also iterate through the generators in python using the for loop. It will produce the same result as produced during the execution of the program using the next() function.
def num_generator():
    yield 1
    yield 2
    yield 3
    yield 4


gen = num_generator()
for i in gen:
    print("Accessing element from generator.")
    print(i)
Output:
Accessing element from generator.
1
Accessing element from generator.
2
Accessing element from generator.
3
Accessing element from generator.
4

Process finished with exit code 0
Examples of generators in Python
As we have discussed generators and generator functions in Python, Let us implement a program to understand the above concepts in a better way. In the following program, we implement a generator function that takes a list as input and calculates the square of elements in the list.
myList = [1, 2, 3, 4, 5, 6, 7, 8, 9, 10]


def square_generator(input_list):
    for element in input_list:
        print("Returning the square of next element:",element)
        yield element*element


print("The input list is:",myList)
gen = square_generator(myList)
for i in range(10):
    print("Accessing square of next element from generator.")
    square = next(gen)
    print(square)
Output:
The input list is: [1, 2, 3, 4, 5, 6, 7, 8, 9, 10]
Accessing square of next element from generator.
Returning the square of next element: 1
1
Accessing square of next element from generator.
Returning the square of next element: 2
4
Accessing square of next element from generator.
Returning the square of next element: 3
9
Accessing square of next element from generator.
Returning the square of next element: 4
16
Accessing square of next element from generator.
Returning the square of next element: 5
25
Accessing square of next element from generator.
Returning the square of next element: 6
36
Accessing square of next element from generator.
Returning the square of next element: 7
49
Accessing square of next element from generator.
Returning the square of next element: 8
64
Accessing square of next element from generator.
Returning the square of next element: 9
81
Accessing square of next element from generator.
Returning the square of next element: 10
100
In the above example, you can see that whenever the next() function is executed with the generator as input, It executes the loop one time till the yield statement. Once the yield statement is executed, the execution of the generator function is paused until we execute the next() function again.
Main difference between a function and a generator function
The main differences between a function and a generator function are as follows.
- A function has a return statement while a generator function has a yield statement.
- A function stops its execution after execution of the first return statement. Whereas, a generator function just pauses the execution after execution of the yield statement.
- A function returns a value or a container object while a generator function returns a generator object.
Conclusion
In this article, we have discussed generator functions and generators in Python.To learn more about python programming, you can read this article on list comprehension. You may also like this article on the linked list in Python.
The post Generators in Python appeared first on PythonForBeginners.com.
Python Insider
Python 3.11.0a1 is available
Now that we are on a release spree, here you have the first alpha release of Python 3.11: Python 3.11.0a1. Let the testing and validation games begin!
Major new features of the 3.11 series, compared to 3.10
Among the new major new features and changes so far:
- PEP 657 – Include Fine-Grained Error Locations in Tracebacks
- PEP 654 – PEP 654 – Exception Groups and except*
- (Hey, fellow core developer, if a feature you find important is missing from this list, let Pablo know.)
The next pre-release of Python 3.11 will be 3.11.0a2, currently scheduled for 2021-11-02.
More resources
- PEP 664, 3.11 Release Schedule
- Report bugs at https://bugs.python.org.
And now for something completely different
Schwarzschild black holes are also unique because they have a space-like singularity at their core, which means that the singularity doesn't happen at a specific point in *space* but happens at a specific point in *time* (the future). This means once you are inside the event horizon you cannot point with your finger towards the direction the singularity is located because the singularity happens in your future: no matter where you move, you will "fall" into it.
For a Schwarzschild black hole (a black hole with no rotation or electromagnetic charge), given a free fall particle starting at the event horizon, the maximum propper time (which happens when it falls without angular velocity) it will experience to fall into the singularity is `π*M` (in natural units), where M is the mass of the black hole. For Sagittarius A* (the black hole at the centre of the milky way) this time is approximately 1 minute.
We hope you enjoy the new releases!
Thanks to all of the many volunteers who help make Python Development and these releases possible! Please consider supporting our efforts by volunteering yourself or through organization contributions to the Python Software Foundation.Your friendly release team,
Ned Deily @nad
Steve Dower @steve.dower
Pablo Galindo Salgado @pablogsal
Python Bytes
#253 A new Python for you, and for everyone!
<p><strong>Watch the live stream:</strong></p> <a href='https://www.youtube.com/watch?v=mMd1TzdpfZ8' style='font-weight: bold;'>Watch on YouTube</a><br> <br> <p><strong>About the show</strong></p> <p>Special guest: Yael Mintz</p> <p>Sponsored by <strong>us:</strong></p> <ul> <li>Check out the <a href="https://training.talkpython.fm/courses/all"><strong>courses over at Talk Python</strong></a></li> <li>And <a href="https://pythontest.com/pytest-book/"><strong>Brian’s book too</strong></a>!</li> </ul> <p><strong>Michael #1:</strong> <a href="https://github.com/rajasegar/awesome-htmx"><strong>awesome-htmx</strong></a></p> <ul> <li>An awesome list of resources about <strong>htmx</strong> such as articles, posts, videos, talks and more.</li> <li>Good for all sorts of examples and multiple languages</li> <li>We get a few nice shoutouts, thanks</li> </ul> <p><strong>Brian #2:</strong> <a href="https://www.python.org/downloads/release/python-3100/"><strong>Python 3.10 is here !!!!</strong></a> </p> <ul> <li>As of Monday. Of course I have it installed on Mac and Windows. Running like a charm.</li> <li>You can watch the <a href="https://t.co/sK5SmgXpif?amp=1">Release Party recording</a>. It’s like 3 hours. And starts with hats. Pablo’s is my fav.</li> <li>Also a <a href="https://www.youtube.com/watch?v=JteTO3EE7y0&t=1s">What’s New video</a> which aired before that with Brandt Bucher, Lukasz Llanga ,and Sebastian Ramirez (33 min) <ul> <li>Includes a deep dive into structural pattern matching that I highly recommend.</li> </ul></li> <li>Reminder of new features: <ul> <li><a href="https://www.python.org/dev/peps/pep-0623/">PEP 623</a> -- Deprecate and prepare for the removal of the wstr member in PyUnicodeObject.</li> <li>PEP 604 -- Allow writing union types as X | Y</li> <li><a href="https://www.python.org/dev/peps/pep-0612/">PEP 612</a> -- Parameter Specification Variables</li> <li><a href="https://www.python.org/dev/peps/pep-0626/">PEP 626</a> -- Precise line numbers for debugging and other tools.</li> <li><a href="https://www.python.org/dev/peps/pep-0618/">PEP 618</a> -- Add Optional Length-Checking To zip.</li> <li><a href="https://bugs.python.org/issue12782">bpo-12782</a>: Parenthesized context managers are now officially allowed.</li> <li><a href="https://www.python.org/dev/peps/pep-0632/">PEP 632</a> -- Deprecate distutils module.</li> <li><a href="https://www.python.org/dev/peps/pep-0613/">PEP 613</a> -- Explicit Type Aliases</li> <li><a href="https://www.python.org/dev/peps/pep-0634/">PEP 634</a> -- Structural Pattern Matching: Specification</li> <li><a href="https://www.python.org/dev/peps/pep-0635/">PEP 635</a> -- Structural Pattern Matching: Motivation and Rationale</li> <li><a href="https://www.python.org/dev/peps/pep-0636/">PEP 636</a> -- Structural Pattern Matching: Tutorial</li> <li><a href="https://www.python.org/dev/peps/pep-0644/">PEP 644</a> -- Require OpenSSL 1.1.1 or newer</li> <li><a href="https://www.python.org/dev/peps/pep-0624/">PEP 624</a> -- Remove Py_UNICODE encoder APIs</li> <li><a href="https://www.python.org/dev/peps/pep-0597/">PEP 597</a> -- Add optional EncodingWarning</li> </ul></li> <li>Takeaway I wasn’t expecting: <code>black</code> doesn’t handle Structural Pattern Matching yet. </li> </ul> <p><strong>Yael #3:</strong> <a href="https://github.com/PyCQA/prospector"><strong>Prospector</strong></a> <a href="https://github.com/PyCQA/prospectors">(almost)</a> <a href="https://github.com/PyCQA/prospector">All Python analysis tools together</a></p> <ul> <li>Instead of running pylint, pycodestyle, mccabe and other separately, prospector allows you to bundle them all together </li> <li>Includes the common <a href="https://www.pylint.org/">Pylint</a> and <a href="https://github.com/PyCQA/pydocstyle">Pydocstyle / Pep257</a>, but also some other less common goodies, such as <a href="https://github.com/PyCQA/mccabe">Mccabe</a>, <a href="https://github.com/landscapeio/dodgy">Dodgy</a>, <a href="https://github.com/jendrikseipp/vulture">Vulture</a>, <a href="https://github.com/PyCQA/bandit">Bandit</a>, <a href="https://github.com/regebro/pyroma">Pyroma</a> and many others </li> <li>Relatively easy configuration that supports profiles, for different cases</li> <li>Built-in support for celery, Flask and Django frameworks</li> <li><a href="https://soshace.com/how-to-use-prospector-for-python-static-code-analysis/">https://soshace.com/how-to-use-prospector-for-python-static-code-analysis/</a></li> </ul> <p><strong>Michael #4:</strong> <a href="https://twitter.com/__aviperl__/status/1442542251817652228"><strong>Rich Pandas DataFrames</strong></a></p> <ul> <li>via Avi Perl, by Khuyen Tran</li> <li>Create animated and pretty Pandas Dataframe or Pandas Series (in the terminal, using Rich)</li> <li>I just had Will over on Talk Python last week BTW: <a href="https://talkpython.fm/episodes/show/336/terminal-magic-with-rich-and-textual"><strong>Terminal magic with Rich and Textual</strong></a></li> <li>Can limit rows, control the animation speed, show head or tail, go “full screen” with clear, etc.</li> <li>Example:</li> </ul> <pre><code> from sklearn.datasets import fetch_openml from rich_dataframe import prettify speed_dating = fetch_openml(name='SpeedDating', version=1)['frame'] table = prettify(speed_dating) </code></pre> <p><strong>Brian #5:</strong> <strong>Union types, baby!</strong></p> <ul> <li>From Python 3.10: “<a href="https://www.python.org/dev/peps/pep-0604/">PEP 604</a> -- Allow writing union types as X | Y”</li> <li>Use as possibly not intended, to avoid Optional:</li> </ul> <pre><code> def foo(x: str | None = None) -> None: pass </code></pre> <ul> <li>3.9 example:</li> </ul> <pre><code> from typing import Optional def foo(x: Optional[str] = None) -> None: pass </code></pre> <ul> <li>But here’s the issue. I need to support Python 3.9 at least, and probably early, what should I do?</li> <li>For 3.7 and above, you can use <code>from __future__ import annotations</code>.</li> <li>And of course Anthony Sottile worked this into <code>pyupgrade</code> and Adam Johnson wrote about it: <ul> <li><a href="https://adamj.eu/tech/2021/05/21/python-type-hints-how-to-upgrade-syntax-with-pyupgrade/">Python Type Hints - How to Upgrade Syntax with pyupgrade</a></li> </ul></li> <li>This article covers: <ul> <li><a href="https://www.python.org/dev/peps/pep-0585/">PEP 585</a> added generic syntax to builtin types. This allows us to write e.g. <code>list[int]</code> instead of using <code>typing.List[int]</code>.</li> <li><a href="https://www.python.org/dev/peps/pep-0604/">PEP 604</a> added the <code>|</code> operator as union syntax. This allows us to write e.g. <code>int | str</code> instead of <code>typing.Union[int, str]</code>, and <code>int | None</code> instead of <code>typing.Optional[int]</code>.</li> <li>How to use these. What they look like. And how to use <code>pyupgrade</code> to just convert your code for you if you’ve already written it the old way. Awesome.</li> </ul></li> </ul> <p><strong>Yael #6:</strong> <a href="https://dev.to/akaihola/improving-python-code-incrementally-3f7a"><strong>Make your code darker - Improving Python code incrementally</strong></a></p> <ul> <li>The idea behind <a href="https://pypi.org/project/darker">Darker</a> is to reformat code using <a href="https://pypi.org/project/black">Black</a> (and optionally <a href="https://pypi.org/project/isort">isort</a>), but only apply new formatting to regions which have been modified by the developer</li> <li>Instead of having one huge PR, darker allows you to reformat the code gradually, when you're touching the code for other reasons.. </li> <li>Every modified line, will be black formatted</li> <li>Once added to <a href="https://github.com/akaihola/darker#using-as-a-pre-commit-hook">Git pre-commit-hook</a>, or added to <a href="https://github.com/akaihola/darker#pycharmintellij-idea">PyCharm</a> <a href="https://github.com/akaihola/darker#pycharmintellij-idea"><em>*</em>*</a>/ <a href="https://github.com/akaihola/darker#visual-studio-code">VScode</a> the formatting will happen automatically</li> </ul> <p><strong>Extras</strong></p> <p>Brian:</p> <ul> <li>I got a couple PRs accepted into pytest. So that’s fun: <ul> <li><a href="https://github.com/pytest-dev/pytest/pull/9133">9133: Add a deselected parameter to assert_outcomes()</a></li> <li><a href="https://github.com/pytest-dev/pytest/pull/9134">9134: Add a pythonpath setting to allow paths to be added to sys.path</a></li> <li>I’ve tested, provided feedback, written about, and submitted issues to the project before. I’ve even contributed some test code. But these are the first source code contributions.</li> <li>It was a cool experience. Great team there at pytest.</li> </ul></li> </ul> <p>Michael:</p> <ul> <li>New htmx course: <a href="https://training.talkpython.fm/courses/htmx-flask-modern-python-web-apps-hold-the-javascript?utm_source=pythonbytes"><strong>HTMX + Flask: Modern Python Web Apps, Hold the JavaScript</strong></a></li> <li><a href="https://pypi.org/project/auto-optional/"><strong>auto-optional</strong></a>: Due to the comments on the show I remembered to add support for <code>Union[X, None]</code> and python 10’s <code>X | None</code> syntax.</li> <li><a href="https://nedbatchelder.com/blog/202110/coverage_60.html">Coverage 6.0 released</a></li> <li><a href="https://docs.djangoproject.com/en/3.2/releases/3.2.8/">Django 3.2.8 released</a></li> </ul> <p>Yael:</p> <ul> <li><a href="https://www.manning.com/books/data-oriented-programming">data-oriented-programming</a> - an innovative approach to coding without OOP, with an emphasis on code and data separation, which simplifies state management and eases concurrency</li> <li>Help us to make <a href="https://github.com/hiredscorelabs/cornell">Cornell</a> awesome 🙂 - contributors are warmly welcomed</li> </ul> <p><strong>Joke:</strong> <a href="https://geek-and-poke.com/geekandpoke/2021/1/24/pair-captchaing"><strong>Pair CAPTCHAing</strong></a></p>
Read the Docs
Read the Docs newsletter - October 2021
Welcome to the latest edition of our monthly newsletter, where we share the most relevant updates around Read the Docs, offer a summary of new features we shipped during the previous month, and share what we’ll be focusing on in the near future.
Company highlights
- We have resumed sending our blog updates by email. You can subscribe to our newsletter so you don’t miss them.
- Version 3 of our Embed API is now implemented, thanks to the CZI grant we received. We will give more details about it soon.
- We have reworked our team page to give you a better idea of who we are and how we work at the company.
New features
- You can now use our newer build specification that leverages a newer image based on Ubuntu 20.04 and gives more control over the versions of Python, Node.js, Rust, and Go. Projects like pypa/cryptography and thebe are already using it, and we will make an announcement with more information soon.
- We have added a new section to our Dashboard that exposes user security logs.
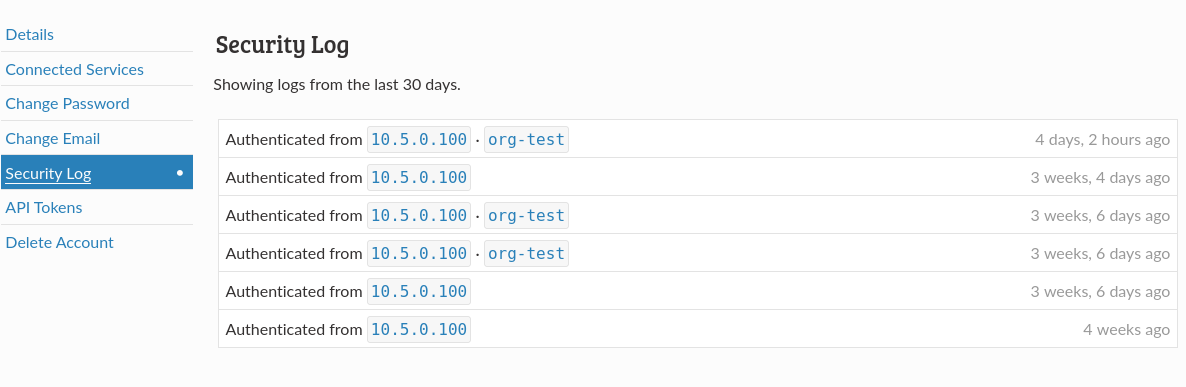
Security logs
- We have added a button on the Analytics section to download all your data, so you are not limited by the last 30 days that we show.
- We have revamped our onboarding process. If you are new to Read the Docs, you can now fork our template repository and follow our tutorial to learn how to use the platform. We plan to keep expanding the tutorial during the coming weeks.
- We have made our how-to guides more visible and simplified its categorization, in addition to other documentation improvements.
Thanks to our external contributors Mozi and Dmitry.
You can always see the latest changes to our platforms in our Read the Docs Changelog.
Upcoming features
- Ana will work on the UI of our landing and marketing pages, while making progress with version 1.1 of our Sphinx theme.
- Anthony will resume work on our new product interface and wrap up some financial updates.
- Eric will focus on expanding our CDN functionality on the commercial site, as well as addressing some upcoming changes to how custom domains work on Read the Docs Community.
- Juan Luis will document several recent changes, such us the new build specification and our support for generic webhooks, and continue expanding our tutorial and improving the SEO of our docs.
- Manuel will finish the migration of our services to Ubuntu 20.04, release a new version of sphinx-hoverxref that uses our new embed API, and gather feedback on our new build specification.
- Santos will continue consolidating our Community and Commercial codebases, finish the work on generic webbooks for easier integration with Slack and other tools, enable Commercial users to create new subscriptions after they cancel, and collaborate with Eric on the CDN issues.
Possible issues
We are detecting an increasing number of spammy projects on our platform. While this rarely affects legitimate users, it is still a concern to us and we are planning to take measures to tackle it.
In addition, some projects experienced networking issues due to the expiration of Let’s Encrypt root certificate. We deployed a fix shortly after the problem was reported.
Considering using Read the Docs for your next Sphinx or MkDocs project? Check out our documentation to get started!
October 06, 2021
William Minchin
Updating a Python Package After 5 Years, and Colourettu 2.1.1. Released
So over the weekend as a Hackoberfest project, I decided to update a project that hadn’t been touched in five years.
That project is Colourettu, I library I wrote several years back to do some basic colour theme management. The last release was version 2.0.0, released in November 2016, basically five years ago. If feels a little bit like cheating to work on my own project for Hackoberfest, but it is officially allowed and the project could use a little love, and it is Open Source. So I don’t feel too bad about it.
Five years ago, Python 3.5 was the most recent Python version out, and the project had recently dropped official 2.6 support, but was still officially supporting Python 2.7. Today, the oldest version of Python supported is 3.6, and version 3.10 just came out a few days ago. Also, I’m not longer worried about supporting Python 2.
But even having gone through that many Python updates, I actually didn’t need to make any changes to actual code base. Most of the changes I needed to do were actually related to the support services around the project. The most significant was the switch from Travis-CI to GitHub Actions for automated testing. Five years ago, Travis was basically the best and only way to do automated testing on pull requests; today it’s faded away. Although it was still technically online today, I couldn’t figure out how to get Travis to work at all. And without an obvious free option with Travis, it seemed like a good time to move to GitHub Actions. Setting up GitHub Actions proved rather straightforward, with the only missing piece being how to mark a particular case as an “allowed failure” (readers, any suggestions?).
There were a couple of other random updates: a couple of private forks for packages used by the documentation site had to be updated to provide PEP-440 compatible version numbers. I also had to adjust the format of math formulas in the documentation to make Sphinx 4 happy. I also updated the release script; I was running an earlier version of minchin.releaser that I’ve since updated and packaged. The most changes were due to black-ify-ing the codebase.
So I was happily surprised at how well this “old” Python code ran; hopefully the next five years will prove as boring!
Changelog
See my previous post for earlier changelog entries.
Version 2.1.1 — October 5, 2021
- bug Documentation: fix formula rendering for Sphinx 4.2
Version 2.1.0 — October 5, 2021
- feature Pull Request 148 various updates to ensure that the package is still installable (and hackable) on current versions of Python
- bug Pull Request 148 proofread documentation
- support Issue 7 upgrade to minchin.releaser package. Colourettu was previously using an early vendorized version of this.
- support Pull Request 147 update minimum versions of several dependencies to remove support for version with known security issues.
- support Pull Request 148 drop official support for Python < 3.6, including dropping support for Python 2. I haven’t changed anything in the codebase that I expect will break these earlier versions, but I’m no longer testing against them.
- support Pull Request 148 switch to personal fork of PSphinxTheme and lconf lexer (i.e. basically the documentation theme) as to provide versions that can be installed with current versions of pip. Specifically, these private version provide PEP440-style version numbers.
- support Pull Request 148 black-ify codebase
- support Pull Request 148 update isort to v5
- support Pull Request 149 swap from Travis-CI to GitHub Actions for Continuous Integration
Ben Cook
How the NumPy append operation works
Anyone familiar with Python will know about the list append method:
a = [1, 2, 3]
a.append(4)

print(a)

# Expected result
# [1, 2, 3, 4]
But what if you want to append to a NumPy array? In that case, you have a couple options. The most common thing you’ll see in idiomatic NumPy code is the np.concatenate() operation which concatenates two or more arrays along a given axis.
NumPy does have an np.append() operation that you can use instead, but you have to be a little careful because the API has a some weirdness in it.
For 1-D arrays, np.append() works as you might expect (the same as Python lists):
np.append(np.zeros(3), 1)

# Expected result
# array([0., 0., 0., 1.])
You don’t get .append() as a method on an ndarray but you can stick a single value onto the end of a vector. Where it becomes weird is when you try to append N-D arrays.
Check this out. Let’s start with a 3×3 identity matrix both Python and NumPy:
x = np.eye(3)
print(x)

# Expected result
# [[1. 0. 0.]
#  [0. 1. 0.]
#  [0. 0. 1.]]

python_x = x.astype(int).tolist()
print(python_x)

# Expected result
# [[1, 0, 0], [0, 1, 0], [0, 0, 1]]
So far so good. There are differences in how the arrays get printed to the screen and the underlying data type of the values, but basically x and python_x have the same data.
Now append the same data to each of them:
python_x.append([1, 0, 0])
print(python_x)

# Expected result
# [[1, 0, 0], [0, 1, 0], [0, 0, 1], [1, 0, 0]]

np.append(x, [1, 0, 0])

# Expected result
# array([1., 0., 0., 0., 1., 0., 0., 0., 1., 1., 0., 0.])
Notice: Python list append adds a row to the matrix, whereas NumPy flattens the original array and appends a flattened array to it, leaving us with an array that has a different rank than the inputs.
This behavior is clearly laid out in the np.append() documentation, but it’s strange if you’re expecting the standard Python approach to work. If you want to append a row to a 2D array in NumPy, you need to 1) make sure the appended value has the same number of dimensions and 2) specify the axis:
np.append(x, [[1, 0, 0]], axis=0)

# Expected result
# array([[1., 0., 0.],
#        [0., 1., 0.],
#        [0., 0., 1.],
#        [1., 0., 0.]])
Or you can just use np.concatenate() like everybody else:
np.concatenate([x, [[1, 0, 0]]])

# Expected result
# array([[1., 0., 0.],
#        [0., 1., 0.],
#        [0., 0., 1.],
#        [1., 0., 0.]])
You still have to match the number of dimensions in all inputs, but the behavior is less likely to surprise future readers of your code.
The post How the NumPy append operation works appeared first on Sparrow Computing.
PyCharm
PyCharm 2021.3 EAP 2
The second PyCharm 2021.3 EAP build is out!
The Early Access Program is designed to give you a chance to try all the improvements to PyCharm and provide actionable feedback that will help ensure that PyCharm users enjoy a smooth experience with the stable release. Don’t hesitate to share your thoughts on topics such as the overall product performance, the version’s look and feel, bugs, new features, and more.
Feel free to share your feedback on Twitter (by mentioning @pycharm)) or by reporting issues to our tracker!

Important! PyCharm EAP builds are not fully tested and might be unstable.
The Toolbox App is the simplest way to get the EAP builds and keep both your stable and EAP versions up to date. You can also manually download the EAP builds from our website.
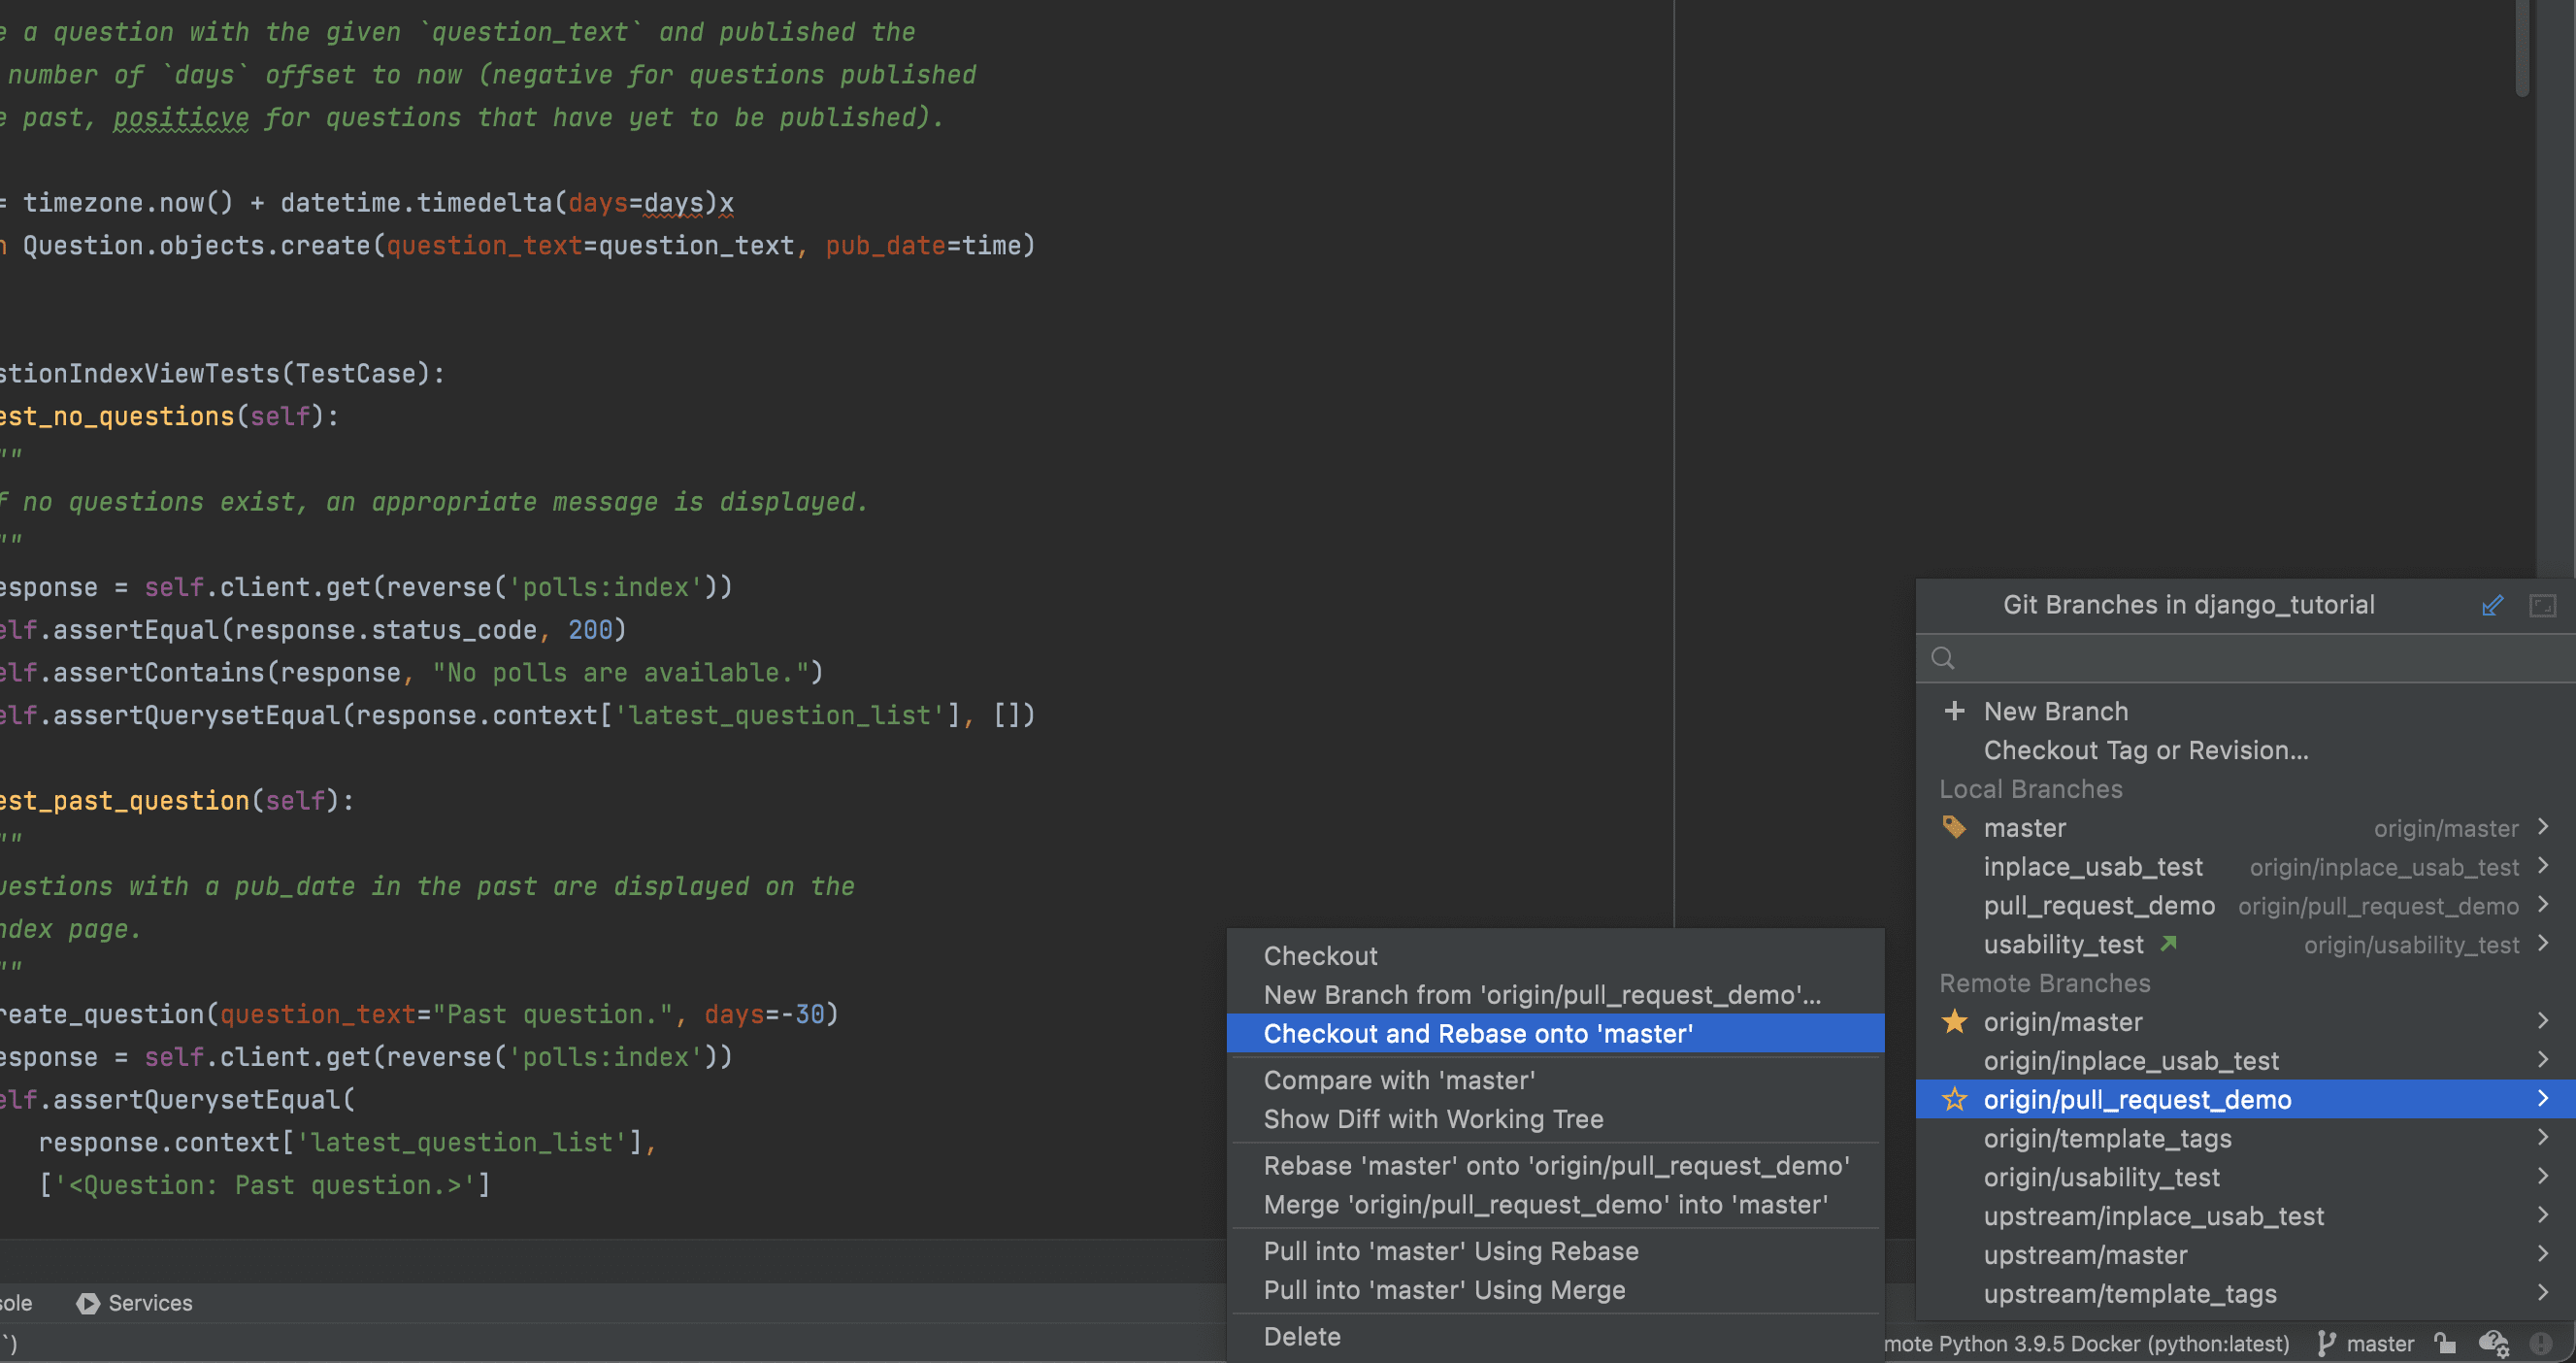
Checkout and Rebase onto Current (remote branches)
This build brings some changes to the version control UI. The Checkout and Rebase onto Current action allows you to check out the selected branch and rebase it on top of a branch that is currently checked out. Until now, it has only been available for local branches. Starting from this EAP, it’s also available for remote branches.
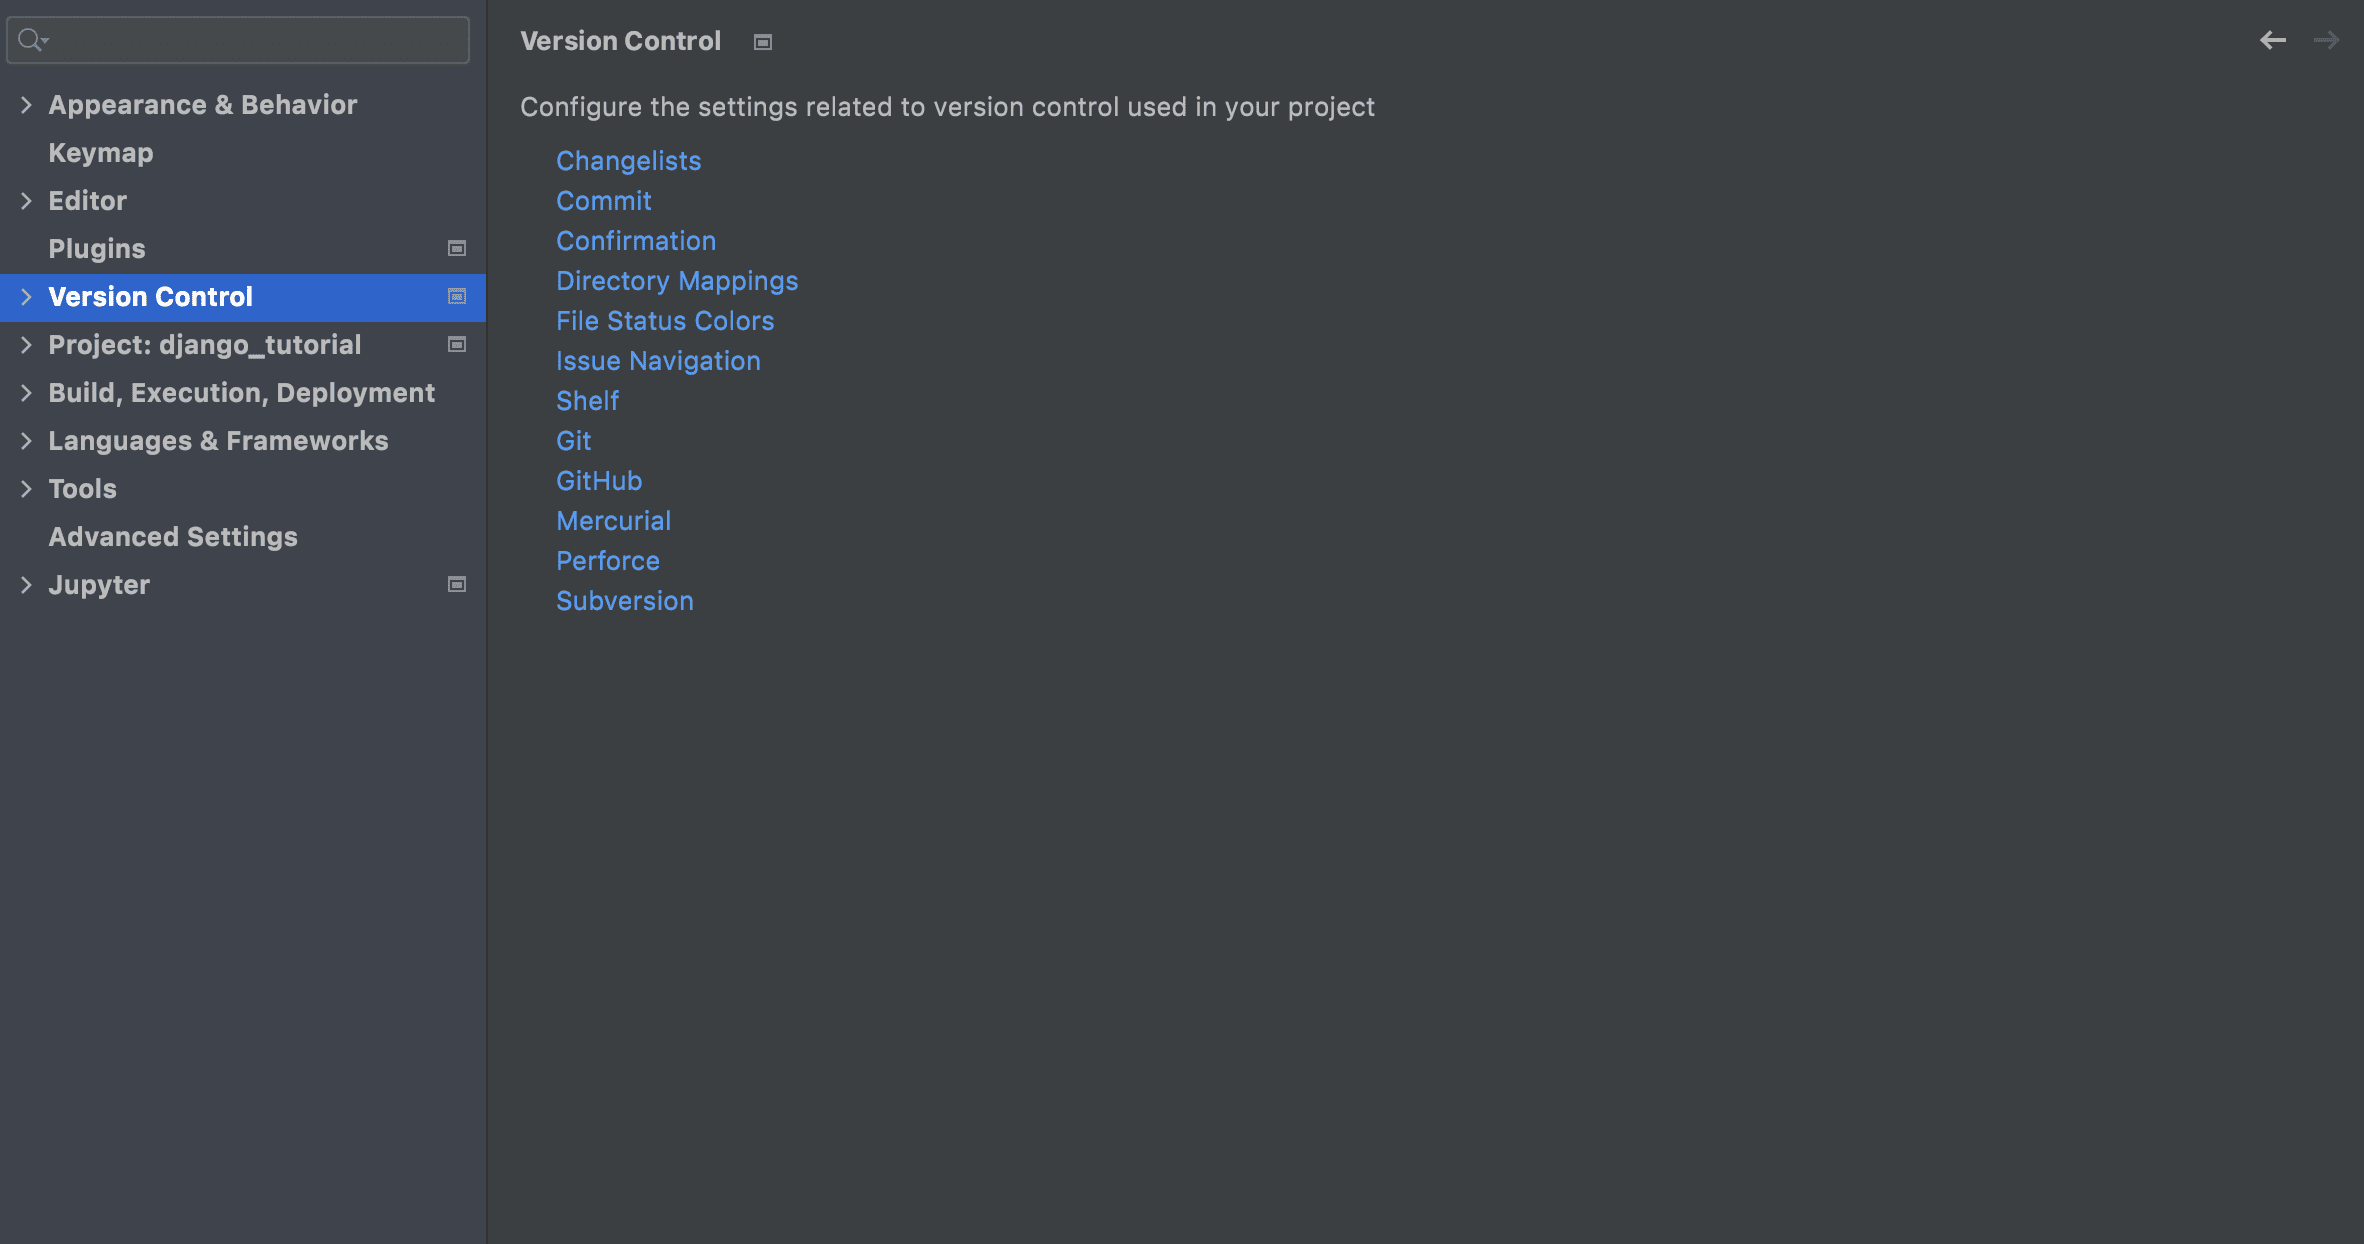
Reorganized VCS settings
To make it easier and faster for you to configure your VCS, we’ve made the VCS settings more discoverable and structured. This is what you will find in Preferences / Settings | Version Control.
The Version Control node now lists all the available settings, and you can quickly navigate to the settings by clicking on them.
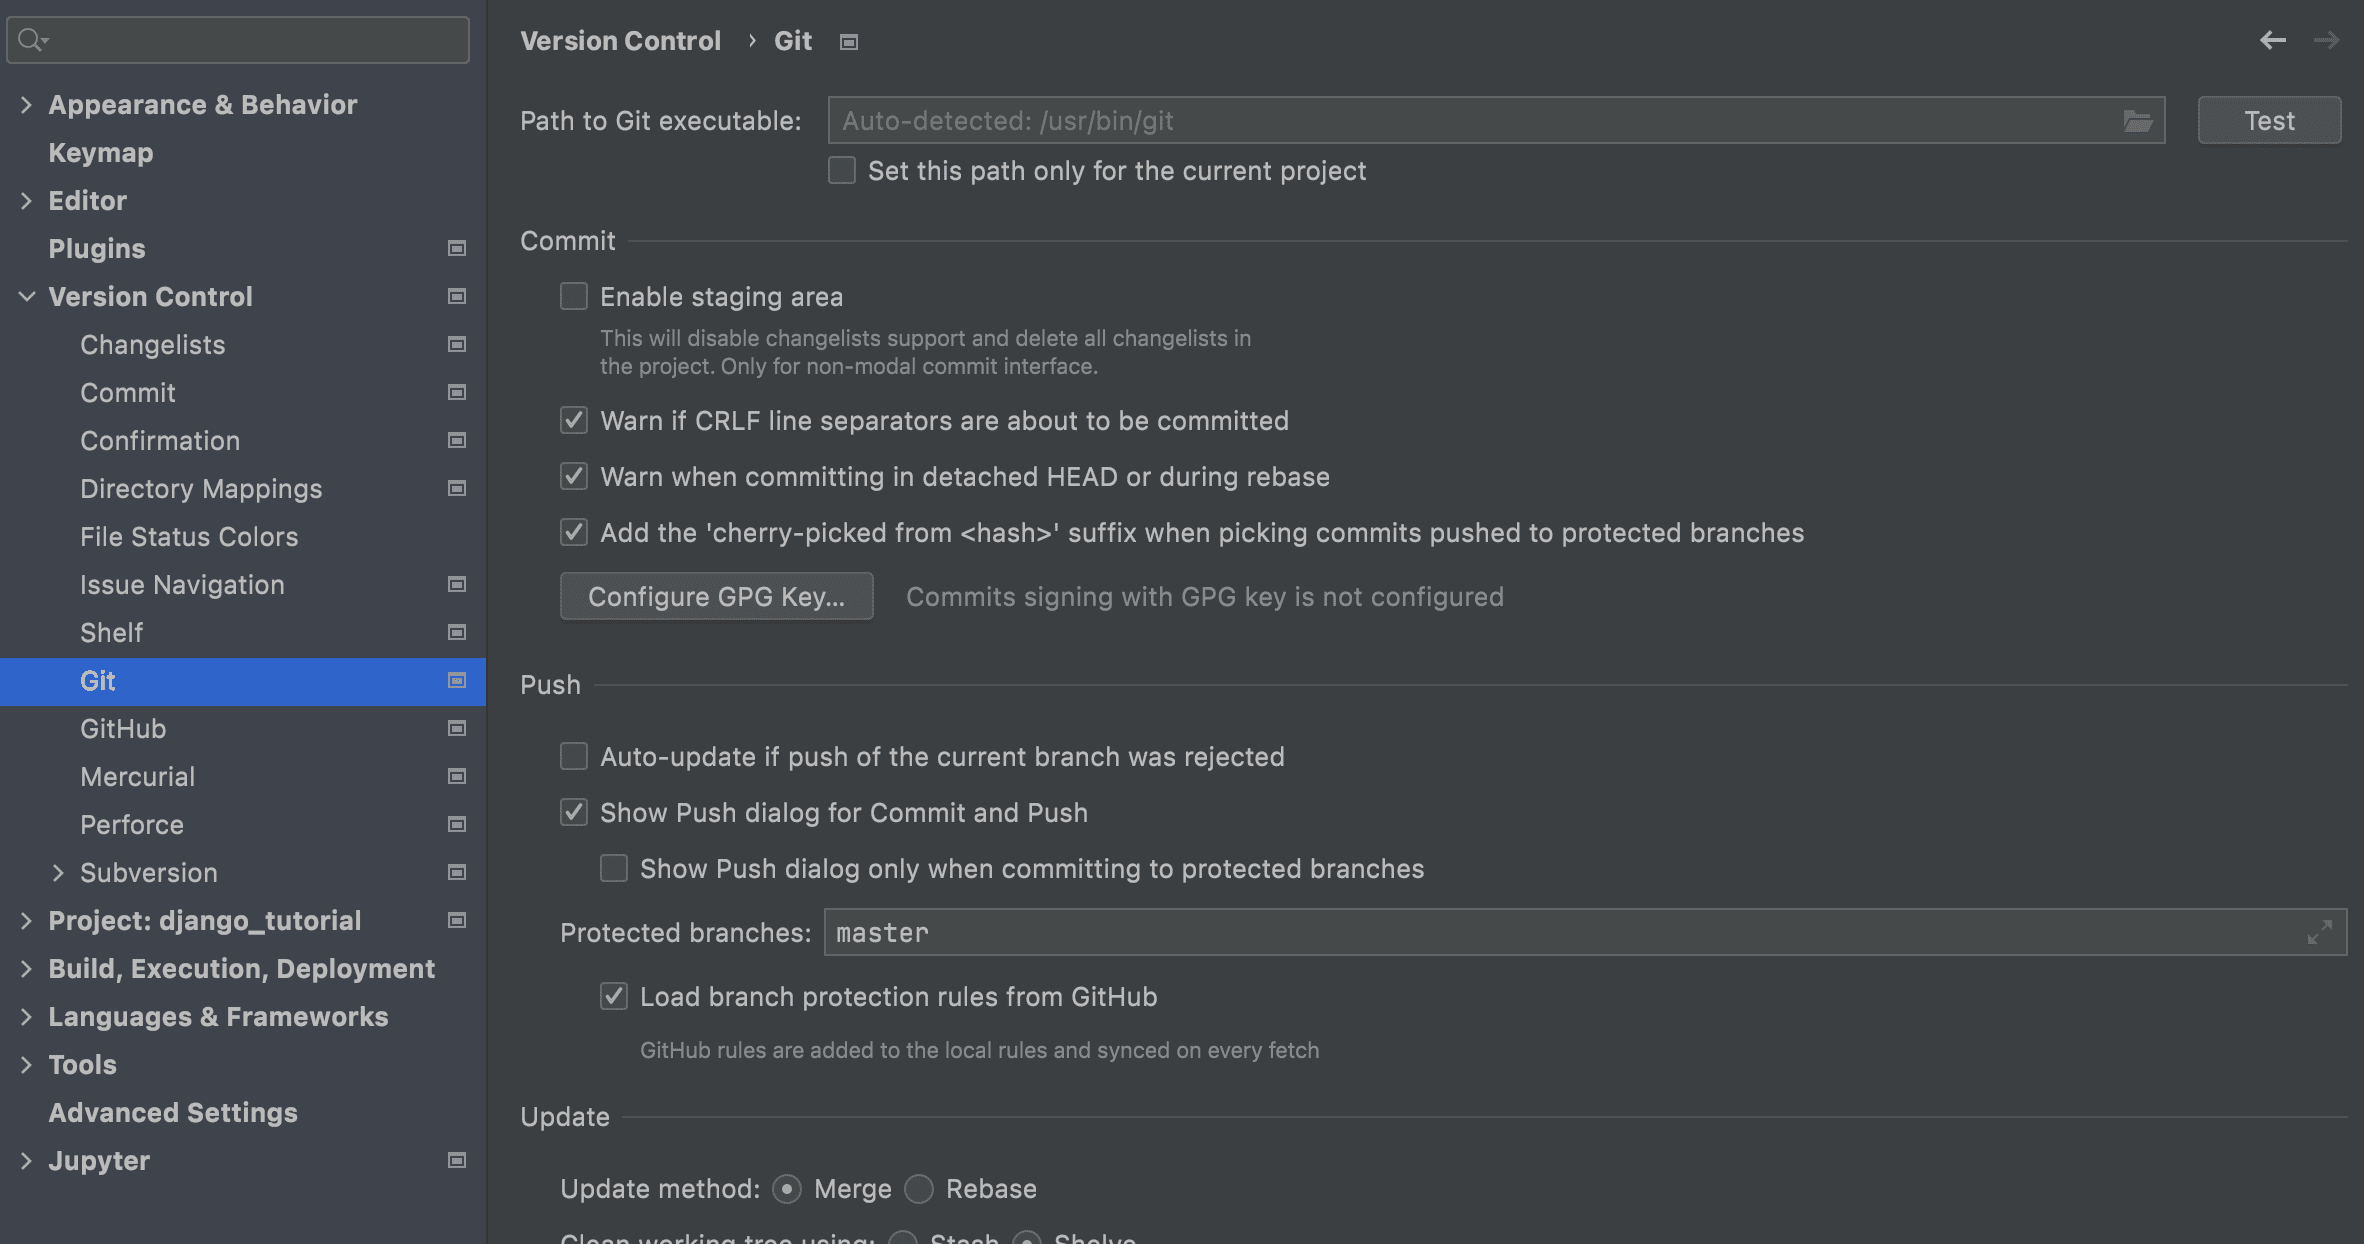
We improved the layout inside the Git node. We divided all the settings into sections that account for the most important processes: Commit, Push, and Update. Additionally, the parameters inside these sections are now organized more logically.
We’ve also added a separate node for Directory mappings, and the background operations are now switched on by default. The previous Background node no longer exists.
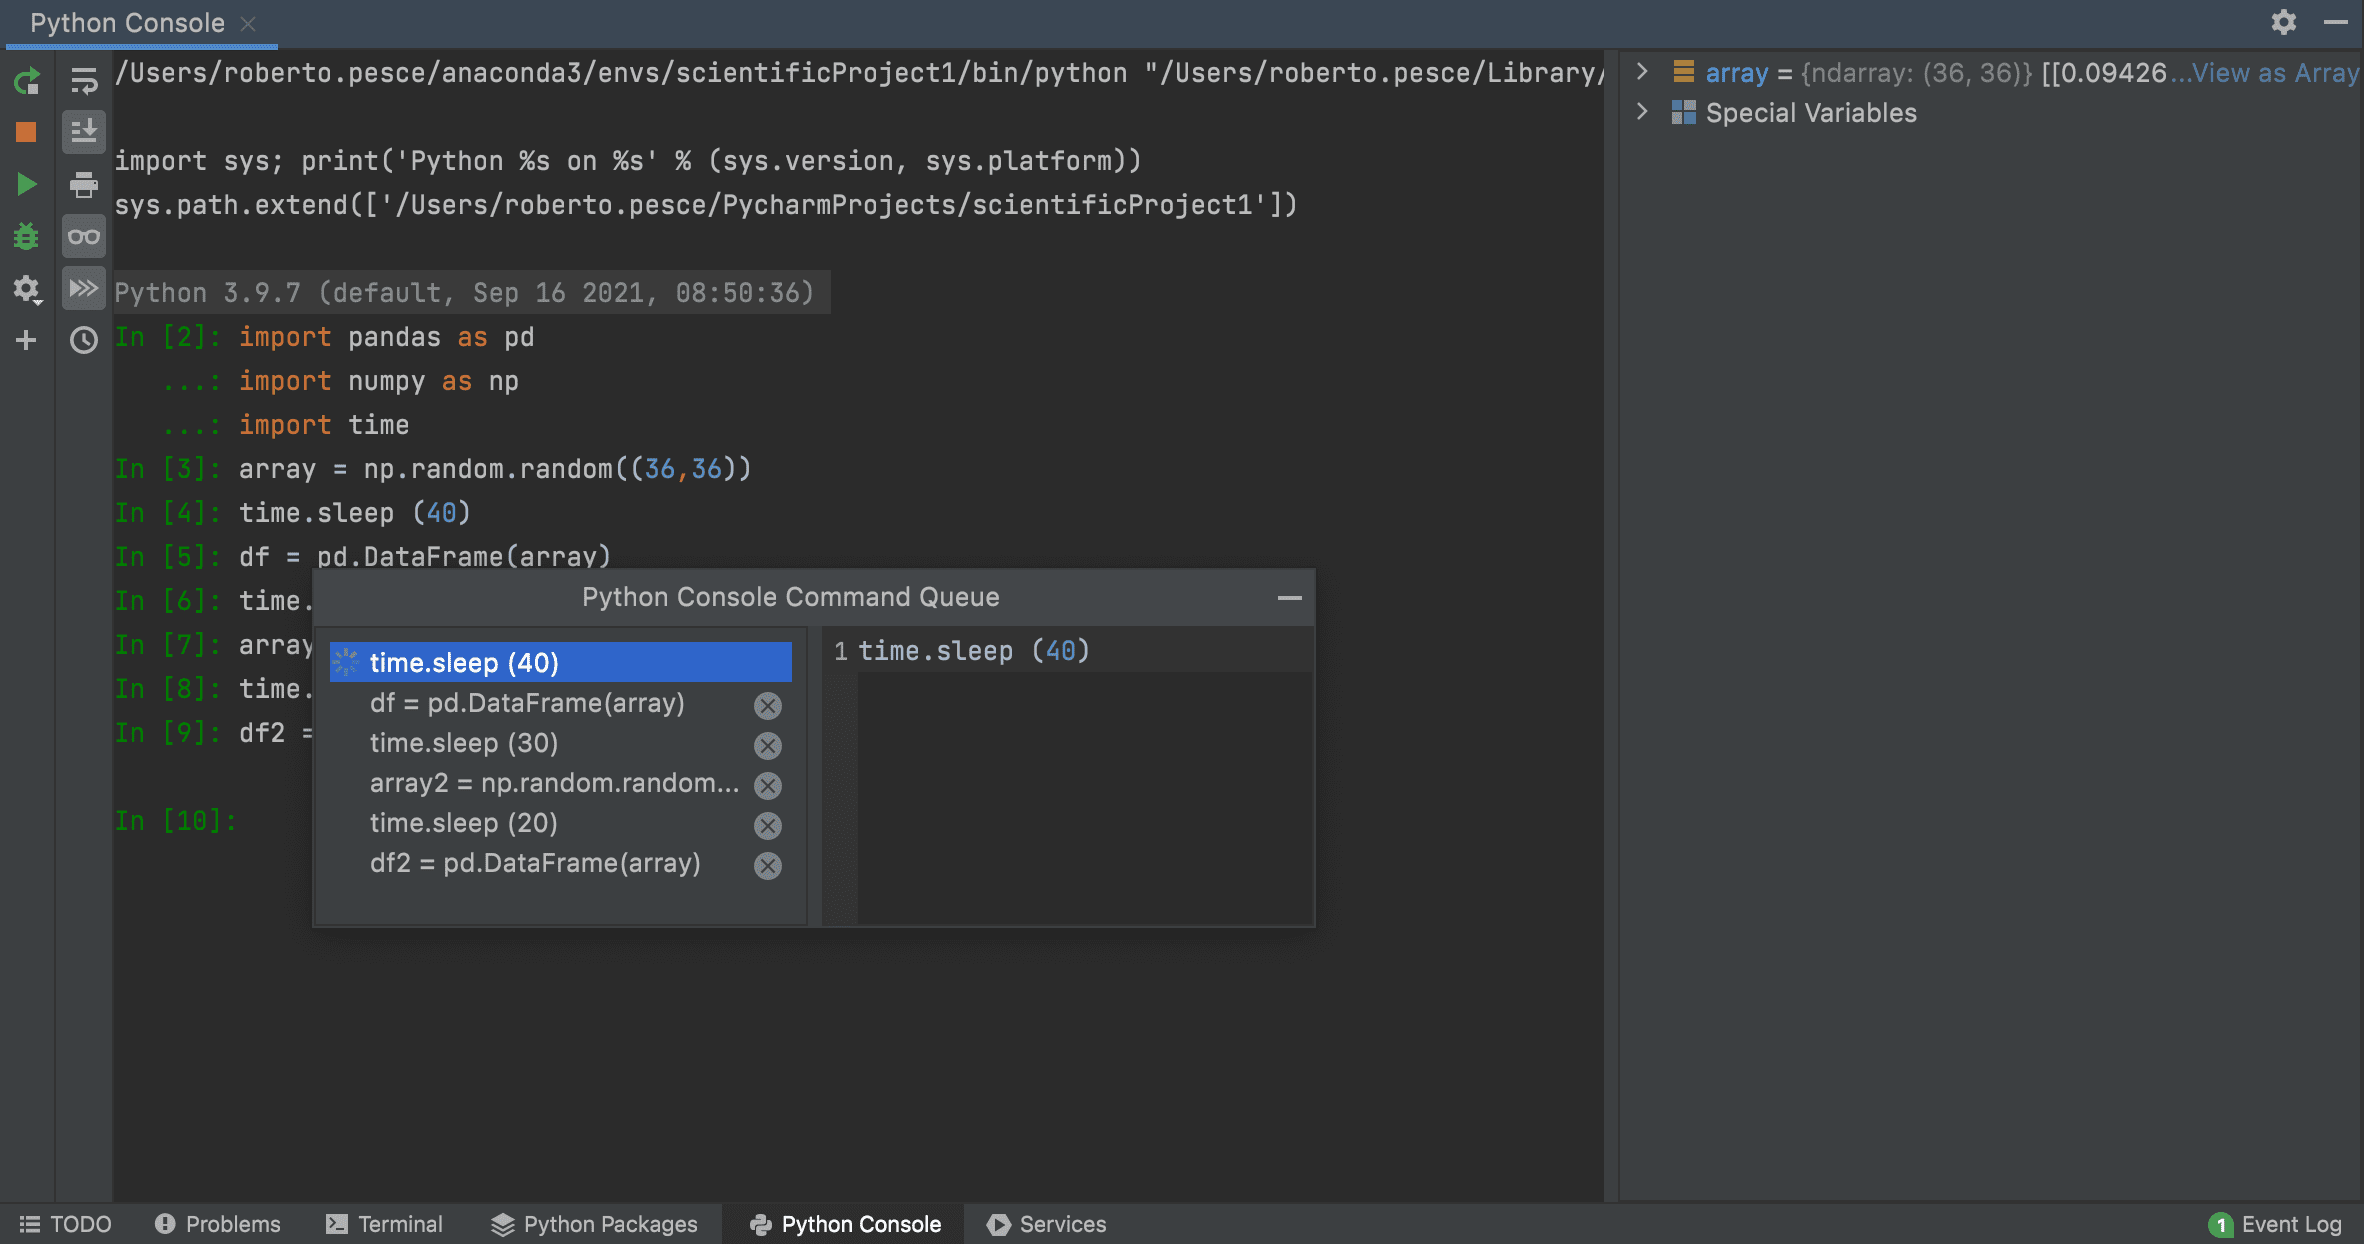
Command execution queue in the Python Console
You no longer need to wait for one cell to finish its execution in order to run the next command in the Python Console. PyCharm will now add your commands to a execution queue, and execute them in order. You can also click the Command queue icon on the console toolbar to inspect and manage the queue.
Notable fixes available in this build:
- Allow creating/editing Run Configurations during indexing
(PY-50717). - You can now turn off smart list editing in Markdown. Go toPreferences / Settings | Languages and Frameworks | Markdown, and deselect Automatic assistance in the editor checkbox (IDEA-273049).
- We fixed a known issue that made the IDE crash on Linux (IDEA-248140).
- The Diff tab now shows the correct file name when comparing files (IDEA-269958).
- Fixed recurring indexing on every startup if the IDE was closed due to OS shutdown (IDEA-275337)
- Fixed the autosave feature so it works as expected even with open pop-ups (IDEA-128672).
Ready to join the EAP?
Some ground rules
- EAP builds are free to use and expire 30 days after the build date.
- You can install an EAP build side by side with your stable PyCharm version.
- These builds are not fully tested and can be unstable.
- our feedback is always welcome. Please use our issue tracker and make sure to mention your build version.
How to download
You can download this EAP from our website. Alternatively, you can use the JetBrains Toolbox App to stay up to date throughout the entire EAP. If you’re on Ubuntu 16.04 or later, you can use snaps to get PyCharm EAP and stay up to date.
The PyCharm team
Real Python
Python's sum(): The Pythonic Way to Sum Values
Python’s built-in function sum() is an efficient and Pythonic way to sum a list of numeric values. Adding several numbers together is a common intermediate step in many computations, so sum() is a pretty handy tool for a Python programmer.
As an additional and interesting use case, you can concatenate lists and tuples using sum(), which can be convenient when you need to flatten a list of lists.
In this tutorial, you’ll learn how to:
- Sum numeric values by hand using general techniques and tools
- Use Python’s
sum()to add several numeric values efficiently - Concatenate lists and tuples with
sum() - Use
sum()to approach common summation problems - Use appropriate values for the arguments in
sum() - Decide between
sum()and alternative tools to sum and concatenate objects
This knowledge will help you efficiently approach and solve summation problems in your code using either sum() or other alternative and specialized tools.
Free Bonus: Click here to get a Python Cheat Sheet and learn the basics of Python 3, like working with data types, dictionaries, lists, and Python functions.
Understanding the Summation Problem
Summing numeric values together is a fairly common problem in programming. For example, say you have a list of numbers [1, 2, 3, 4, 5] and want to add them together to compute their total sum. With standard arithmetic, you’ll do something like this:
1 + 2 + 3 + 4 + 5 = 15
As far as math goes, this expression is pretty straightforward. It walks you through a short series of additions until you find the sum of all the numbers.
It’s possible to do this particular calculation by hand, but imagine some other situations where it might not be so possible. If you have a particularly long list of numbers, adding by hand can be inefficient and error-prone. What happens if you don’t even know how many items are in the list? Finally, imagine a scenario where the number of items you need to add changes dynamically or unpredictably.
In situations like these, whether you have a long or short list of numbers, Python can be quite useful to solve summation problems.
If you want to sum the numbers by creating your own solution from scratch, then you can try using a for loop:
>>> numbers = [1, 2, 3, 4, 5]
>>> total = 0

>>> for number in numbers:
...     total += number
...

>>> total
15
Here, you first create total and initialize it to 0. This variable works as an accumulator in which you store intermediate results until you get the final one. The loop iterates through numbers and updates total by accumulating each successive value using an augmented assignment.
You can also wrap the for loop in a function. This way, you can reuse the code for different lists:
>>> def sum_numbers(numbers):
...     total = 0
...     for number in numbers:
...         total += number
...     return total
...

>>> sum_numbers([1, 2, 3, 4, 5])
15

>>> sum_numbers([])
0
In sum_numbers(), you take an iterable—specifically, a list of numeric values—as an argument and return the total sum of the values in the input list. If the input list is empty, then the function returns 0. The for loop is the same one that you saw before.
You can also use recursion instead of iteration. Recursion is a functional programming technique where a function is called within its own definition. In other words, a recursive function calls itself in a loop:
>>> def sum_numbers(numbers):
...     if len(numbers) == 0:
...         return 0
...     return numbers[0] + sum_numbers(numbers[1:])
...

>>> sum_numbers([1, 2, 3, 4, 5])
15
When you define a recursive function, you take the risk of running into an infinite loop. To prevent this, you need to define both a base case that stops the recursion and a recursive case to call the function and start the implicit loop.
In the above example, the base case implies that the sum of a zero-length list is 0. The recursive case implies that the total sum is the first value, numbers[0], plus the sum of the rest of the values, numbers[1:]. Because the recursive case uses a shorter sequence on each iteration, you expect to run into the base case when numbers is a zero-length list. As a final result, you get the sum of all the items in your input list, numbers.
Note: In this example, if you don’t check for an empty input list (your base case), then sum_numbers() will never run into an infinite recursive loop. When your numbers list reaches a length of 0, the code tries to access an item from the empty list, which raises an IndexError and breaks the loop.
With this kind of implementation, you’ll never get a sum from this function. You’ll get an IndexError every time.
Another option to sum a list of numbers in Python is to use reduce() from functools. To get the sum of a list of numbers, you can pass either operator.add or an appropriate lambda function as the first argument to reduce():
>>> from functools import reduce
>>> from operator import add

>>> reduce(add, [1, 2, 3, 4, 5])
15

>>> reduce(add, [])
Traceback (most recent call last):
    ...
TypeError: reduce() of empty sequence with no initial value

>>> reduce(lambda x, y: x + y, [1, 2, 3, 4, 5])
15
Read the full article at https://realpython.com/python-sum-function/ »
[ Improve Your Python With 🐍 Python Tricks 💌 – Get a short & sweet Python Trick delivered to your inbox every couple of days. >> Click here to learn more and see examples ]
Quansight Labs Blog
Using Hypothesis to test array-consuming libraries

Over the summer,
I've been interning at Quansight Labs
to develop testing tools
for the developers and users
of the upcoming Array API standard.
Specifically,
I contributed "strategies"
to the testing library Hypothesis,
which I'm excited to announce
are now available in hypothesis.extra.array_api.
Check out the primary pull request I made
for more background.
This blog post is for anyone developing array-consuming methods (think SciPy and scikit-learn) and is new to property-based testing. I demonstrate a typical workflow of testing with Hypothesis whilst writing an array-consuming function that works for all libraries adopting the Array API, catching bugs before your users do.
Read more… (12 min remaining to read)
Stack Abuse
Getting Started with GitHub Actions - Software Automation
Introduction
In this guide, we'll take a look at what GitHub actions are, how they work, and build a workflow using Python to showcase how you can use GitHub actions to automate tasks.

Since its inception in 2008, GitHub has grown to become the de facto leader in development project hosting. A community-oriented idea to allow all of our favourite open-source programs free hosting in one central place blew up. GitHub became so popular, that it became synonymous with git; you'll find dozens of articles online explaining how git is not the same as GitHub, and vice-versa.
On it's 10 year anniversairy, a big company acquired GitHub for 7.5 billion dollars. That company's name is Microsoft. GitHub acquisition aside, building WSL and having many open-source projects like VS Code, .NET and TypeScript, just to name a few, Microsoft changed the development game and the general public's opinion on the company's invasion of privacy that was Windows 10.
Community-oriented as it still may be, GitHub's next goal was to start making some revenue - by entering the enterprise scene. Cue - GitHub Actions.
Taking a Look at Existing Enterprise Solutions
At the time of Microsoft getting its hands on GitHub, the enterprise scene for software development was already established by a few big players:
- Atlassian's BitBucket allowed for seamless integration with Jira and Trello, the leaders in issue management and organization.
- Amazon's CodeCommit allowed organizations using AWS to never leave the comforts of one UI and one CLI tool.
- GitLab, with it's DevOps-oriented approach aimed to centralize the entire development process under one roof.
In the past few years GitHub has managed to add many of it's enterprise competition's features, including CI/CD
CI/CD and Automation
Modern software development relies heavily on automation, and for a simple reason - it speeds things up. New versions are automatically built, tested and deployed to the appropriate environments.
All it takes is a single effort to write up a couple of scripts and configure a few machines to execute them. GitHub's offering of such features comes in the form of GitHub Actions
An Overview of GitHub Actions
At the time of writing this guide, GitHub Actions are less than two years old. Despite its young age, the feature has matured pretty well due to it being a feature of GitHub.
The Community
Countless users jumped aboard and started getting to know the ins and outs of GitHub Actions and started writing up their own reusable modules (or actions) and shared them with the rest of the world. GitHub heavily relies on such contributions in its marketing model. Currently there are over 9,500 different actions which allow you to, in a few lines of code, set up your environments, run linters and testers, interact with numerous major platform APIs etc. All without ever installing any software besides git and your favourite editor.
Worfklows
We define our automated process through workflows. They are YAML files which contain, among other things, the name of our workflow, trigger events, jobs and steps of our pipeline and runners to perform them.
YAML
YAML Ain't a Markup Language or YAML (a recursive acronym) is a language mostly used for writing configuration files. It is often preferred over JSON for easier writing and readibility. Even though JSON is faster in terms of serialization, and much more strict, YAML is used in places where speed is not of great importance.
If you've never had expirience with YAML, I highly encourage you to visit Learn X in Y minutes, where X=YAML.
If you're somewhat experienced, I recommend reading about some of YAML's idiosyncrasies and gotchas.
Trigger Events
The on keyword specifies one or more GitHub (note: not just git) events that will trigger the workflow. The event can be very broad, e.g. on every push to the repository, or very specific, e.g. every time a pull request gets a new comment.
The events can also be scheduled in a cron-like fashion:
name: my workflow
on:
  push:
    branches: [main, test]
Here, we've got a trigger event set for every push to either main or test branch. Another way to register triggers is on a schedule, such as:
name: my nightly build workflow
on:
  schedule:
    cron: '0 22 * * *'
This is a nighly build scheduled for 10PM every day.
Jobs
So far, we've given our workflow a name and configured different events that trigger it. The jobs keyword lists actions that will be executed. One workflow can hold multiple jobs with multiple steps each:
jobs:
  job1:
    steps:
      .
      .
  job2:
    steps:
      .
      .
By default, all jobs run in parallel, but we can make one job wait for the execution of another using the needs keyword:
jobs:
  job1:
    steps:
      .
      .
  job2:
    needs: job1
    steps:
      .
      .
  job3:
    needs: [job1, job2]
    steps:
      .
      .
Ensuring jobs execute successfully one by one.
We can also independently configure each job's environment, or run a job across multiple configurations using the matrix strategy. The documentation notes:
A matrix allows you to create multiple jobs by performing variable substitution in a single job definition.
Here's an example of a matrix build configured to work on multiple platforms:
jobs:
  ubuntu_job:
    runs-on: ubuntu-latest
    steps:
      .
      .
  multi_os_job:
    runs-on: {{matrix.os}}
    strategy:
      matrix:
        os: [ubuntu-latest, windows-2016, macos-latest ]
    steps:
      .
      .
Actions
Actions are reusable modules which can be placed in workflows as any other job or step. They can both take inputs and produce outputs. The community marketplace is rich with many bootstrap actions for preparing environments; we will be using a few today.
You can write your own actions as either docker containers or by using vanilla JavaScript and contribute to the marketplace, or keep them to yourself.
An action can easily be referenced in a workflow like any other step in the list:
jobs:
  compile_code:
    runs-on: ubuntu-latest
    steps:
      - name: check out repo
        uses: actions/checkout@v2
      - name: compile code
        run: gcc main.c
      .
      .
Here, we can see an example of using actions like any other step. Note that steps are, unlike jobs, always executed consecutively.
Runners
Runners, otherwise known as agents or workers, are machines which are tasked with executing your workflows. Each runner can be set up differently. For example, GitHub offers runners in the three most popular OS flavors - Ubuntu, Windows and MacOS.
GitHub offers their own runners, but you can also opt to host your own runner with the GitHub Actions runner application configured.
Pricing
GitHub runners can execute workflows for free if the repository is public, and the monthly threshold doesn't exceed 2000 minutes.
Teams and Enterprises have their own pricing categories (typical) with different perks and prices, at $4/user per month and $21/user per month respectively, as of writing this guide.
For a complete overview of GitHub's plans, check out GitHub's updated pricing page.
Artifacts - Workflow Persistent Data
Since GitHub runners are temporarily available, so is the data they process and generate. Artifacts are data that can remain available on the repository page after the execution of runners and need to be uploaded with the special upload-artifact action.
The default retention time period is 90 days, but that can be changed:

The overview screen greets us with a lot of data, including the number of the workflow run, a list of all jobs that are queued for execution or have already executed, the visual representation of different jobs and their connections, as well as any artifacts produced by the workflow.
GitHub Actions in Practice - A Python Benchmarker
Note: this example uses a repository created for this article, which can be found, unsurprisingly, on GitHub.
Let's combine what we've covered into a fullly-fledged workflow. We will be creating a Python benchmarker workflow which we will place in .github/workflows/benchmark.yml.
The workflow will be triggered on every push to the main branch.
name: python version benchmarker

on:

push:
  branches: [main]
The workflow consists of three stages.
The Lint Stage
The first job is tasked with linting the contents of benchmarker.py, making sure that it has a score of at least 8.0:
jobs:
  pylint:
    runs-on: ubuntu-latest
      steps:
        - uses: actions/checkout@v2 				# checkout repo
        - uses: actions/setup-python@v2				# set up environment for python
            with:
              python-version: 3.7
        - uses: py-actions/py-dependency-install@v2 # install dependencies from requirements.txt
            with:
              path: requirements.txt
        - name: run pylint, fail under 8.5
          run: pip install pylint; pylint benchmarker.py --fail-under=8
Benchmark
We will be running the benchmark across 6 different versions and implementations of python, failing if the code isn't compatible with all of them (configured with fail-fast parameter of the matrix strategy, which is true by default):
  benchmark:
    runs-on: ubuntu-latest
    needs: pylint
    outputs:
      pypy2: ${{ steps.result.outputs.pypy2 }}
      pypy3: ${{ steps.result.outputs.pypy3 }}
      py2-7: ${{ steps.result.outputs.py2-7 }}
      py3-6: ${{ steps.result.outputs.py3-6 }}
      py3-7: ${{ steps.result.outputs.py3-7 }}
      py3-8: ${{ steps.result.outputs.py3-8 }}
    strategy:
      matrix:
        include:
        - python-version: pypy2
          out: pypy2
        - python-version: pypy3
          out: pypy3
        - python-version: 2.7
          out: py2-7
        - python-version: 3.6
          out: py3-6
        - python-version: 3.7
          out: py3-7
        - python-version: 3.8
          out: py3-8
    steps:
    - uses: actions/checkout@v2
    - name: setup py
    uses: actions/setup-python@v2
     with:
        python-version: ${{matrix.python-version}}
    - name: save benchmark stats
      id: result
      run: |
        echo "::set-output name=${{matrix.out}}::$(python benchmarker.py)"
Let's take a more detailed look at this, to see some finer issues you can come accross when using GitHub Actions. The outputs keyword specifies key:value pairs that a job can produce and allow other jobs to reference. The key value is the name of the output and the value is a reference to a particular output of a step with a given id.
In our case the step with an id: result will produce an output based on the matrix' value of the python-version which had to be modified and provided with the out parameter since GitHub's object access syntax doesn't allow dots in object names, as well as having numbers on the first position.
There was no inherent way of placing outputs in a single json and referencing steps.result.outputs as a JSON object - which can be done for read-only purpose as we will see in the following stage. Each output must instead be defined explicitly.
Uploading to Pastebin and Creating a New Artifact
The third and final stage will read the previous stage's outputs and compile them into a single file. That file will be uploaded as an artifact as well as uploaded to pastebin.
In order to make a post request to pastebin we will need to configure an account and then use its API key:
  pastebin:
    runs-on: ubuntu-latest
    needs: benchmark
    steps:
      - uses: actions/checkout@v2
      - uses: actions/setup-python@v2
        with:
          python-version: 3.9
      - uses: py-actions/py-dependency-install@v2
        with:
          path: requirements.txt
      - name: use benchmark data
        run: echo '${{ toJSON(needs.benchmark.outputs) }}' > matrix-outputs.json
      - name: pastebin API request
        env:
          PASTEBIN_API_KEY: ${{ secrets.PASTEBIN_API_KEY }}
        run: python pastebin.py
      - name: upload newly created artifact
        uses: actions/upload-artifact@v2
        with:
          name: benchmark-stats
          path: newpaste.txt
The secret is placed as a job's environment variable to be easily accessed with os.environ[PASTEBIN_API_KEY] in Python.
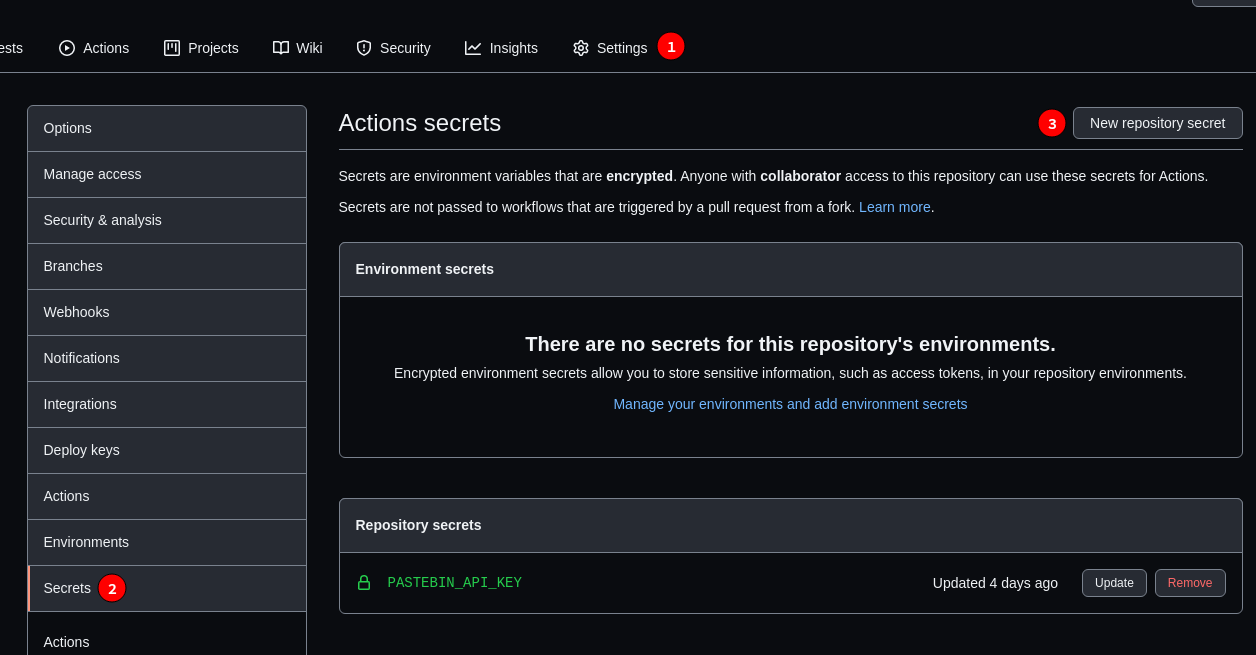
Secrets management in GitHub
GitHub offers a safe place for secrets on a repository or project-wide level. To save a secret, navigate to the repository Settings and add a new value in the Secrets tab:
When Not to Choose GitHub Actions as a CI/CD Tool?
Even though we've seen the potential of this new feature of GitHub, there are some things to consider; things that may be dealbrakers and make you search for an automation tool elsewhere:
- GitHub's offering of runners is pretty lacking. With 2 cores and 8GB of RAM, they are good for running linters and testing; but don't even think about some serious compilation.
- REWRITE Workflow debugging can be an unpleasant experience. There is no way of re-running a single job but re-running the entire workflow. If the final step is encountering issues, you'll either have to rewrite the workflow to make troubleshooting a bit more bearable or wait for the entire workflow to run before getting to your point of troubleshooting.
- No support for distributed builds.
Conclusion
GitHub Actions have matured a lot in the past few years, but not enough. Still, the potential is there. With the best API out of all git platforms, and with the innovative approach of writing actions in JavaScript, all backed up by the largest git community in the world - there is no doubt that GitHub Actions has the potential to take over the entire CI/CD game. But not yet.
For now, use this tool for simple compiling/packaging or to append tags to your commits while the enterprise still relies on the likes of Jenkins, Travis CI and GitLab CI.
Made With Mu
Announcing Mu version 1.1.0-beta.6

We’re delighted to announce that beta 6 of Mu is here (get it from from the download page)!
As always, since this is a beta release and may contain bugs or unfinished features. Please provide bug reports or feedback via GitHub.
One of the characteristics of this release is that it contains contributions from several folk who are not regular core members of the volunteer Mu developers team. This is a healthy sign as it proves three things:
- Folks see value in and care about Mu.
- The Mu project itself is friendly and welcoming to new contributors.
- Our codebase is small and simple enough that it’s easy to make changes.
Many thanks to everyone who has contributed to this release. Your work is really appreciated.
So, what’s new?
- Carlos fixed some packaging problems relating to the iPython kernel bundled with Mu.
- Martin fixed a couple of problems relating to the stopping of child processes (Flask and scripts stopped via KeyboardInterrupt in Linux).
- The web mode checks for the availability of templates in the local directory tree before starting up. If a template directory isn’t found in the expected location, then the user sees a helpful message describing the problem and what they need to do to fix it.
- Mu’s splash screen no longer always appears on top of everything else on the user’s desktop. The splash screen now also logs the progress of installing the various packages needed on first install. Thanks to Carlos for these changes.
- A new admin/settings option has been added to allow users to manually change the translation Mu uses for its interface. Updating this setting requires a restart of Mu. Zander contributed the icon/glyph to indicate the relevant tab is for translation related settings (not entirely obvious if Mu’s UI is using a language you don’t understand and you’re looking for the setting that relates to translations). The icon makes this clear.
- On some desktop windowing systems there is a bug that means windows re-open at a position higher up the screen, and so may appear off the top of the screen. We’ve ensured this never happens with Mu. If Mu starts with any part of the window off the screen, the window is moved to be within the dimensions of the screen. This was a weird one to track down and fix.
- Many thanks to Ethan Spoelstra who contributed a change so Crostini on ChromeOS is used to return the correct CIRCUITPY path if it exists.
- Huge thanks to Keith Packard for several contributions to this release of Mu. Keith refactored the way in which Mu handles pasting in the REPL window so it works correctly and more broadly across operating systems.
- Keith also fixed some font related issues in the REPL.
- Keith was on fire with a couple more contributions relating to SVG icons in the buttons in Mu. We’re very grateful to Ben Williams for putting in the work to make our button icons SVG files. Keith made the code changes to implement this.
- Thanks to Miro Hrončok for pointing out a change in Python 10 which would break some of our UI calls into PyQt, and who provided a patch to fix things.
- Some minor clarifications in our developer documentation.
We’re getting close to a 1.1.0-final, with some virtual environment fixes and translation related work remaining to be done.
That’s it..! :-)
October 05, 2021
PyCoder’s Weekly
Issue #493 (Oct. 5, 2021)
#493 – OCTOBER 5, 2021
View in Browser »

Python 3.10: Cool New Features for You to Try
Explore some of the coolest and most useful features in Python 3.10. You’ll appreciate more user-friendly error messages, learn about how you can handle complicated data structures with structural pattern matching, and explore new enhancements to Python’s type system.
REAL PYTHON
Data Elixir: Data Science Newsletter

Data Elixir is an email newsletter that keeps you on top of the tools and trends in Data Science. Covers machine learning, data visualization, analytics, and strategy. Curated weekly with top picks from around the web →
DATA ELIXIR sponsor
Python 3.10 Release Party Stream
A recording of the Python 3.10 Release Stream with Pablo Galindo, CPython Core Developer and Python 3.10 Release Manager, and Leon Sandøy.
YOUTUBE.COM video
Python 3.11 Will Get “Zero Cost” Exception Handling
With “Zero-cost” exceptions the cost of try statements is almost eliminated when no exception is raised.
PYTHON.ORG
Discussions
What Defines a Number in Python? The Question May Be Harder Than You Think…
Static type-checkers such as Mypy have grown increasingly popular in recent years in the Python community, yet it’s surprisingly difficult to write a type hint that will accept any number. This answer on Stack Overflow digs into why.
STACK OVERFLOW • Shared by Alex Waygood
Why Does It Feel Like Everyone Is Trying to Play Code Golf?
Why explicit is better than implicit, or in Martin Fowler’s words: “Any fool can write code that a computer can understand. Good programmers write code that humans can understand.”
REDDIT
Python Jobs
Senior Python Engineer at Moody's AI & ML Center of Excellence (New York, NY, USA)
Senior Software Engineer (Washington D.C.)
Senior Backend Software Engineer (Anywhere)
Software Engineer (Anywhere)
Articles & Tutorials
Make Your Python App Interactive With a Text User Interface
Have you wanted to create a Python application that goes further than a command-line interface? You would like it to have a friendly interface but don’t want to make a GUI (Graphical User Interface) or web application. Maybe a TUI (Text User Interface)would be a perfect fit for the project. This week on the show, it’s Will McGugan talking about his projects Textual and Rich.
REAL PYTHON podcast
Multiple Queues With Django Celery: When and How to Use Them
How to work with multiple queues in Celery, when you need it and how to set it up. The tutorial includes file processing and DNS lookups for domains of email addresses. Also, docker-compose.yml is covered for local development.
APPLIKU.COM
Accelerate Your Python Apps With Apache Cassandra™ NoSQL. Register for an Astra DB Demo

Scale data for your Django, Flask, FastAPI apps with our multi-cloud, serverless DBaaS–built on Apache Cassandra™. Painless APIs, free for developers. Get 80 Gigabytes of Storage Free Every Month. Explore Astra DB now →
DATASTAX sponsor
Hosting a Django Project on Heroku
In this step-by-step project, you’ll learn about hosting Django projects in the cloud using Heroku, a platform-as-a-service (PaaS) provider used by many startups and developers.
REAL PYTHON
Proportional Fonts and Yapf vs Black
How to set up VSCode to deal nicely with proportional fonts and set up automated code formatting that leads to a visually pleasing result.
NELSON MINAR
Code Style Matters
An article about the importance of having a consistent Python coding style and tools that can help you achieve this goal.
RODRIGO GIRÃO SERRÃO
An Intro to Python Editors
Learn about some of the most popular Python editors in this tutorial. Includes info on PyCharm, WingIDE, VSCode, and IDLE
MIKE DRISCOLL
PostgreSQL vs Python for Data Evaluation: What, Why, and How
A primer on using PostgreSQL to more efficiently perform your data evaluation tasks done in Excel, R, or Python.
MIRANDA AUHL
Receive a $5 Donation to the OSS of Your Choice When You Deploy Your Free Scout APM Trial Today
Scout is performance monitoring designed to provide the data insights necessary for any dev to become a performance pro. Find and fix observability issues before your customers notice by connecting your error reporting and APM data on one platform.
SCOUT APM sponsor
Docker Best Practices for Python Developers
A look at several best practices to make your Dockerfiles and images cleaner, leaner, and more secure.
AMAL SHAJI • Shared by Amal Shaji
Create a Stunning PDF Flyer in Python With borb
This guide shows you how to create a nice-looking PDF flyer in Python using the borb PDF library.
JORIS SCHELLEKENS • Shared by Joris Schellekens
Writing Python Extensions in Assembly
How to write a CPython Extension in 100% assembly.
ANTHONY SHAW
How SQL Injection Is Explored: Using IBM and Python as Example
GUILHERME LATROVA • Shared by Guilherme Latrova
Projects & Code
wonk: Combine AWS Policy Files Into Smaller Compiled Policy Sets
GITHUB.COM/AMINOHEALTH • Shared by Kirk Strauser
Events
Real Python Office Hours (Virtual)
October 6, 2021
REALPYTHON.COM
PyCon ZA 2021
October 7 to October 9, 2021
PYCON.ORG
Canberra Python Meetup
October 7, 2021
MEETUP.COM
Sydney Python User Group (SyPy)
October 7, 2021
SYPY.ORG
Reunión Python Valencia
October 7, 2021
GOOGLE.COM
Python Miami
October 9 to October 10, 2021
PYTHONDEVELOPERSMIAMI.COM
PyDelhi User Group Meetup
October 9, 2021
MEETUP.COM
Happy Pythoning!
This was PyCoder’s Weekly Issue #493.
View in Browser »
[ Subscribe to 🐍 PyCoder’s Weekly 💌 – Get the best Python news, articles, and tutorials delivered to your inbox once a week >> Click here to learn more ]
Mike Driscoll
PyBites Podcast: Episode #043 - Becoming a prolific Python content provider
This week, Mike Driscoll (author of this website), is on the PyBites Podcast. It's titled Episode #043 - Becoming a prolific Python content provider
You can listen to the podcast on PyBites.
In the podcast, the hosts and I talk about:
- how Mike got into programming and Python (and the importance of community),
- how Mike uses Python at work for an automated test framework (to test C++ GUI apps),
- how Mike got into Python content creation through blogging and later writing 9 (!) books,
- how to keep up with new technology,
- how to stay consistent and motivated in producing content,
- the fundamental skills as a Python developer these days,
- dealing with imposter syndrome (realizing you might have more to bring to the table than you think!)
- learning new libraries, the benefit of pair programming (for both junior and senior engineers),
- and more ...
The post PyBites Podcast: Episode #043 - Becoming a prolific Python content provider appeared first on Mouse Vs Python.
Real Python
Cool New Features in Python 3.10
Python 3.10 is out! Volunteers have been working on the new version since May 2020 to bring you a better, faster, and more secure Python. As of October 4, 2021, the first official version is available.
Each new version of Python brings a host of changes. You can read about all of them in the documentation. Here, you’ll get to learn about the coolest new features.
In this course, you’ll learn about:
- Debugging with more helpful and precise error messages
- Using structural pattern matching to work with data structures
- Adding more readable and more specific type hints
- Checking the length of sequences when using
zip() - Calculating multivariable statistics
[ Improve Your Python With 🐍 Python Tricks 💌 – Get a short & sweet Python Trick delivered to your inbox every couple of days. >> Click here to learn more and see examples ]
Python for Beginners
Closures in Python
You might have heard about decorators in Python. Decorators are implemented using a closure. In this article, we will study closures in python. To understand closures in a better way, we will first study nested functions and free variables as these are prerequisites for understanding a closure in python.
What is a Nested Function?
A nested function is a function defined inside another function. By scoping rules, a nested function can access all the variables defined in its enclosing function. A nested function can use any non-local variable from its enclosing function but we cannot modify the nonlocal variable because it is in read-only mode by default. This can be understood from the following example.
def enclosing_function():
   myVar = 1117
   print("It is enclosing function which encloses a nested function.")

   def nested_function(val):
       print("I am in nested function and I can access myVar from my enclosing function's scope.")
       print("The value of myVar is:", myVar)
       temp = myVar + val
       print("Value after adding {} to {} is {}.".format(val, myVar, temp))

   nested_function(10)


# Execution
enclosing_function()
Output:
It is enclosing function which encloses a nested function.
I am in nested function and I can access myVar from my enclosing function's scope.
The value of myVar is: 1117
Value after adding 10 to 1117 is 1127.
In the above code, we have defined an enclosing function named enclosing_function. In that, we have defined a nested function named nested_function. Here, you can observe that we can access a variable declared inside enclosing_function in the nested_function.
To modify the non-local variables inside the nested function, you may declare the non-local variables using the nonlocal keyword.
What is a Free Variable?
In a program, we can access a variable only within the scope in which it is declared. In other words, If we declare a variable inside the scope of a function or a code block, it can be accessed only within that scope. If we try to access the variable outside the scope, a NameError exception will occur.
In some cases like nested functions, we can access a variable outside the scope where it is defined. Such variables that can be accessed outside the scope in which they have been declared are called free variables. In the above example, myVar is a free variable as we can access it inside the nested_function.
Now that we have understood the concept of nested functions and free variables, let us see what a closure is in Python.
What are Closures in Python?
The closure is a technique with which we can attach data to a code. To implement a closure in Python, we use free variables and nested functions. After defining a nested function inside the enclosing function, we return the nested function using the return statement. Here the nested function should use a free variable to create a closure. If the nested function is using a free variable, the nested function is called the closure function.
A closure function allows you to use a variable even if the scope in which it was defined has been removed from the memory. By using the closure function, we can access the free variable that was defined in the enclosing function even if the scope of the enclosing function has been destroyed. Thus, the data in the enclosing function gets attached to the code in the closure function.
Conditions for Closures to Exist in Python
For a closure to exist in Python, certain conditions should be satisfied. These conditions are as follows.
- There should be a nested function defined inside an enclosing function.
- The nested function should access variables from the enclosing function.
- The enclosing function should return the nested function.
Example of a Closure in Python
Having studied the concept behind closure in Python, let us look at an example to understand the concept in a better way. Following is a python program to create a function that adds a random number to the input.
import random


def random_addition():
   values = [123, 1123, 11123, 111123, 1111123]

   def nested_function(val):
       x = random.choice(values)
       temp = x + val
       print("Value after adding {} to {} is {}.".format(val, x, temp))

   return nested_function


# Execution
random_function = random_addition()
random_function(10)
random_function(23)
random_function(24)
Output:
Value after adding 10 to 123 is 133.
Value after adding 23 to 1123 is 1146.
Value after adding 24 to 111123 is 111147.
In the above code, we have defined an enclosing function named random_addition. In random_addition, we have a list of numbers. Inside random_addition, We have defined a nested_function which takes a number as input and adds a random number from the list of numbers defined in random_addition to the input value and prints the output.
If you will observe the code, you can see that the function random_addition is executed only once in the program and it returns the nested function which is assigned to the random_function variable. Once the execution of random_addition is completed, its scope is wiped out from the memory. But, we can execute the random_function any number of times and each time we access the values defined in the random_addition function. It happens even if the scope of random_addition is not present in the memory. This means that the data has been attached to the code which is the main function of a closure in Python.
Conclusion
In this article, we have discussed nested functions, free variables, and closures in Python. A closure is a wonderful tool to use if you want to avoid the use of global variables. Closures are also used in implementing decorators in python. To learn more about python programming, you can read this article on list comprehension. You may also like this article on the linked list in Python.
The post Closures in Python appeared first on PythonForBeginners.com.
Stack Abuse
Handling File Uploads with Django
Introduction
The World Wide Web facilitated the transfer of huge amounts of data between networked computers, and it's a community that creates and shares data in abundance. This data can take various forms and shapes, and some common human-interpretable format are images, videos, and audio files.
Users are so used to file sharing within a wide variety of software, that its novelty is far-gone, and its functionality is oftentimes considered standard.
In this guide, we'll take a look at how to upload a file with Python, to a Django-based web application.
Files that are uploaded can be additionally processed in various forms, or could be left in their raw state. Uploading files also raises a question of storage (where the files end up) as well as display (how they can be retrieved and displayed). Throughout the guide, we'll be taking these questions into consideration, building a small project that offers a user the ability to upload files to a Django web application.
Project Setup
We will be building a small project where we can implement file upload, storage, and display functionalities of Django, with a database, however, storing the images on a hard drive.
Let's assume we live in an imaginary universe where we live alongside the magical creatures of the Harry Potter books, and the magi-zoologists of our world need an application to keep track of information regarding each magical creature they study. We will create a form through which they can log descriptions and images for each beast, then we will render that form, store the information and display it to the user when needed.
If you're unfamiliar with Django and its modules, such as
django-admin- you can read out general guide to creating REST APIs that cover the basic elements of Django. Throughout this guide, we'll assume basic knowledge of Django and quickly go through the setup process, though, if you'd like to gain deeper understanding of the project creation process, read our Guide to Creating a REST API in Python with Django!
We start by creating a virtual environment to avoid having our dependencies cause version mismatch issues with other projects. This step is optional, but highly recommended, and considered good practice for keeping Python environments clean. Let's create a directory that will act as a container for the environment.
Open your command prompt/shell and inside the directory we've just created, run:
$ mkdir fileupload
$ cd fileupload
$ python -m venv ./myenv
# OR
$ python3 -m venv ./myenv
Now that our virtual environment has been created, all that's is left to do is to activate it, by running the activate script:
# Windows
$ myenv/Scripts/activate.bat
# Linux
$ source myenv/Scripts/activate
# MacOS
$ source env/bin/activate
Once the environment is activated, if we install dependencies, they'll only be applicable to that environment, and won't collide with other environments, or even the system environment. Here, we can install Django via pip:
$ pip install "Django==3.0.*"
Now, let's create a project, named fantasticbeasts via the startproject command of the django-admin module. Once a project skeleton has been created, we can move into that directory and start the app via startapp:
$ django-admin startproject fantasticbeasts
$ cd fantasticbeasts
$ django-admin startapp beasts
And finally, let's register this app in the fantasticbeasts/settings.py file, by adding it to the list of INSTALLED_APPS:
INSTALLED_APPS = [
    'beasts',
    'django.contrib.admin',
    'django.contrib.auth',
    'django.contrib.contenttypes',
    'django.contrib.sessions',
    'django.contrib.messages',
    'django.contrib.staticfiles',
]
Awesome! Now we are all set. We can define a simple model for a Beast, create a form and template to display it to an end user, as well as handle the files they send through with the form.
Uploading Files with Django
Creating the Model
Let's start off by defining a model of a Beast, which directly matches to a database table. A form can then be created to represent a blank slate of this model, allowing the user to fill in the details. In the beasts/models.py file, we can define a model that extends the models.Model class, which then inherits the functionality to be saved in the database:
from django.db import models

class Beast(models.Model):
    MOM_CLASSIFICATIONS = [
    ('XXXXX', 'Known Wizard  Killer'),
    ('XXXX', 'Dangerous'),
    ('XXX', 'Competent wizard should cope'),
    ('XX', 'Harmless'),
    ('X', 'Boring'),
 ]
    name = models.CharField(max_length=60)
    mom_classification = models.CharField(max_length=5, choices=MOM_CLASSIFICATIONS)
    description = models.TextField()
    media = models.FileField(null=True, blank=True)
Each beast has a name, description, accompanying media (sightings of the beast) as well as a mom_classification (M.O.M stands for Ministry of Magic).
media is an instance of a FileField which was initialized with the null argument set to True. This initialization lets the database know that it is okay for the media field to be null if the user entering the data simply doesn't have any media to attach. Since we'll be mapping this model to a form - and Django takes care of the validation for us, we need to let Django know that the form's input for the media can be blank, so it doesn't raise any exceptions during validation. null refers to the database, while blank refers to the user-end validation, and generally, you'll want these two to be set to the same value for consistency.
Note: If you'd like to enforce the addition of media by the user, set these arguments to False.
A FileField by default will only handle one file, and allow the user to upload a single item from their file system. In a later section, we'll take a look at how to upload multiple files as well.
Creating the Model Form
Once our model is defined, we'll bind it to a form. We don't need to do this manually on the front-end, as Django can bootstrap this functionality for us:
from django.forms import ModelForm
from .models import Beast

class BeastForm(ModelForm):
    class Meta:
        model = Beast
        fields = '__all__'
We just created a BeastForm and bound the Beast model to it. We also set the fields to __all__ so all of our model's fields would be displayed when we use it on an HTML page. You can individually tweak the fields here if you'd like some to stay hidden, though, for our simple model - we'll want to display them all.
Registering Models with Admin
Django automatically creates an admin-site for developers to use throughout the development process. Here, we can test out our models and fields without having to spin up pages ourselves. For users, though, you'll want to create them, and disable the admin website before going live.
Let's register our model to the admin website by adding it to the beasts/admin.py file:
from django.contrib import admin
from .models import Beast

admin.site.register(Beast)
Registering URL Paths
With the application structure ready, a model defined and registered, as well as bound to a form - let's configure the URL paths that will allow a user to use this application. To do this, let's create a urls.py file inside our app. Then we can go on and "include" its content in the project-level urls.py file.
Our beasts/urls.py will look something like this:
from django.urls import path
from .import views

urlpatterns = [
	path("", views.addbeast,  name='addbeast')
 ]
And the project-level [urls.py] will have this added:
urlpatterns = [
    path("", include("reviews.urls"))
]
We are adding an empty string for our URL simply because this is a pocket-size project, and there is no need to complicate it. We haven't already created a view, but registered its name here before its creation. Let's create the HTML template and the views.addbeast view next.
Creating a Template to Display Our Form
To hold our templates, let's create a templates folder under our beasts directory. The name is non-negotiable because Django will look for HTML templates only under the folders named templates.
Inside our new folder, let's add an entry.html file that has a <form> that accepts the fields pertaining to a Beast:
<!DOCTYPE html>
<html lang="en">
<head>
    <meta charset="UTF-8">
    <meta http-equiv="X-UA-Compatible" content="IE=edge">
    <meta name="viewport" content="width=device-width, initial-scale=1.0">
    <title>Fantastic Beasts</title>
</head>
<body>
    <form action="/" method="POST" enctype="multipart/form-data">
        {% csrf_token %}
        {% for entry in form %}
           <div>
                {{ entry.label_tag }}
           </div>
           <div>
               {{entry}}
           </div>
        {% endfor %}
        <button>
            Save!
        </button>
    </form>
</body>
</html>
The action="/" attribute points to the request handler we'll be hitting when the user selects the "Save!" button. The input of the form dictates how the data is encoded, so we've set the enctype to a multipart/form-data type, to allow for file uploads. Whenever you add an input of type "file" to a Django form, you'll have to set the enctype to multipart/form-data.
The {% csrf_token %} is another must-have for any form with action = "POST". It is a unique token Django kindly creates for each client to ensure security when accepting requests. A CSRF token is unique to every POST request from this form, and they make CSRF attacks impossible.
CSRF attacks consist of malicious users forging a request in another user's stead, typically through another domain, and if a valid token is missing, the request to the server is rejected.
The form variable we are iterating in the for each loop ({% for entry in form %}) will be passed to this HTML template by the view. This variable is an instance of our BeastForm, and it comes with some cool tricks. We use entry.label_tag, which returns us the label for that Model Form field (the label will be the field's name unless otherwise specified), and we wrap the form field in a div to make our form look decent.
Creating a View to Render Our Template
Now, let's create a view to render this template and connect it to our back-end. We'll start out by importing the render and HttpResponseRedirect classes - both of which are built-in Django classes, alongside our BeastForm object.
Instead of a class-based view, we can opt to make a function-based view which serves well for simple prototypes and demos like this.
If the incoming request is a POST request, a new BeastForm instance is created with the body of the POST request (the fields) and the files sent through the request. Django automatically deserializes the body data into an object, and injects the request.FILES as our file field:
from django.shortcuts import render
from .forms import BeastForm
from django.http import HttpResponseRedirect

def entry(request):
    if request.method == 'POST':
        form = BeastForm(request.POST, request.FILES)

        if form.is_valid():
            form.save()
            return HttpResponseRedirect("/")
    else:
        form = BeastForm()

    return render(request, "entry.html", {
        "form": form
    })
To validate the input, as it may be invalid, we can use the is_valid() method of the BeastForm instance, clearing the form if it's invalid. Otherwise, if the form is valid - we save it to the database via the save() method, and redirect the user to the homepage (which is also our entry.html page), prompting the user to enter another beast's information.
Where are the files?
Note: Through this approach, the files are saved to the database and no file-handling is required. Although it works, this is not an advised strategy, and we'll rectify it with a proper file-handling system in the next section.
For now, let's make migrations and migrate to commit changes to the model schema (since we haven't done that before). Once we run the project, we can see how all this looks on the development server. From the terminal, while the virtual environment is still active, run:
$ python manage.py makemigrations
$ python manage.py migrate
$ python manage.py runserver
Now, once we hit http://127.0.0.1:8000/ using a browser, you should see something like this:
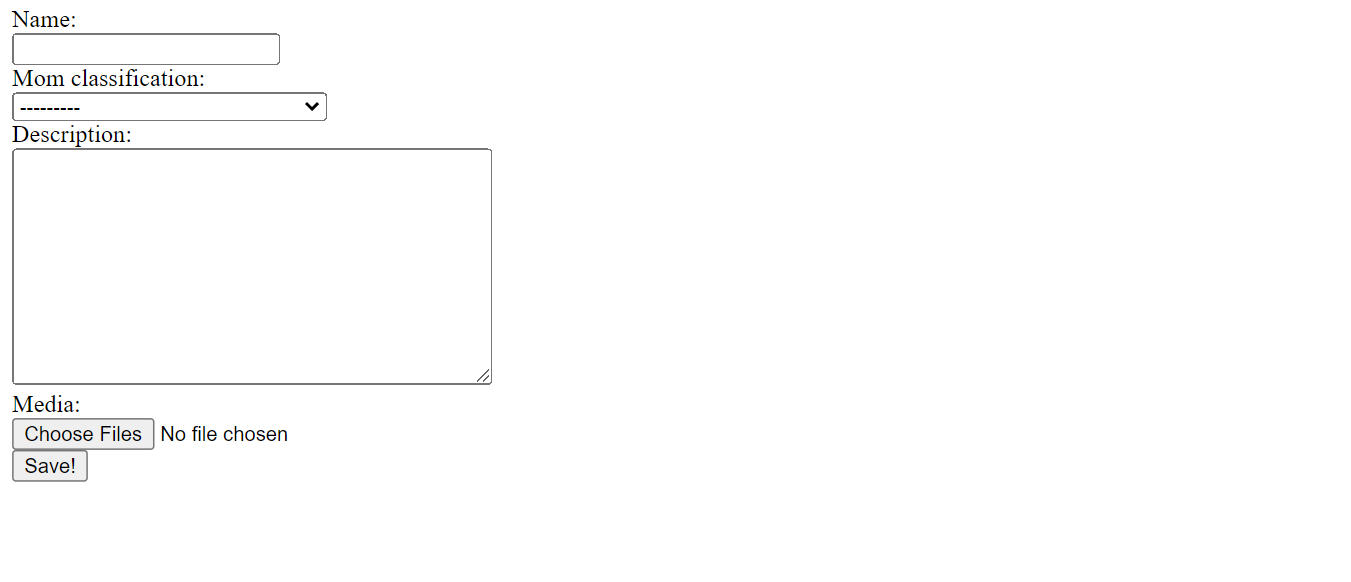
You can go ahead and fill in the form with some random input and add on a file; any file type will do since we named the field "media" but assigned it a FileField that is generic.
Note: You can enforce certain file types, such as images through Django, which we'll take a look at once we cover a more valid file-storing system, and handling multiple files instead of just one.
After submitting the form, you can see your data on the database through the admin page!
Storing Files on an HDD Instead of a Database
At the moment, our code is capable of storing the files in the database. However, this is not a desirable practice. With time our database will get "fat" and slow, and we do not want that to happen. Images haven't been stored in databases as blobs for a while now, and you'll typically save images on your own server where the application is hosted on, or on an external server or service such as AWS's S3.
If you'd like to read more about uploading files to services such as AWS S3 - read our Guide to Uploading Files to AWS S3 in Python with Django!
Let's see how we can store the uploaded files on disk, in a nice little folder under our project. To house them, let's add an uploads folder under beasts and modify the BeastForm's media field to aim at a folder instead of a database:
media = models.FileField(upload_to="media", null=True, blank=True)
We've set the FileField's target folder to "media", which doesn't yet exist. Since presumably other files could be uploaded, the uploads folder will have a subdirectory named "media" for users to upload images of beasts to.
To let Django know where this "media" directory is, we add it to the settings.py file:
MEDIA_ROOT = os.path.join(BASE_DIR, 'uploads/')
os.path.join(BASE_DIR, 'uploads/') appends "/uploads" to the BASE_DIR -the built-in variable that holds the absolute path to our project folder. MEDIA_ROOT tells Django where our files will reside.
Let's save all the changes we've made and once we apply our migrations, Django will create a folder named "media",as in [upload_to="media"], under uploads.
All the submitted files will get saved in that folder thereafter. Database bloat is fixed!
Uploading Multiple Files with Django
There is not much additional work required to handle the upload of multiple files. All we need to do is let our model's form know that it is okay for the media field to take in more than one input.
We do this by adding a widgets field in our BeastForm:
from django.forms import ModelForm, ClearableFileInput
from .models import Beast

class BeastForm(ModelForm):
    class Meta:
        model = Beast
		fields = '__all__'
        widgets = {
            'media': ClearableFileInput(attrs={'multiple': True})
        }
Now, when on the entry.html page, a user is allowed to select multiple files and the request.FILES property will contain more files rather than one.
Enforcing Image Files with Django using ImageField
Django defines an additional field type - an ImageField, that can limit the user input to image files. We have collected different types of files for our beasts' documentation, but more often than not, in our applications, we will ask the user for one specific file input.
Let's swap our FileField with an ImageField:
media = models.ImageField(upload_to="media", null=True, blank=True,)
The ImageField is on Pillow images, which is a widely-used Python library for handling and manipulating images, so if you don't have it already installed, you'll be prompted with an exception:
Cannot use ImageField because Pillow is not installed.
        HINT: Get Pillow at https://pypi.org/project/Pillow/ or run command "python -m pip install Pillow".
Let's go ahead and adhere to the terminal's advice. Quit the server for a moment to run:
$ python -m pip install Pillow
Now, if we go ahead and make and apply our migrations and run our development server, we'll see that when we try to upload a file, our options are limited to images.
Displaying Uploaded Images
We are very close to the finish line. Let's see how we can retrieve and display our stored images and call it a day.
Go ahead and open your beasts/views.py file. We will change our if clause so that when a form is submitted successfully, the view does not reload the page but, instead it redirects us to another one, which will contain a list of all beasts and their information, alongside their associated image:
 if form.is_valid():
      form.save()
      return HttpResponseRedirect("/success")
Now let's go ahead and create a view to render the success page. Inside our beasts/views.py file, insert:
def success(request):
    beasts = Beast.objects.order_by('name')
    return render(request, "success.html", {
        "beasts": beasts
    })
On our "success" page, we will list the names and images of the beasts in our database. To do that, we simply collect the Beast objects, order them by their name and render them in the success.html template:
<!DOCTYPE html>
<html lang="en">
<head>
    <meta charset="UTF-8">
    <meta http-equiv="X-UA-Compatible" content="IE=edge">
    <meta name="viewport" content="width=device-width, initial-scale=1.0">
    <title>Fantastic Beasts</title>
</head>
<body>
    {% for beast in beasts %}
       <div>
            {{ beast.name }}
       </div>
       {% if beast.media %}
        <div>
            <img src="{{ beast.media.url }}" width="500" height=auto alt="">
        </div>
       {% endif %}
    {% endfor %}
</body>
</html>
We have already mentioned that the database's job is not to store files, it's job is storing the paths to those files. Any instance of FileField or ImageField will have a URL attribute pointing to the file's location in the file system. In an <img> tag, we feed this attribute to the src attribute to display the images for our beasts.
By default, Django's security kicks in to stop us from serving any files from the project to the outside, which is a welcome security-check. Though, we want to expose the files in the "media" file, so we'll have to define a media URL and add it to the urls.py file:
In the settings.py file, let's add the MEDIA_URL:
MEDIA_URL = "/beast-media/"
Here, the /name-between/ can be anything you want, though it has to be wrapped around in quotes and slashes. Now, modify the project-level urls.py file to include a static folder that serves static files:
from django.contrib import admin
from django.urls import path, include
from django.conf import settings
from django.conf.urls.static import static

urlpatterns = [
    path('admin/', admin.site.urls),
    path("", include("ency.urls"))
]  + static(settings.MEDIA_URL, document_root=settings.MEDIA_ROOT)
The static() function maps the MEDIA_URL, to the actual path to where our files reside, MEDIA_ROOT. Requests that try to reach any of our files can get access via this MEDIA_URL, which is automatically prefixed to the [url] attribute of FileField and ImageField instances.
If we save our changes and go to our development server, we will now see everything works smoothly.
Note: This method can only be used in the development and only if the MEDIA_URL is local.
If you're not saving the files to your HDD, but a different service, read our Guide to Serving Static Files in Python With Django, AWS S3 and WhiteNoise!
Conclusion
In this guide, we've covered how to upload files, store files and finally, serve files with Django.
We have created a small application that is, for other than educational purposes, not very useful. However, it should be a sturdy stepping stone for you to start experimenting with file uploads.
Python Insider
Python 3.10.0 is available

On behalf of the Python development community and the Python 3.10 release team, I’m pleased to announce the availability of Python 3.10.0.
Python 3.10.0 is the newest major release of the Python programming language, and it contains many new features and optimizations.
https://www.python.org/downloads/release/python-3100/
Major new features of the 3.10 series, compared to 3.9
Among the new major new features and changes so far:
- PEP 623 – Deprecate and prepare for the removal of the wstr member in PyUnicodeObject.
- PEP 604 – Allow writing union types as X | Y
- PEP 612 – Parameter Specification Variables
- PEP 626 – Precise line numbers for debugging and other tools.
- PEP 618 – Add Optional Length-Checking To zip.
- bpo-12782: Parenthesized context managers are now officially allowed.
- PEP 632 – Deprecate distutils module.
- PEP 613 – Explicit Type Aliases
- PEP 634 – Structural Pattern Matching: Specification
- PEP 635 – Structural Pattern Matching: Motivation and Rationale
- PEP 636 – Structural Pattern Matching: Tutorial
- PEP 644 – Require OpenSSL 1.1.1 or newer
- PEP 624 – Remove Py_UNICODE encoder APIs
- PEP 597 – Add optional EncodingWarning
- PEP 619, 3.10 Release Schedule
- Report bugs at https://bugs.python.org.
bpo-38605: from __future__ import annotations (PEP 563) used to be on this list in previous pre-releases but it has been postponed to Python 3.11 due to some compatibility concerns. You can read the Steering Council communication about it here to learn more.
And now for something completely different
For a Schwarzschild black hole (a black hole with no rotation or electromagnetic charge), given a free fall particle starting at the event horizon, the maximum propper time (which happens when it falls without angular velocity) it will experience to fall into the singularity is `π*M` (in natural units), where M is the mass of the black hole. For Sagittarius A* (the black hole at the centre of the milky way) this time is approximately 1 minute.
Schwarzschild black holes are also unique because they have a space-like singularity at their core, which means that the singularity doesn't happen at a specific point in *space* but happens at a specific point in *time* (the future). This means once you are inside the event horizon you cannot point with your finger towards the direction the singularity is located because the singularity happens in your future: no matter where you move, you will "fall" into it.
We hope you enjoy the new releases!
Thanks to all of the many volunteers who help make Python Development and these releases possible! Please consider supporting our efforts by volunteering yourself or through organization contributions to the Python Software Foundation.Your friendly release team,
Ned Deily @nad
Steve Dower @steve.dower
Pablo Galindo Salgado @pablogsal
Talk Python to Me
#336: Terminal magic with Rich and Textual
Have you heard of the package Rich? This library allows you to create very, well, rich terminal-based UIs in Python. When you think of what you can typically build with basic print statements, that may seem quite limited. But with Rich, imagine justified tables, progress bars, rendering of markdown, and way more. <br/> <br/> This is one of the fastest growing projects in the Python space these days. And the creator, Will McGugan is here to give is the whole history and even a peak at the future of Rich and a follow on library called Textual.<br/> <br/> <strong>Links from the show</strong><br/> <br/> <div><b>Will on Twitter</b>: <a href="https://twitter.com/willmcgugan" target="_blank" rel="noopener">@willmcgugan</a><br/> <b>Rich</b>: <a href="https://github.com/willmcgugan/rich" target="_blank" rel="noopener">github.com</a><br/> <b>Textual</b>: <a href="https://github.com/willmcgugan/textual" target="_blank" rel="noopener">github.com</a><br/> <b>Pyfilesystem</b>: <a href="https://www.pyfilesystem.org/" target="_blank" rel="noopener">pyfilesystem.org</a><br/> <b>A Look At – and Inside – Textual Video</b>: <a href="https://www.youtube.com/watch?v=1kTWxamIJ_k" target="_blank" rel="noopener">youtube.com</a><br/> <b>ObjExplore</b>: <a href="https://reposhub.com/python/command-line-tools/kylepollina-objexplore.html" target="_blank" rel="noopener">reposhub.com</a><br/> <b>ghtop</b>: <a href="https://ghtop.fast.ai/" target="_blank" rel="noopener">ghtop.fast.ai</a><br/> <b>Watch this episode on YouTube</b>: <a href="https://www.youtube.com/watch?v=laWyjfzur28" target="_blank" rel="noopener">youtube.com</a><br/> <b>Episode transcripts</b>: <a href="https://talkpython.fm/episodes/transcript/336/terminal-magic-with-rich-and-textual" target="_blank" rel="noopener">talkpython.fm</a><br/> <br/> <b>---------- Stay in touch with us ----------</b><br/> <b>Subscribe on YouTube (for live streams)</b>: <a href="https://talkpython.fm/youtube" target="_blank" rel="noopener">youtube.com</a><br/> <b>Follow Talk Python on Twitter</b>: <a href="https://twitter.com/talkpython" target="_blank" rel="noopener">@talkpython</a><br/> <b>Follow Michael on Twitter</b>: <a href="https://twitter.com/mkennedy" target="_blank" rel="noopener">@mkennedy</a><br/></div><br/> <strong>Sponsors</strong><br/> <a href='https://clubhouse.io/talkpython'>Shortcut</a><br> <a href='https://talkpython.fm/training'>Talk Python Training</a><br> <a href='https://talkpython.fm/assemblyai'>AssemblyAI</a>
Django Weblog
Django bugfix release: 3.2.8
Today we've issued the 3.2.8 bugfix release.
The release package and checksums are available from our downloads page, as well as from the Python Package Index. The PGP key ID used for this release is Carlton Gibson: E17DF5C82B4F9D00
Codementor
Functions in Python
In This Article We are going to learn how functions will work. Let's first discuss What exactly is a Python Function. In Python, Function is a group of related statements that performs a specific...
Steps to implement a Machine Learning Algorithm
Steps to implement a machine learning algorithm with easiest explanation. Learn this and things will be smoother.
Python⇒Speed
Why you can't switch to Python 3.10 just yet
Python 3.10 is now available–but should you switch to it immediately? And if not now, when?
The short answer is, no, you probably don’t want to switch immediately; quite possibly you can’t switch immediately. To understand why, we need to consider Python packaging, the software development process, and take a look at the history of past releases.
We can then make a guess about when Python 3.10 will actually be usable.
Read more...October 04, 2021
Quansight Labs Blog
Dataframe interchange protocol and Vaex
The work I briefly describe in this blog post is the implementation of the dataframe interchange protocol into Vaex which I was working on through the three month period as a Quansight Labs Intern.
 Connection between dataframe libraries with dataframe protocol
About | What is all that?
Today there are quite a number of different dataframe libraries available in Python. Also, there are quite a number of, for example, plotting libraries. In most cases they accept only the general Pandas dataframe and so the user is quite often made to convert between dataframes in order to be able to use the functionalities of a specific plotting library. It would be extremely cool to be able to use plotting libraries on any kind of dataframe, would it not?
Read more… (13 min remaining to read)
Python Morsels
How to read from a text file

Transcript
Let's talk about reading from a text file in Python.
Opening and reading a text file in Python
Python has a built-in open function that accepts a filename (in this case we're using this diary980.md file), and it gives us back a file object:
>>> f = open("diary980.md")
>>> f
<_io.TextIOWrapper name='diary980.md' mode='r' encoding='UTF-8'>
Technically, we get back an _io.TextIOWrapper object, but we don't talk about it that way; we refer to this thing as a file object.
File objects have a read method, which gives back a string representing the entire contents of that file:
>>> f.read()
'Python Log -- Day 980\n\nToday I learned about metaclasses.\nMetaclasses are a class\'s class.\nMeaning every class is an instance of a metaclass.\nThe default metaclass is "type".\n\nClasses control features (like string representations) of all their instances.\nMetaclasses can control similar features for their classes.\n\nI doubt I\'ll ever need to make a metaclass, at least not for production code.\n'
That string represents the contents of this diary980.md file:
Python Log -- Day 980

Today I learned about metaclasses.
Metaclasses are a class's class.
Meaning every class is an instance of a metaclass.
The default metaclass is "type".

Classes control features (like string representations) of all their instances.
Metaclasses can control similar features for their classes.

I doubt I'll ever need to make a metaclass, at least not for production code.
Once we're done working with a file, we should make sure it's closed, in order to let the operating system know that we're done with it:
>>> f.close()
After we've closed a file, we can't do anything else with that file object:
>>> f.read()
Traceback (most recent call last):
  File "<stdin>", line 1, in <module>
ValueError: I/O operation on closed file.
Closing files manually using the close method
Now we can rely on Python closing files automatically when our Python process exits, but we usually shouldn't rely on that (unless we want our file open for the entirety of our Python process).
We could close files manually using the close method on file objects, but we probably shouldn't do that either.
Here we're opening a file, processing it, and then closing it:
In [1]: diary_file = open("diary980.md")
   ...: day = int(diary_file.read().splitlines()[0].split('--')[1])
   ...: diary_file.close()
   ...: print(day)
If an exception occurs on the line between the open call and the close method call, our close method will never be called:
ValueError                                Traceback (most recent call last)
<ipython-input-1-88e2802a7886> in <module>
      1 diary_file = open("diary980.md")
----> 2 day = int(diary_file.read().splitlines()[0].split('--')[1])
      3 diary_file.close()
      4 print(day)

ValueError: invalid literal for int() with base 10: ' Day 980'
Our file object is still open at this point:
In [2]: diary_file.closed
Out[2]: False
The line of code before our close method call raised an exception so our file wasn't properly closed.
Using a with block to automatically close the file
We can fix this problem by using a with block.
Using a with block will automatically close our file for us:
with open("diary980.md") as diary_file:
    day = int(diary_file.read().splitlines()[0].split('--')[1])
print(day)
A with block works with a context manager, and files are context managers.
When a with block is entered, Python will inform the context manager object so it can execute some special entrance code.
When the with block is exited (when the indentation level ends the code block) Python will inform the context manager object so it can execute some special exit code.
See the context managers page for more on context managers.
File objects choose to make their exit code close themselves automatically.
So you can use a with block to make sure that your file always closes when the with block exits.
If we execute the code in our with block:
In [1]: with open("diary980.md") as diary_file:
   ...:     day = int(diary_file.read().splitlines()[0].split('--')[1])
   ...: print(day)
---------------------------------------------------------------------------
ValueError                                Traceback (most recent call last)
<ipython-input-1-5d7936c2bce8> in <module>
      1 with open("diary980.md") as diary_file:
----> 2     day = int(diary_file.read().splitlines()[0].split('--')[1])
      3 print(day)

ValueError: invalid literal for int() with base 10: ' Day 980'
Even though an exception occurred our file will end up closed because our with block was exited:
In [2]: diary_file.closed
Out[2]: True
Summary
To work with a text file in Python, you can use the built-in open function, which gives you back a file object.
File objects have a read method, which will give you back the entire contents of that file as a string.
You should always make sure that your files are closed when you're done working with them.
For a very simple command-line program, you could just rely on Python to close the file automatically when your Python program exits.
But it's considered a best practice to use a with block to make sure that your file is closed automatically as soon as you're done with it.
Real Python
Python 3.10: Cool New Features for You to Try
Python 3.10 is out! Volunteers have been working on the new version since May 2020 to bring you a better, faster, and more secure Python. As of October 4, 2021, the first official version is available.
Each new version of Python brings a host of changes. You can read about all of them in the documentation. Here, you’ll get to learn about the coolest new features.
In this tutorial, you’ll learn about:
- Debugging with more helpful and precise error messages
- Using structural pattern matching to work with data structures
- Adding more readable and more specific type hints
- Checking the length of sequences when using
zip() - Calculating multivariable statistics
To try out the new features yourself, you need to run Python 3.10. You can get it from the Python homepage. Alternatively, you can use Docker with the latest Python image.
Free Bonus: 5 Thoughts On Python Mastery, a free course for Python developers that shows you the roadmap and the mindset you’ll need to take your Python skills to the next level.
Better Error Messages
Python is often lauded for being a user-friendly programming language. While this is true, there are certain parts of Python that could be friendlier. Python 3.10 comes with a host of more precise and constructive error messages. In this section, you’ll see some of the newest improvements. The full list is available in the documentation.
Think back to writing your first Hello World program in Python:
# hello.py

print("Hello, World!)
Maybe you created a file, added the famous call to print(), and saved it as hello.py. You then ran the program, eager to call yourself a proper Pythonista. However, something went wrong:
$ python hello.py
  File "/home/rp/hello.py", line 3
    print("Hello, World!)
                        ^
SyntaxError: EOL while scanning string literal
There was a SyntaxError in the code. EOL, what does that even mean? You went back to your code, and after a bit of staring and searching, you realized that there was a missing quotation mark at the end of your string.
One of the more impactful improvements in Python 3.10 is better and more precise error messages for many common issues. If you run your buggy Hello World in Python 3.10, you’ll get a bit more help than in earlier versions of Python:
$ python hello.py
  File "/home/rp/hello.py", line 3
    print("Hello, World!)
          ^
SyntaxError: unterminated string literal (detected at line 3)
The error message is still a bit technical, but gone is the mysterious EOL. Instead, the message tells you that you need to terminate your string! There are similar improvements to many different error messages, as you’ll see below.
A SyntaxError is an error raised when your code is parsed, before it even starts to execute. Syntax errors can be tricky to debug because the interpreter provides imprecise or sometimes even misleading error messages. The following code is missing a curly brace to terminate the dictionary:
 1# unterminated_dict.py
 2
 3months = {
 4    10: "October",
 5    11: "November",
 6    12: "December"
 7
 8print(f"{months[10]} is the tenth month")
The missing closing curly brace that should have been on line 7 is an error. If you run this code with Python 3.9 or earlier, you’ll see the following error message:
  File "/home/rp/unterminated_dict.py", line 8
    print(f"{months[10]} is the tenth month")
    ^
SyntaxError: invalid syntax
The error message highlights line 8, but there are no syntactical problems in line 8! If you’ve experienced your share of syntax errors in Python, you might already know that the trick is to look at the lines before the one Python complains about. In this case, you’re looking for the missing closing brace on line 7.
In Python 3.10, the same code shows a much more helpful and precise error message:
  File "/home/rp/unterminated_dict.py", line 3
    months = {
             ^
SyntaxError: '{' was never closed
This points you straight to the offending dictionary and allows you to fix the issue in no time.
There are a few other ways to mess up dictionary syntax. A typical one is forgetting a comma after one of the items:
Read the full article at https://realpython.com/python310-new-features/ »
[ Improve Your Python With 🐍 Python Tricks 💌 – Get a short & sweet Python Trick delivered to your inbox every couple of days. >> Click here to learn more and see examples ]