Domains » Use a Domain You Already Own (Domain Connection)
Have you already purchased a domain name with another provider, such as GoDaddy, Namecheap, or 1&1? If you prefer to keep your domain registered with your current provider, you can use it with your WordPress.com site by connecting your domain.
Connecting your domain means that instead of an address like yourgroovysite.wordpress.com, you can make your site’s address something like yourgroovydomain.com without the WordPress name in the address.
There are three important steps to connecting your domain to your WordPress.com site:
- Attaching your domain to your WordPress.com site. Jump to steps.
- Updating your domain name’s name servers to point to WordPress.com. Jump to steps.
- (Optional, but important) If you have an email service with your domain provider, adding the email configuration to WordPress.com. Jump to information.
Domain Connection Overview
Domain connection means:
- You keep the domain registered with the company you purchased it from (the registrar), such as GoDaddy, Namecheap, or 1&1, but point the domain to your WordPress.com site.
- You will still need to pay the current registrar to keep the domain active every year.
- Some domain settings and configurations will need to be made with the current registrar. We explain those in this guide.
- If you’re trying to connect a subdomain (for example blog.yourgroovydomain.com instead of yourgroovydomain.com), visit our Connect A Subdomain support guide instead.
- If you have an email service through your domain provider, you may need to add the email DNS records to your site here on WordPress.com to make sure there is no loss of email service.
💡
If you would like to manage your site and domain all in one place, you can follow the steps to transfer the domain to us instead of connecting.
Getting Started With Domain Conection
Watch a brief video on how to connect your domain name to your WordPress.com site below.
Steps to Connect a Domain
📌
If you have more than one site, go to My Sites→ Switch Site and make sure to choose the site you want to add the domain to before following these steps.
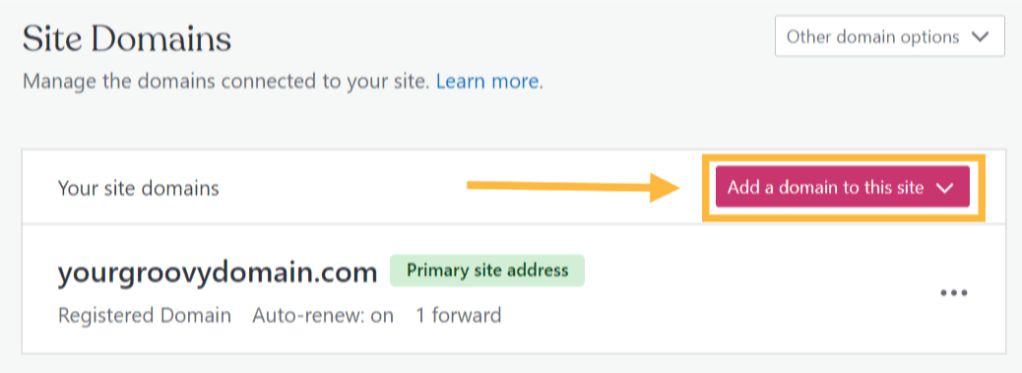
- Go to the Domains page by selecting My Site → Upgrades → Domains.
- Select Add a domain to this site on the right.

- Select Use a domain I own. Enter the domain you’d like to connect and click the Next button.
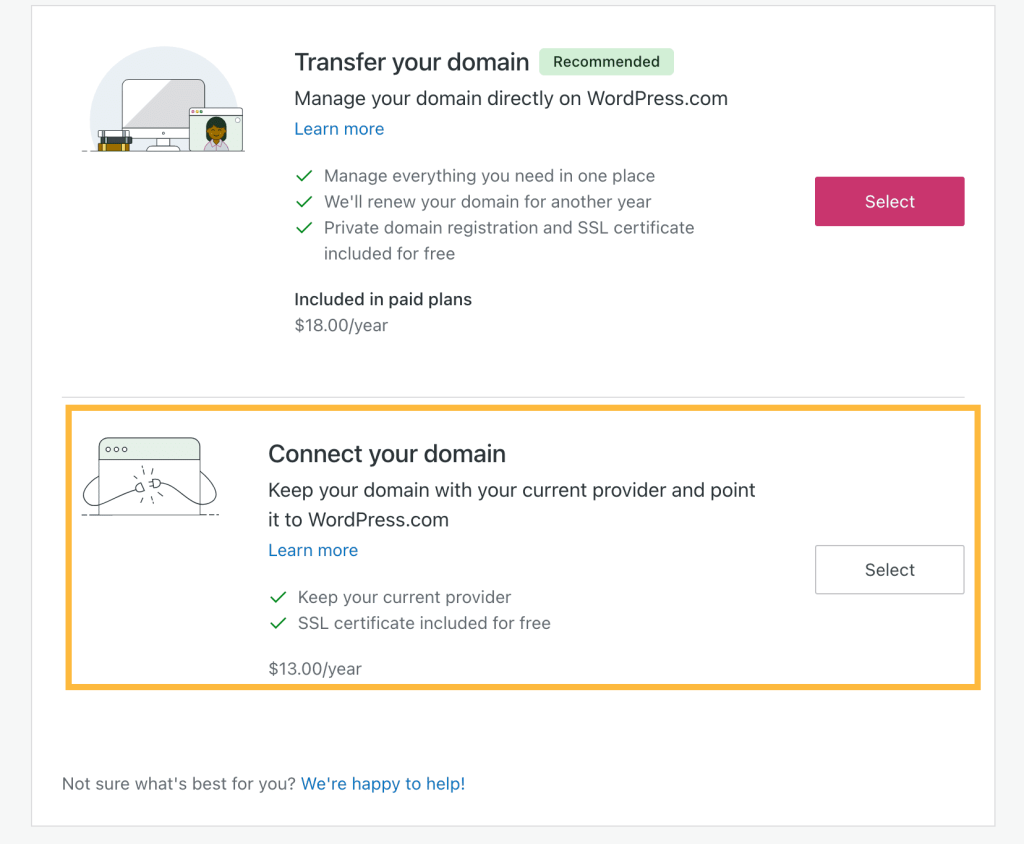
- On the next screen Select next to the Connect your domain option.

- After the connection is set up on your WordPress.com site, you can point your domain to WordPress.com by changing the name servers or adding our A records from the next screen. See the next section for detailed information about adding name servers at your domain registrar.
Change Your Domain's Name Servers
Name servers tell the domain where to point to. These must be changed with the company you purchased your domain from in order for the domain to load your WordPress.com site. You have two options for getting your name servers updated to point to your WordPress.com site.
Option 1: Update Name Servers Yourself
You can log into your account at your domain registrar and replace any existing name servers with these three domain name server (DNS) addresses:
ns1.wordpress.com
ns2.wordpress.com
ns3.wordpress.com
Remember to remove your old name servers when you add the WordPress.com name servers.
You can find your domain provider in this list of common providers for further instructions.
Option 2: Contact Your Domain Registrar
If you’re not comfortable making the change yourself, you can contact the support department at your domain registrar for help. Here is a sample email you can send them:
I would like to use my domain with a WordPress.com site. In order to do this, I need to point my domain’s name servers to the following:
ns1.wordpress.com
ns2.wordpress.com
ns3.wordpress.com
Instructions for Common Domain Providers
The process for changing your name servers is different for each registrar.
For convenience, we have included links to instructions for common registrars below. We recommend that you contact your domain registrar’s support department for help if you’re having trouble changing the name servers yourself.
Click here for links to common providers:
Wix – In addition to this linked guide, Wix also requires you to add a CNAME record for www pointing to @.
Alternatives to Using Name Servers
While we strongly recommend that you use name servers to connect your domain name to WordPress.com, there are alternative ways to connect your existing domain to WordPress.com.
Connecting with A records
We strongly recommend that you use name servers to point to WordPress.com. However, in some cases, the domain registrar will only accept IP addresses. In those cases, you can find the IP addresses (A records) with the following steps:
- Go to Upgrades → Domains.
- Click the connected domain with the Complete setup label next to it.
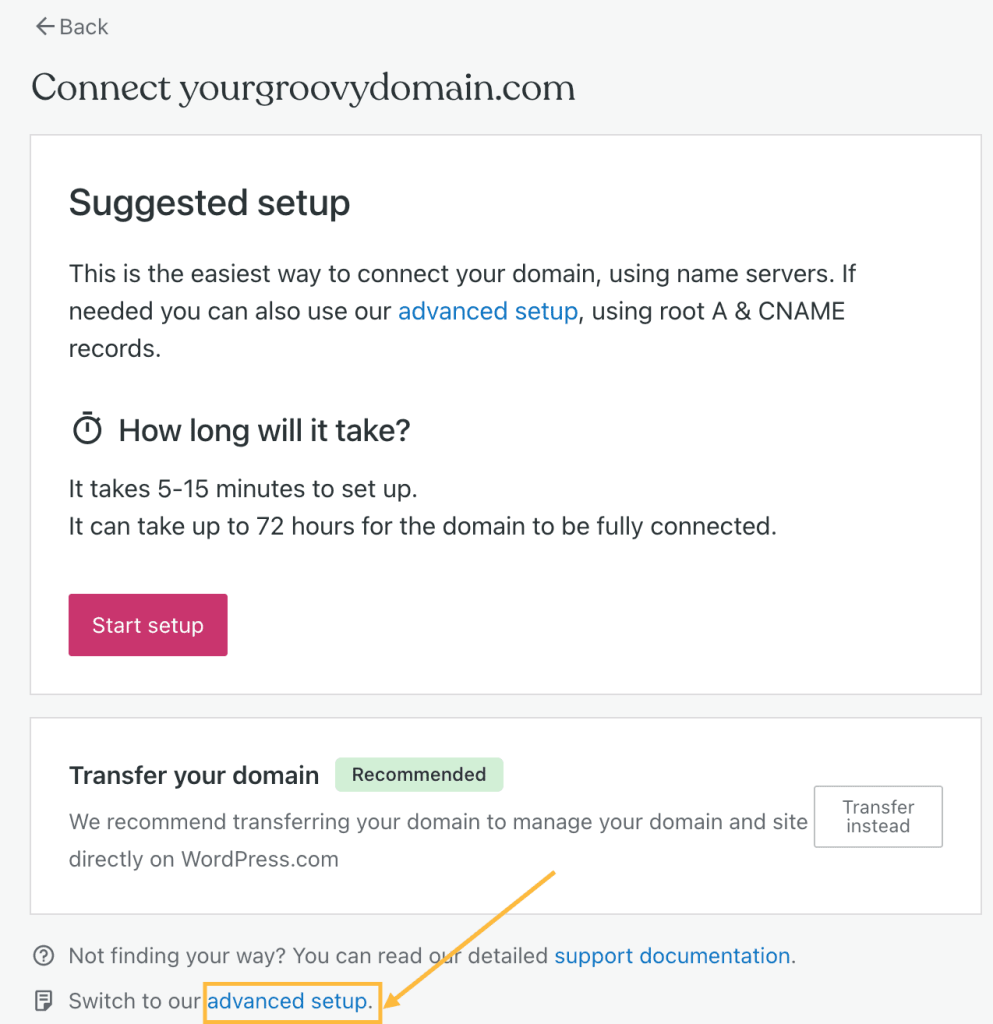
- Click Advanced Setup at the bottom as seen in the following screenshot:

- Click Start Setup.
- In the next screen, you will be asked to log into your domain provider. On your domain’s provider site go to domain’s management settings. If you are not sure how to find this section, we suggest contacting your domain’s provider.
- Once you find the domain manage settings in your provider, click the button I found the domain’s settings page

- In the next screen we provide the IP records that you need to at your domain’s provider. Make sure to find the root A records and replace them with the ones we provide.
- You then want to add a CNAME record to make sure there is a redirection between www and your root domain. Replace the “www” CNAME record of your domain by adding your domain in the value field.
- Once you made these changes, click Verify Connection
⚠️
Bear in mind, IP addresses can change without notice, which is why name servers is the preferred method.
If your domain is registered through GoDaddy or 1&1
If your domain is registered with GoDaddy or 1&1, you may see an option to Connect Your Domain which can configure the DNS changes for you.
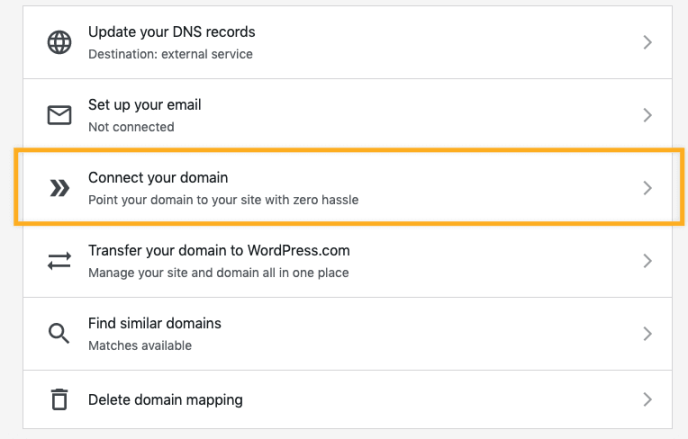
1. Go to My Sites → Upgrades → Domains. Choose the domain you connected.
2. Click on Connect Your Domain.

3. Click the Configure Your Domain Settings button.
4. Log into your account at your domain registrar (or DNS provider) when you see the prompt.
5. Confirm that you want to set your domain to point to WordPress.com
6. This will create the necessary DNS changes at your registrar/DNS provider to use your domain here.
After Changing Name Servers
- The domain might not load right away. It can take up to 72 hours for your domain name servers (DNS) to update fully. You will also likely need to clear your browser’s cache.
- Once you confirm that your site loads when visiting your domain, you can follow a few steps to set the primary domain.
- Important: If you had other services connected to your domain, such as email or subdomains, you may have to reconfigure the DNS settings in your WordPress.com account.
- If you later decide you no longer want to point your domain to WordPress.com, you can log into your registrar/DNS provider to remove the DNS records and point the domain elsewhere.
Internationalized Domain Names (IDNs)
Your domain name is an IDN if it contains language-specific characters such as ä, û, ע, ж, 字, मा. Domain registration, transfers-in, and connecting for IDNs, also known as Internationalized Domain Names, are not currently supported.
Frequently Asked Questions
Below are some Frequently Asked Questions and Troubleshooting Tips:
I changed name servers, but my domain isn’t loading or pointing to my WordPress.com site.
- Name server changes can take up to 72 hours to fully propagate, during which time the domain might not load properly.
- Try clearing your browser’s cache to make sure your browser is loading the most up to date information.
- Contact your domain registrar to ensure the name servers were changed properly (and that the old ones were completely removed).
Can I connect a domain to a specific page on my site?
Domains cannot be connected to specific directories on your site, for example yourgroovydomain.com/about-us
Can I have “www” before my domain name?
WordPress.com automatically removes the “www” from all URLs. Connecting the “www”subdomain is not supported.
Your site address can still be reached at “www”, but it will always redirect to the non-www version. This is for SEO reasons; search engines prefer one version of the site address be set as the canonical URL, otherwise they will see duplicate content. WordPress.com has chosen the non-www version of your site as the canonical URL.
Still confused?
Help us improve:
We're always looking to improve our documentation. If this page didn't answer your question or left you wanting more, let us know! We love hearing your feedback. For support, please use the forums or contact support form. Thanks!