

You don’t need to be Mark Zuckerburg to make a website in 2021.
In fact, with the sheer number of website building tools available today, you don’t even need to know a single line of code to create a functional and professional-looking website or blog.
All you need is a free weekend and the right resources at your disposal, including a detailed step-by-step guide on how to make a website like the one you’re reading. 😉
Need a quick answer? Take our interactive quiz:
What’s the Best Website Builder Software?
Before even thinking about designing your website, you need to know what software or platform you’re going to use.
Most articles will push you towards a single solution regardless of your actual requirements. This will usually be WordPress because it’s the most widely used, powering around 40% of the internet.
But the truth is, everyone needs different things from a website, and there’s no one-size-fits-all solution to every use case, including yours.
So let’s look at your options and narrow them down.
1. Website Builders
A Website Builder is a software platform that allows you to build a website through a visual interface, usually in a drag-and-drop fashion.
They typically take a template-based approach, meaning you select from a large library of pre-designed layouts, then proceed to change everything from the colors, typography, images, and text.
When To Use A Website Builder
Website Builders are ideal for creating simple, static websites, like a local business or service-based website, or those with a set number of pages — sometimes referred to as a 5-page website.
These usually include a home page, about page, pricing page, gallery page, and contact page. You may also include the standard legal pages, such as your terms and conditions and privacy policy.
The only other exception is if you plan to add a blogging element to your website at some point, in which case you should consider going with a Content Management System instead (see next section).
Top Website Builders
We’ll be looking at the best Website Builder platforms, and comparing their key strengths and weaknesses side-by-side.
Specifically, these are:
- Wix
- Squarespace
- Weebly (Square)
- Webflow
Pros: – A large number of templates – High design flexibility (freehand editor) – App Market for tons more widgets – Ad-driven free plan | Cons: – Templates can’t be changed later – Freehand design can be harder to get right | |
Pros: – Very easy to use – Beautiful template designs – Addons for blogging and e-commerce – Mobile app to build on the go – Live chat support | Cons: – Could benefit from more templates – Somewhat rigid design editor | |
Pros: – Very easy to use – Good variety of website templates – App Center for extra features – Mobile app to build on the go | Cons: – Sometimes limited in design flexibility – Blogging tools feel underdeveloped – Limited support on cheaper plans | |
Pros: – A very high level of design flexibility – A good variety of free templates – Supports dynamic content (advanced) – Forever free plan | Cons: – Not beginner-friendly – Some website templates cost extra – No native support for multilingual sites |


What’s The Best Website Builder?
Overall, Squarespace is the better choice for quickly and easily building a great looking 5-page website, especially for beginners with minimal design and technical experience.
If you’re ready to start building your website with Squarespace, click here to jump down to our step-by-step guide.
2. Content Management Systems (CMS)
A Content Management System, or CMS, is a platform designed to simplify the creation and management of a content-driven website.
While some Website Builders have CMS capabilities, a true CMS gives you full control over larger libraries of content, allowing you to display and organize hundreds or even thousands of pages or posts across your site.
Traditionally, Content Management Systems offer very little in the way of design flexibility, though there have been some major developments in this area in recent years, especially with regards to WordPress.
When To Use A Content Management System
Content Management Systems can be used to build simple, static websites (and often are), but they generally aren’t as intuitive as Website Builders for this purpose alone.
Instead, a CMS should be considered when you’re looking to publish and manage lots of content on your website. This particularly the case for bloggers, be it for a personal or commercial blog.
If you only plan to publish a small number of articles on an infrequent basis, you could get away with using the publishing features inside a Website Builder, but we would still recommend a CMS in this case — just for future-proofing.
Top Content Management Systems
We’ll be looking at the best CMS platforms, and comparing their key strengths and weaknesses side-by-side.
Specifically, these are:
- WordPress
- Drupal
- Joomla
- Ghost
Pros: – Highly customizable – Huge library of plugins and themes – Very well documented | Cons: – Not the most intuitive CMS – Sometimes requires many plugins to make it work | |
Pros: – Very easy to customize – Can easily handle lots of data (think web applications) – Strong focus on security | Cons: – Not intended for beginners – Often confusing documentation | |
Pros: – Advanced user management – Good support for different content types – Flexible application of themes across a single website | Cons: – Steep learning curve – Fewer templates and modules (plugins) | |
Pros: – Simple, beginner-friendly interface – Lightweight and fast framework (built on modern tech) – Built-in membership solution | Cons: – Relatively small selection of themes and plugins – No support for e-commerce sites – No native support for blog comments |


What’s The Best CMS?
Overall, despite the learning curve to WordPress, the upsides still give it the edge over other CMS platforms, particularly if you’re building a more blog-centric website.
If you’re ready to start building your website with WordPress, click here to jump down to our step-by-step guide.
3. Landing Page Builders
Landing Page Builders are very similar to Website Builders, and some have even become full Website Builders later on in their development.
They share a similar visual interface and drag-and-drop approach, and also both rely on templates to achieve professional-looking page designs with no coding or design experience.
The key difference with Landing Page Builders, however, is their focus on conversions, meaning they’re often used for marketing campaigns.
When To Use A Landing Page Builder
A Landing Page Builder is ideal when creating a single page of content with a single conversion goal, otherwise known as a landing page.
There are so many use cases for landing pages, but I’ll touch on the main ones:
- Short and long-form sales pages for selling individual products
- Lead capture pages to collect email addresses or phone numbers
- Webinar sign up pages to build a webinar attendee list
- Physical event sign up pages (similar to webinars)
- Resumes, CV’s or portfolios to showcase your experience
Landing Page Builders are also particularly useful for tracking the performance of a page, such as through built-in traffic and conversion analytics, often alongside advanced A/B testing features.
Top Landing Page Builders
We’ll be looking at the best Landing Page Builder platforms, and comparing their key strengths and weaknesses side-by-side.
Specifically, these are:
- Unbounce
- Instapage
- Leadpages
Pros: – Intuitive design editor/builder – Tons of professional templates – Robust A/B testing features – Live chat support | Cons: – Split-testing only works for – Unbounce-built pages – Very expensive for beginners | |
Pros: – Clean/modern UI – Quick to publish (as per its name) – Great documentation and live chat support | Cons: – Fewer templates compared to competing products – Very expensive for beginners | |
Pros: – Very easy to use – High-performing templates (based on data) – Can be used to build an entire website – Has the most affordable plans | Cons: – Design editor can be limiting at times – No split-testing on cheaper plans |


What’s The Best Landing Page Builder?
Overall, LeadPages is the best value for money. If you’re just looking to throw up a high performing landing with little hassle and limited expenses, this is go-to.
If you’re ready to start building your website with LeadPages, click here to jump down to our step-by-step guide.
How To Make A Website
Now that you know which platform is best suited to your needs, it’s time to roll up your sleeves and start building.
Below, you’ll find an in-depth guide for each of the recommended website building platforms, those being Squarespace, WordPress, and LeadPages.
How To Make A Website With Squarespace
Step 1. Sign Up to Squarespace
First, head over to Squarespace.com.

You’ll get a 14-day trial using the Get Started button on the Squarespace website, but it’s worth knowing the costs ahead of time.
The pricing page can be found here, featuring both monthly and annual plans with the latter offering a small discount.

If you’re just looking to build a small personal or local business website, the Personal plan should offer more than enough to get you started.
This plan is $16 per month on a monthly basis, or $12 per month on an annual basis — for a total of $144 per year.
Step 2. Choose a Site Template
Squarespace wastes no time throwing you into the template selection screen, where you’ll find no shortage of professional designs to choose from.
If you need something specific, it’s worth looking at the template filters to narrow down your options:

Most Squarespace templates are multi-page designs, meaning they include all the relevant pages with a coherent design.
A few are single-page designs, such as portfolio templates.
Take some time scrolling through the available templates until you find something that catches your eye, keeping in mind that almost all of the content can be changed later on.

You can hover over any template to preview it.
I would recommend doing this before moving forward with any template because the thumbnail only shows a fraction of the overall design.
Doing so also opens up the responsive controls, allowing you to preview the template in desktop, tablet and mobile view. There’s even an option to check a live demo site using this template.

Once you’ve decided on a template, click the Start With This Design button to begin importing the template into your Squarespace account.
In this case, I’ve gone with a local restaurant template.
When finished, Squarespace will show a brief welcome screen with a few basic configurations to get you started.

I’ll be going a lot more into website configurations in the next step, so don’t worry too much about this popup.
You should now have your chosen template loaded into the Squarespace editor, ready to start customizing:

Step 3. Check Basic Configurations
The left sidebar is where most of the magic happens in terms of website management.
These include things like adding and organizing pages, adjusting global design settings, adding marketing elements like popups and advertising pixels, and checking website analytics.

You don’t need to concern yourself with many of these options for a simple 5-page website, but we’ll cover a few of them at the end, just in case.
Where you should be looking, however, is in the Settings panel.
This is where the most important settings are when it comes to your initial website setup, including making it private, connecting social profiles, and adding a domain name.

If you don’t know, a domain name is the name you type into your browser address bar to visit a particular website.
To see your default domain name (provided by Squarespace), go to Settings > Domains.
The default domain name will be something.squarespace.com, but you can change the “something” to whatever you want.
More importantly, you can choose to register your own domain name through Squarespace. This is absolutely worth doing to remove the squarespace branding from the name, and the first year is free on all annual plans.

You can find domain names cheaper elsewhere, but going through Squarespace will automatically configure it to work with your website. Again, this is worth paying a few extra bucks for.
Moving on, if you have social media accounts for your business, you’ll want to add them as well.
These can be added under both Settings > Social Links, and Settings > Connected Accounts.

If you’re building a website for business, take a moment to fill out some basic information about your company.
Doing so will display the relevant information across certain areas of the site, saving you a lot of time.
This can be found under Settings > Business Information.

Finally, if you want to keep your website private until it’s ready to launch, Squarespace allows you to block public access.
Your website will automatically be set to Private if you’re on the free trial, and will require upgrading in order to set it to Public (just remember to do this when you’re ready to launch).
These options can found under Settings > Site Availability.

Step 4. Customize Global Styles
Now it’s time to start customizing the template.
In particular, this part will be focusing on the global styling aspects of the template, meaning changes that apply across your entire website.
To start, you’ll need to go Design > Site Styles.

By doing so, the left side panel will collapse to make space for a new side panel on the right.
This is the Site Styles panel.
First, you’ll want to go through and adjust the Fonts, including the font style and sizes for regular paragraphs, headings, buttons and various other design elements.

After that, select Colors.
Squarespace provides a number of color palettes for you to switch between, and clicking any of them will instantly change the site preview.
Of course, you can also create your own color palettes if you prefer.

Aside from fonts and colors, you may also want to adjust other styling aspects in this panel, including maximum page width, element spacing and animations.
Otherwise, you can pretty much leave everything else as is.
Step 5. Customize the Header and Footer
The header is the very top section of your website.
It typically contains things like your logo, navigation menu, buttons and social icons, while appearing on virtually every page of your website.
To begin customizing it, you’ll need to go into “edit mode” by clicking the Edit button in the top corner of your template:

This will collapse the side panel once again, this time allowing more room for the website design to take precedent.
In this mode, you’ll also be able to interact with specific elements on the page in order to make changes, including the header.
To edit the header, hover over the top section of your website and click the Edit Site Header button that appears:

This will trigger a small popup that can be used to customize the header in a number of ways.
While you can’t directly change the header, the popup allows you to easily change your logo, edit links, adjust sizes, configure scroll behaviors, and enable other elements like carts and account logins.

If you scroll to the very bottom of your website, you’ll see the footer. This is also a global section that appears on every page.
Unlike the header section, however, the footer is treated as a regular content section, meaning you can make changes to it directly.
As before, hover over the footer section and click the Edit Footer button — but we’ll talk about more editing content sections in the next step.

Step 6. Edit the Page Design and Content
With most of the groundwork done, you can now start editing the actual page content.
To select a specific page to edit, you’ll first need to come out of editing mode. Simply click Save in the top left corner, then click Done. (You’ll know you’re out when the side panel reappears).
From here, you can select Pages from the side panel, or click the menu navigation directly in the preview:

After selecting a page to edit, go back into Edit mode.
At this point, you can scroll down and hover over different sections of the page to start interacting with them.
For example, hovering over this section reveals some controls, allowing you to make changes, including customizing, copying or moving the section:

Clicking the Pencil icon lets you customize the section styling.
Styling options include adjusting section height, width and alignment, along with the ability to add background colors and images.

You can also click on any content section to make changes to the text.
Fortunately, Squarespace supports inline text editing, so you can type directly on the page as opposed to a sidebar or popup text area.
This will also bring up some basic formatting controls:

Text is just one of many elements you can find on a page, and each follows slightly different rules when editing them.
To add new elements to the page, you’ll need to click the Plus icon that appears when hovering in a section container.
Doing so will bring up the elements panel:
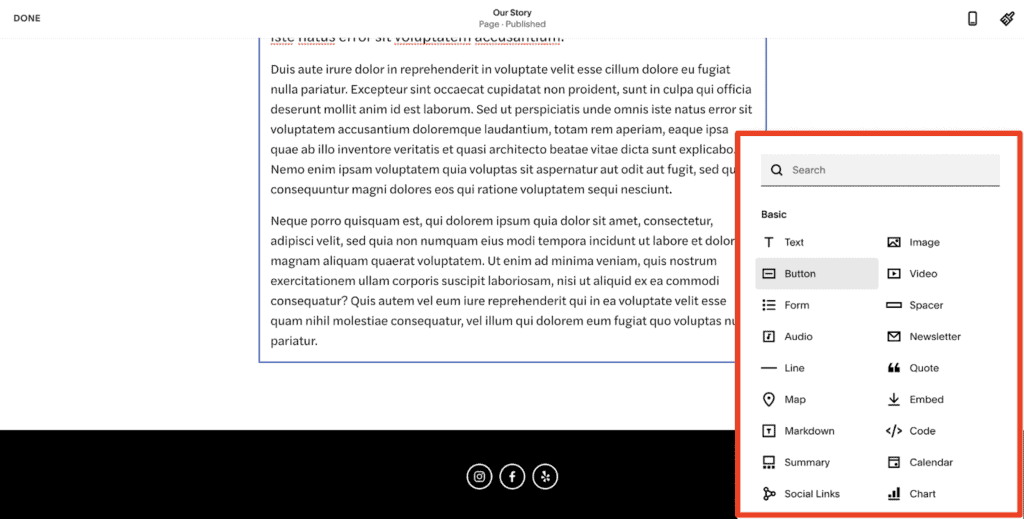
Here you’ll find all the basic elements used in web design, including text, images, buttons, videos, forms, dividers, and quotes.
Squarespace even has a few advanced elements like forms, interactive maps, charts, and code embeds.
What’s more, you can also directly drag new and existing elements within a section to rearrange them:

While Squarespace is somewhat rigid in their template designs, the drag and drop feature should allow you to achieve just about any layout you need using sections, columns and elements.
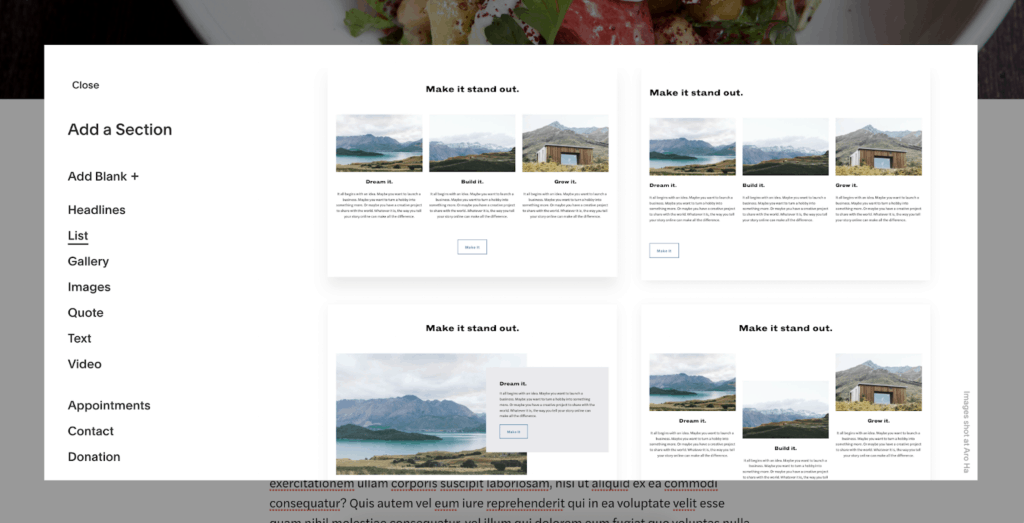
If you prefer a more hands-off approach, you can click the Add Section button to open the section template library, and insert an entire predesigned section into the page:
Step 7. Add New Pages or Collections (Optional)
Finally, you may wish to add more pages to the template.
You can do this by existing Edit mode, clicking Pages in the side panel, then clicking the Plus icon to add a new page or layout.

A new blank page will still use the same header and footer (see step 5) from your template, but will allow you to create the main page content from scratch.
While this is a viable approach, Page Layouts saves a ton of time, especially because they adhere to your global styling settings (meaning they seamlessly match up with the rest of your website).
Here’s a glimpse of the Page Layouts available:

Before we wrap this up, let’s quickly touch on Collections.
Collections are like plugins that will extend the functionality of your website, including adding things like a blog module, an e-commerce store, a portfolio, and an events feature.
You can add Collections the same way you would add a new Page:

Adding a blog, for example, will prompt you to choose from a new set of predesigned blog layouts.
Much of this can be styled the same way as you saw in the previous step, and you’ll have access to a new Pages interface for each of your blog posts.

Of course, if you decide to take the blogging side of your website further, it’s a good idea to consider a CMS like WordPress instead.
Congratulations, you’re finished!
How To Make A Website With WordPress
Step 1. Choose a Hosting Company
Before you can install WordPress CMS, you’ll need web hosting.
Web hosting refers to putting your website files on a physical web server, allowing it to be publicly accessible online.
You don’t need to worry about hosting when using most Website/Landing Page builders because it comes bundled with the service, but most CMS platforms are self-hosted, meaning you’ll need your own hosting.
Without making this too complicated, the version of WordPress we’ll be using is self-hosted, as it provides the highest level of control and flexibility.
Plenty of web hosting companies exist to make this as seamless as possible, but these are the most popular:
Company | Year 1 cost | Best | Link | |
 | Siteground | $83.88 | All-rounder | |
 | Hostinger | $35.88 | On a budget | |
 | Cloudways | $100 | Speed | |
 | Kinsta | $300 | For speed and support | |
 | WP Engine | $300 | For speed and support |
Which one should you choose?
Well, if you’re just getting started, Siteground offers the best balance of speed, reliability and support for the money — so that’s the one I recommend to anyone starting out.
Step 2. Set Up Your Web Hosting
Assuming you’re going with my recommended host, head over to the Siteground shared hosting plans page.
The cheapest plan (StartUp) should be more than enough to get you going, and can always be upgraded later if needed.
With the first year discount applied, it should take the price down from the usual $14.99 per month to just $6.99 per month. You will have to pay for a full year upfront, though.

After choosing a plan, Siteground will ask for a domain name.
This is the name people type into the browser address bar to reach your site, and it should match your company name.
You can register a new domain here, directly through Siteground. This is highly recommended because it will automatically connect everything up with your website, avoiding any technical setup.
Registering a new domain will only set you back $15.95 per year, so it’s very affordable.

I won’t take you through the entire sign up process as it’s fairly straightforward, but there are a couple things to note.
First, be sure to choose a data center closest to where your audience resides. This will ensure the best possible loading times for your readers.
Second, the additional services aren’t required, especially when you’re just starting out. If you’re on any kind of budget, feel free to skip those.

Step 3. Install WordPress
If you’re not using Siteground, the WordPress installation process will look slightly different and you may even have to install it manually. If that’s the case, please contact your hosting company for instructions.
Otherwise, inside your Siteground dashboard, go to Websites > New Website.

If you registered a domain during sign up (recommended), you’ll want to choose the Existing Domain option and enter that same domain below.
If you registered a domain elsewhere or plan to use a temporary domain, those options are available too:

Next, choose to Start a New Website.
If you happen to have a website with a different provider, you can also use the Migrate Website option to move it over.

Now choose WordPress for the Application.
You’ll need to enter an email address and password before proceeding. This will be your WordPress login credentials.

The WordPress installation process should only take a few minutes at most.
Once it’s finished, you’ll see your new website listed in your Siteground dashboard, under Websites.
While you’re here, you should enable SSL for your domain. This will add another layer of security to your site among other benefits. It’s also free and only takes a few clicks to activate.

With that done, you can go ahead and open your new WordPress admin dashboard.
To access it, go to WordPress Kit > WordPress Admin.

Step 4. Check Basic Configurations
Now that you have WordPress set up and you’re logged in to your brand new dashboard, there are a few quick configurations to look at.
The left sidebar is how you’ll navigate through the backend of your website (where most changes are made).
First, go to Settings > General.

Check the highlighted fields above, making sure your Site Title, Tagline, URL and Email Address field are all correct.
Note: If you plan to allow users to register an account on your website, you should also enable ‘Anyone can register’ next to the Membership label.
Next, go to Settings > Permalinks.

Permalinks dictate the URL structure of your pages and posts, and WordPress doesn’t use the most intuitive setting by default.
Even if you don’t fully understand why at this stage, change your Permalinks structure to ‘Post name’. You’ll thank me later.
Finally, go to Users > All Users.

From here, you click into your own user account to make changes.
You can also add new users, including contributors, authors, editors, and even additional administrators. There’s also an option to email new users with login instructions.
Step 5. Install Necessary Plugins
Plugins extend the functionality of the WordPress CMS, and they’re a huge part of what makes WordPress so powerful.
There are plugins that help with designing pages, others that change the behaviour of your pages or content, some that enhance security, and even a few that help your site gain more visibility in search engines.
There are thousands of WordPress plugins available in the plugin directory (called the repository). The vast majority of them are free, while a few have optional paid upgrades.
You can access this repository through the WordPress dashboard by going to Plugins > Add New.
From here, you can browse Popular and Recommended plugins, or make use of the full search function to find something more specific:

To use a plugin, simply click Install Now, wait a few seconds, then click the Activate option when prompted.
Activated plugins will show themselves in different ways throughout the WordPress interface depending on their function. In most cases, you’ll find a new entry in the left sidebar of your dashboard.
Tip: Be mindful of how many plugins you add to your website. Having too many will likely slow the loading time of your pages, and potentially even cause conflicts that break your site altogether.
We have a few recommendations to get you started:
- Elementor (free) to design landing pages and popups
- WPRocket to optimize page speed and load times
- ShortPixel
- SG Optimizer
- WordFence
There are also plugins to extend the functionality of your theme, but we’ll cover all that in the next section.
Step 6. Change the WordPress Theme
A WordPress theme dictates the way your website looks, feels, and functions.
After installing WordPress for the first time, your WordPress theme will be set to whatever the latest default theme is, but you’ll want to change that.
You can change your WordPress theme from the admin dashboard by going to Appearance > Themes, then clicking Add New.
This will bring you to the WordPress theme directory:

Every theme in this directory is free, though some can be upgraded to premium (paid) versions for more advanced features.
Like plugins, there are thousands of themes to choose from, and you can use the tabs to filter through Featured, Popular and New WordPress themes. It also has a Feature Filter search bar to find something specific.
Scrolling through, you can click any theme to preview it and read reviews left by other WordPress users. If you like what you see, you can Install it:

There are plenty of great themes out there, but it’s important to choose one that’s fast and secure, as well as one that offers plenty of design flexibility.
The following themes all tick the right boxes, and come highly recommended in the WordPress community:
- GeneratePress
- OceanWP
- Astra
- Blocksy
- Kadence
I highly recommend going with Blocksy if this is your first time building a WordPress website.
It allows for a high level of customization while still being very easy to use, and it has a number of Starter Sites that we’ll be taking advantage of. Besides, the free version alone is as good as any premium theme you’ll find.
To get it up and running, search for “Blocksy” in the theme directory, then click the blue button to install it, and finally click Activate.

Once activated, Blocksy will prompt you to install the Blocky Companion plugin.
Go ahead and agree to install it. This will add a few handy features to the theme settings, one being required for the next step.

Step 7. Install A Blocksy Starter Site (Optional)
Blocksy, among a handful of other themes, comes with a library of Starter Sites that allow you to import a professional website design in just a few clicks.
This includes the core pages of a traditional website, all following a coherent layout and design, as well providing images and text for inspiration.
Here are a few options from the Starter Sites library:

Importing a Starter Site doesn’t add anything new to the theme, it only configures Blocksy according to the site design you choose, and it also creates the relevant pages inside WordPress.
You can almost think of them as style presets — meaning they can be adapted for any industry by simply making a few changes and/or swapping out the content.
Alternatively, you can choose to skip the Starter Sites and adjust the design entirely through the Theme Customizer, which we’ll cover in the next step.
To install a Starter Site, click Blocksy in the WordPress sidebar, then navigate to the Starter Sites tab:

From here, you can preview each Starter Site, including its various pages to see if it’s close to what you need from a design perspective.
Remember, the industry used in the Starter Site is just a placeholder, the content can be changed and adapted to your needs.
In this case, I will go ahead and Import the first one; the Yogi Site.
Before importing anything, Blocksy will ask for permission to create a child theme, add some necessary plugins, and create the relevant pages.
Don’t worry if you don’t understand this yet. Just leave everything as is, proceed to the end, and click the Install button.

The import process should only take a minute or two. Once it’s finished, you’ll be prompted to view your website or head over to the Theme Customizer.
At this point, it’s a good idea to open your website and make sure everything looks the way it should, according to the original Starter Site design.
If there’s any issue with the import, try importing it once more. If it still doesn’t work, the problem is likely on the hosting server, so you’ll need to contact your host for a solution.
Assuming all goes to plan, you should have yourself a professional-looking, fully-functional website, complete with multiple pages:

Step 8. Customize The Theme Design (Optional)
Before we go into customizing the theme, it’s important to clarify what we’re actually referring to as the “theme”.
The theme is the overall layout and design aesthetic of the site, such as the colors, typography, and spacing. It also dictates the layout of dynamic pages like your blog archives and blog article layout.
It does not control the page content, such as images, icons or text.
So, if you’re happy with the layout and design aesthetic of your theme at this stage (particularly if you used a Starter Site), and you only wish to change the page content, you can skip ahead to the next step.
If you didn’t use a Starter Site or you just want to make some changes to the theme itself, you’ll need to open up the Theme Customizer.
You can access this by going to Appearance > Customize.

The Customizer will have different options depending on the theme you’re using, and some will allow for far more customization than others.
This is where the power of Blocksy really begins to show, as it allows you to change virtually any aspect of your theme, easily and efficiently, and without ever touching a line of code.
The first settings to look at are the General settings, found in the Customizer sidebar under General Options > General.

Here, you can adjust everything from the width of your website, as well as the styling of elements like buttons, form fields and content spacing.
This is also where you can add links to your various social media networks to be displayed throughout your website, should you choose to.
The next thing you’ll want to do is adjust your global color palette, found in the sidebar under General Options > Colors.

Here, you can switch between different color presets or your own custom color palette, applying across your entire website in an instant.
Once you’re happy with the colors, you’ll want to click back, then into the typography settings.
This is found under General Options > Typography.

This area allows you to adjust your fonts and font sizes for your body text and headings, and like the color options, any changes here will instantly apply across your entire website.
Now let’s get into the real juicy stuff.
While you can use the sidebar to make general changes to your website, Blocksy allows you to click specific regions in your Customizer preview to bring up the relevant settings.
For example, I can click the header section to quickly jump to the header customizations — which, in this case, opens the header builder:

The Blocksy header builder gives you full design control over what shows in the header section of your website, including how (and if) your logo, menu navigation, buttons, and social links are presented.
And yes, this builder is also available for your footer.
Getting into the deeper theme-controlled aspects of your website, you can also navigate to the blog section, clicking various sections to make layout and structural changes.
For example, you can change your blog archives to show new posts through a number of different grid layouts:

Similarly, by clicking into a blog post, you can customize the way individual articles are presented on your website.
You can also adjust the specific page and posts elements that are displayed on your content, including things like featured images, tags, share boxes, related post grids, and comment boxes.

There’s a lot more you can do inside Blocksy, but these are the main components you need to look at when first setting up your website.
Otherwise, once you’re happy with how everything looks, click the Publish button to save your changes.
Step 9. Manage Your Pages and Posts
The core pages of your website include the home page, about page, contact page, and any other page you might put in your menu navigation.
In WordPress, you can view, add and edit your pages by going to Pages in the sidebar.
If you installed a Blocksy Starter Site (like I did), you’ll see a number of pages here already. To edit any of these pages, simply click on the page title to open the WordPress visual editor:

If you chose not to install a Starter Site, or you wish to add more pages, you’ll need to click the Add New button at the top.
To demonstrate how this works, let’s click the Home page to open the editor:

The WordPress visual editor gives you a near-perfect representation of what your page looks like when published.
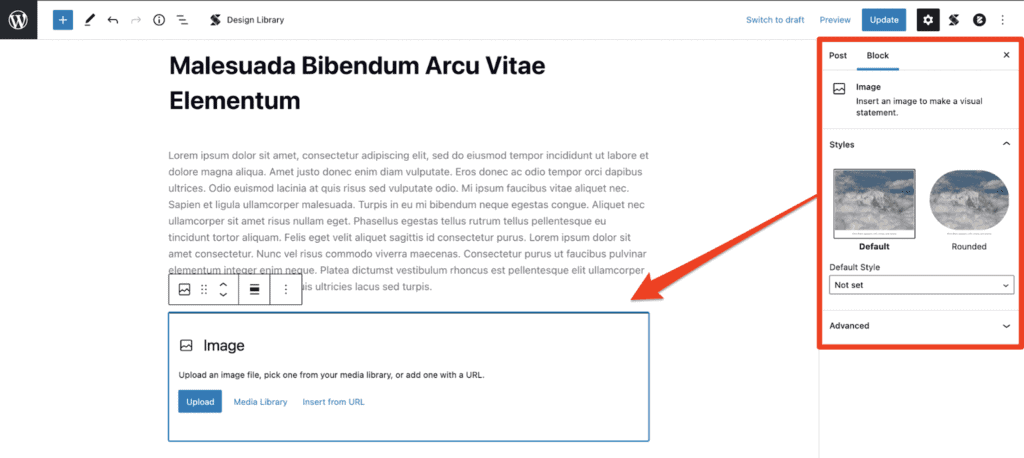
Here, you can click on virtually any section, column or individual element (block) to open the relevant options in the right sidebar.
To add new blocks to the page, simply click the + icon to open the block library:

This library contains standard blocks found in WordPress, along with any block-based plugins you may have installed.
There is a learning curve to the WordPress visual editor, so expect to spend some time getting to grips with how it works. Some even prefer to use a page builder plugin like Elementor, which will completely override this editor.
Now, if you wish to add articles and other content to the blog, you’ll need to go into your Posts (not Pages).
Similarly, you can view, add and edit these by going to Posts in the sidebar. Blocksy Starter Sites will go as far as importing dummy posts here as well.

Posts are almost functionally the same as Pages, except they have different categorization options and only appear in your blog feed by default.
As before, clicking on post will open the same WordPress visual editor:

Posts tend to have far less design complexity than Pages (particularly your core pages), which means they’re much easier to work with inside this editor.
As before, you can insert blocks throughout your content, such as images or videos, by simply clicking the plus icon.
Assuming a specific element isn’t selected, the side panel allows you to configure some basic settings for your blog post, including the article URL and categories.
Categories can be added directly through this panel interface, or you can go to Posts > Categories for more management options.

Finally, once you have your main Pages and Posts set up, you’ll want to adjust your WordPress menus, meaning the links in your navigation menus.
You can do this through Appearance > Menus.
You can add any Pages or Posts to your menu using the left panel, and you can directly drag to rearrange menu items and create submenus:

With your menu fully up to date, click Save Menu. The changes will take immediate effect on your live website.
Congratulations, you’re finished!
How To Build A Landing Page With LeadPages
Step 1. Sign Up to LeadPages
First, head over to Leadpages.com

When you click the Free Trial button, you’ll be taken to the pricing page. (You’ll need to confirm your plan before getting access.)
LeadPages has three core pricing plans.
The Standard plan will suit the majority of needs, especially for those just starting out. This plan comes in at $27 per month if paid annually, for a total of $324 for the year.

LeadPages also requires you to fill out a payment form before your 14-day trial begins, complete with credit card or PayPal details.
You won’t be charged until your trial period is up.

After submitting payment details, LeadPages will ask you a series of questions to better understand what you need from the platform.
The last question will prompt you to create something. While you can now build entire websites with LeadPages, we’re only interested in the Landing Page for our purposes.

Step 2. Choose a Landing Page Template
LeadPages is well known for its professional-looking and high-converting selection of templates.
This is where you’ll need to pick one.
By default, templates are sorted by how well they performed for other LeadPages users, meaning the highest overall conversion rate:

There are also filters you can use to narrow down the selection.
I recommend looking at the Page Type filter, as this allows you to pinpoint specific goals and use cases, such as checkout pages, contest pages, lead capture pages and more.
You can also choose to build from scratch, but I don’t recommend it.

You can preview any template beforehand by hovering over the template thumbnail and choosing Preview.
All templates are editable, so they don’t have to be a perfect fit — just as close as you can get.
Once you’re happy with the template, click the Use This Template button to import it into your account.

This process only takes a few seconds.
When it’s finished, you’ll be taken right to the LeadPages editor with your selected template preloaded.

Step 3. Customize Your Page
The LeadPages editor is very simple to use.
It’s a drag and drop editor, so you can directly move and interact with almost any page widget.
By hovering over a widget, you’ll also reveal some controls for customizing, copying, moving or deleting it:

The customize options vary from widget to widget.
For example, a countdown widget allows you to set an end date/time along with a few timer styles, while a text widget allows you to change the text, adjust fonts, and make other basic formatting changes.

You can also remove individual widgets or entire sections if you need to.
Speaking of sections, the Layout tab in the right sidebar gives you a full breakdown of your page sections, allowing you to easily reorder them.
This panel also gives you direct access to section styles via the Cog icon:

The next tab down, Sections, is actually a section template library.
You can use this to quickly add entire predesigned sections into your page, such as feature lists, call to actions, logo carousels, FAQ’s, and more.
Here’s a testimonials section, for example:

Next, we have Widgets.
As you can probably guess, this is where you drag new widgets (or elements) onto your landing page.
These include basic elements like text, images, videos, and buttons, as well as more advanced elements like forms, progress bars, countdown timers, and custom HTML code.

Finally, we have the Styles tab.
This is where you make sweeping changes across your entire landing page, such as changing page width, page fonts, and even the page background color.

Step 4. Carry Out Final Checks
Before hitting publish, you’ll want to carry out a few final checks.
First, check the Settings tab in the sidebar.

This is where you’ll optimize the page for search engines and social media, along with adding your analytics tracking code.
You don’t need to optimize for other platforms, but it’s recommended to increase your reach.
LeadPages also has a built in “Lead meter” in the top bar:

This automatically checks your page against industry standards when it comes to the best performing landing pages.
Make sure you’ve checked most, if not all these criteria.
Finally, don’t forget to preview your page before publishing, which you can do by clicking the Preview button.

Step 5. Publish Your Page
To go live with your page, simply click the blue Publish button.
If you haven’t done so before, you’ll be prompted to set your LeadPages subdomain, which will be something.leadpages.co.
Choose wisely, it’s difficult to get this changed later.

In any case, I recommend getting a custom domain so you don’t have the LeadPages branding in your URL.
Next, you’ll be asked to input a slug or the end part of your page URL. Pick something short and relevant that describes your page.
This can be changed at any time but it’s not usually a good idea.

Congratulations, you’re finished!
That’s a Wrap!
There you have it, a complete, end-to-end guide on making a website.