Plugins
Plugins are tools, made by many people and companies in the WordPress community, to add extra features to WordPress. On the WordPress.com Business and eCommerce plans, you can choose from many thousands of plugins to extend the functionality of your site.
Built-in Features
A WordPress.com website comes with many features built-in, meaning you won’t need a plugin for it. The features listed in this drop-down come as standard for all WordPress.com sites, without any need for you to install a plugin. Before you install a plugin, check to make sure the feature isn’t already covered here:
Click here to see a list of all built-in WordPress.com features.
- WordPress.com stats (our version of Google Analytics)
- Essential SEO (Search Engine Optimization)
- Security scanning
- Advanced galleries (tiled, mosaic, slideshows, and more)
- Social Media (add social media buttons to your posts and pages)
- Contact Forms
- Extended Customizer
- Extended Widgets (Flickr, Eventbrite, Google Calendar, Twitter, and more)
- Akismet (advanced anti-spam security)
- Backup & Export (24/7 backup of your entire site)
- Importer
- Extended Shortcodes (video, audio, and more)
- Infinite scroll
- Related posts
- Email subscriptions (follow button)
- Advanced Commenting (comment likes, user mentions, notifications, and more)
- Markdown
- Likes (for Posts)
- Embeds (Facebook, Twitter, Instagram, TikTok, and more)
- Post Carousel
- Event Countdown
- Eventbrite Events
- Mailchimp subscription form
- Polls
- Slideshows
Included with Personal plan and higher:
- Payments block (recurring or one time payments with Stripe)
- Premium Content block (restrict content to paying subscribers only)
- Audio block (embed audio or podcasts)
- Donations
Included with Premium, Business, and eCommerce:
- Custom Design (custom fonts, CSS editor, and more)
- Video Uploading
- Google Analytics
- Appointment bookings via Calendly
- Pay with PayPal block
Included with Business, and eCommerce:
The Jetpack and Akismet plugins come pre-installed on your site and cannot be deactivated. They provide many of the essential features of your site that are mentioned in the list above. However, you can deactivate specific Jetpack modules. To do that, go to My Site → Jetpack → Dashboard and scroll all the way to the bottom where you can find the Modules option.
Installing Plugins
If the functionality you want on your site is not included as a standard feature, our WordPress.com Business and eCommerce plans allow you to install other plugins. With many thousands of plugins available, you can make your site do almost anything.
To install a plugin, go to My Site → Plugins → Add New. You’ll see a showcase of some featured plugins, as well as a tab for the most popular, recommended, and favorite plugins. You can also search for plugins by functionality or look for a specific plugin that you’ve heard about.
After you click on a plugin name, you’ll see a button to install it on your site. You can also read all about the plugin – what functionality it provides, how it works, and how to adjust its settings.

Most plugins are created by third-party developers unaffiliated with WordPress.com, made available to enhance the functionality of your WordPress.com site. Before you install a plugin, you’ll want to check the following criteria:
- Last updated: indicates that it is actively being supported and worked on. Avoid plugins that have not been updated in a long time.
- Active installations: indicates a popular and well-supported plugin.
- Rating: feedback from customers who installed the plugin.
- Compatible: Make sure the plugin compatible with the version of WordPress you are running (WordPress.com sites always use the latest version automatically.)

Before installing any plugins, it’s always good to read over the plugin’s information page to make sure you know how to use it and what it will do for your site.
Install Plugins via a .zip File
In some cases, you may obtain a plugin’s ZIP file to upload to your site to install the plugin. Here’s what to do:
- Go to My Site(s) → Plugins and click Upload Plugin or Add New.
- Click on Choose File to find the .zip file location on your computer and then choose Install Now. Do not unzip the file before uploading it.

- Once it’s installed, click Activate Plugin to enable the plugin on your site.

Installing Plugins via SFTP
You can also install plugins via Secure File Transfer Protocol (SFTP). See here for more information.
Trying or Adding Multiple Plugins
It’s a good idea to periodically audit your plugins and delete those that you are no longer using. Unnecessary code from these plugins can cause problems.
If you’re testing different plugins to try to get specific functionality, it’s a good idea to deactivate a plugin before moving on to another one to test. This will keep your active plugins list to just the plugins you are using, and avoid confusion over having multiple plugins that do the same thing. Unless there are multiple plugins that need to be activated to work together, it is best to install one plugin at a time and test/set up each one individually.
In the event that a plugin causes undesirable results on your site, you’ll be able to isolate the specific plugin that caused the issue and deactivate it.
Learn more tips for managing your plugins here:
Working with Installed Plugins
Once you have installed some plugins on your site, you can go to Plugins → Installed Plugins to see a list of all the plugins on your site.
Plugins usually add new menu items to your Dashboard. In the example on the right, menu items added by plugins are highlighted.
Some plugins will add their menus inside of existing options like Settings, Tools, or Appearance.
In the list of your installed plugins, look for Settings, View Details, Docs, or Support (each plugin offers different links). Those menu items will take you to information on configuring your plugin:


Deactivate a Plugin
You can deactivate a plugin on your site if you no longer need it, or if you need to turn it off temporarily. Deactivating a plugin is non-destructive: the plugin will remain on your site for you to reactivate if you need to. When you reactivate a plugin, all of its settings and content will be saved just like before.
To deactivate a plugin:
- Go to Plugins → Installed Plugins.
- Find the plugin in the list.
- Click Deactivate.
You can also erase a plugin permanently from your site. After deactivating the plugin following the steps above, the Delete option will appear.
Getting Help with Plugins
If you’re struggling to understand or set up a plugin, your best option for support is to go directly to the plugin’s creator. To find support for your plugin, go to My Site(s) → Plugins → Installed Plugins and look for a link to Docs or Support in the plugin’s details to find out how to contact them.
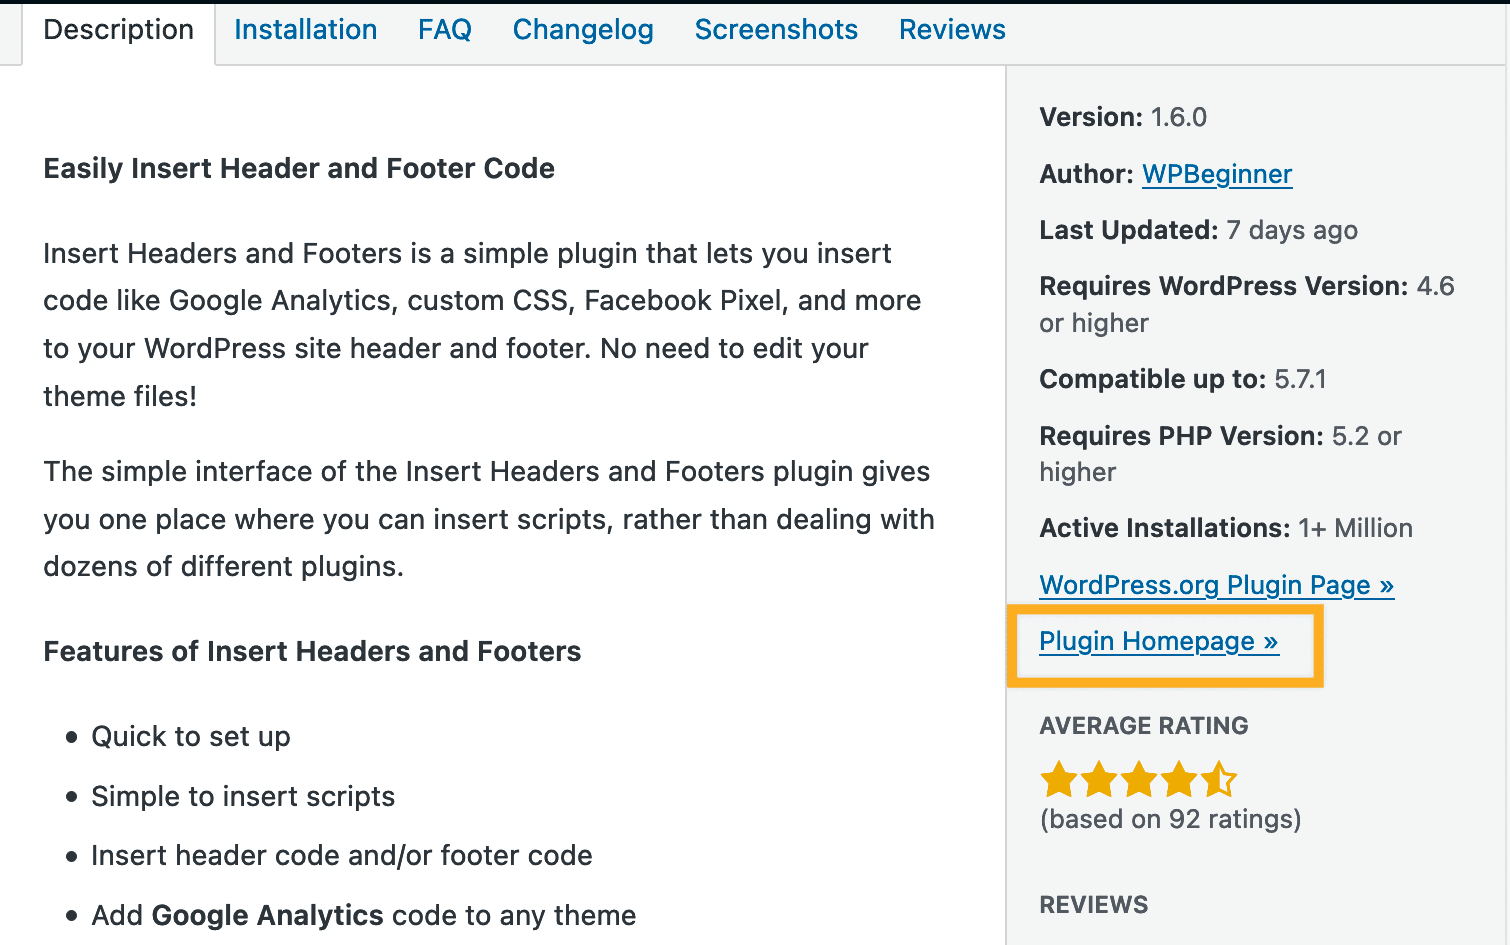
If you don’t see those options, look for a link to the Plugin Homepage after clicking View Details:
If a plugin has blocked you from accessing your own site, contact our Happiness Engineers to help deactivate the plugin for you.
📌
When you contact WordPress.com support, we will assist with plugins made by us (such as Jetpack and WooCommerce.) For plugins not made by us, we generally cannot assist you with them. Instead, we will show you how to reach out to the plugin’s creator directly. Here’s more information on our scope of support for third-party tools.
Identifying Plugin Conflicts
If you’ve noticed an error in functionality or a plugin is displaying errors, there may be a conflict with a plugin or theme that is active on your site.
In the case where you’ve recently installed a new plugin or theme, or suspect a certain one is causing a problem, you might try deactivating it temporarily to see if having it turned off resolves your issue.
There are two main ways to identify plugin conflicts on your site:
As the site owner, it is your responsibility to identify plugin issues on your site and contact the plugin authors to help fix issues. Clicking on the above links will guide you through the steps to take.
Incompatible Plugins
While the vast majority of plugins are supported here at WordPress.com, there are some that are not, usually because the feature is already included or the plugin would damage your site. This Incompatible Plugins page contains a list of these unsupported plugins and accompanying reasons why they aren’t supported.
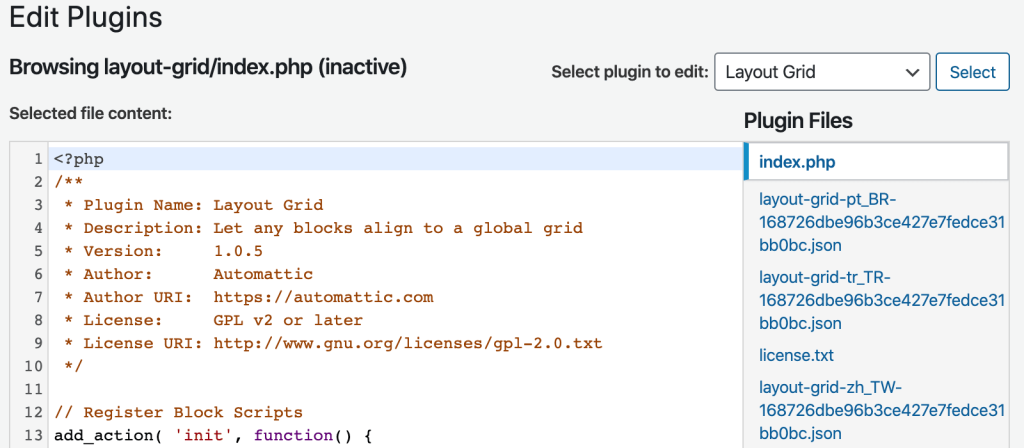
Plugin Editor (Advanced)
The Plugin Editor menu option allows you to directly edit the code of your installed Plugins.
⚠️
The Plugin Editor is for site owners with advanced coding/programming knowledge. Proceed with caution.
Editing plugins directly may introduce incompatibilities that break your site and your changes may be lost in future updates. If you absolutely have to make direct edits to this plugin, use a file manager to create a copy with a new name and hang on to the original. That way, you can re-enable a functional version if something goes wrong.
Versatile plans and pricing
-
Free

Best for students
-
Personal

Best for hobbyists
-
Premium

Best for freelancers
-
Business

Best for small businesses
Still confused?
Help us improve:
We're always looking to improve our documentation. If this page didn't answer your question or left you wanting more, let us know! We love hearing your feedback. For support, please use the forums or contact support form. Thanks!
