Organization owners can manage allowed IP addresses for an organization.
About allowed IP addresses
You can restrict access to organization assets by configuring an allow list for specific IP addresses. For example, you can allow access from only the IP address of your office network. The allow list for IP addresses will block access via the web, API, and Git from any IP addresses that are not on the allow list.
You can approve access for a single IP address, or a range of addresses, using CIDR notation. For more information, see "CIDR notation" on Wikipedia.
To enforce the IP allow list, you must first add IP addresses to the list, then enable the IP allow list. You must add your current IP address, or a matching range, before you enable the IP allow list.
If you set up an allow list you can also choose to automatically add to your allow list any IP addresses configured for GitHub Apps that you install in your organization. The creator of a GitHub App can configure an allow list for their application, specifying the IP addresses at which the application runs. By inheriting their allow list into yours, you avoid connection requests from the application being refused. For more information, see "Allowing access by GitHub Apps."
You can also configure allowed IP addresses for the organizations in an enterprise account. For more information, see "Enforcing security settings in your enterprise account."
Adding an allowed IP address
-
In the top right corner of GitHub, click your profile photo, then click Your organizations.

-
Next to the organization, click Settings.

-
In the left sidebar, click Organization security.

-
At the bottom of the "IP allow list" section, enter an IP address, or a range of addresses in CIDR notation.

-
Optionally, enter a description of the allowed IP address or range.

-
Click Add.

Enabling allowed IP addresses
-
In the top right corner of GitHub, click your profile photo, then click Your organizations.
-
Next to the organization, click Settings.
-
In the left sidebar, click Organization security.
-
Under "IP allow list", select Enable IP allow list.

-
Click Save.
Allowing access by GitHub Apps
If you're using an allow list, you can also choose to automatically add to your allow list any IP addresses configured for GitHub Apps that you install in your organization.
If you select Enable IP allow list configuration for installed GitHub Apps in your allow list settings, then IP addresses from installed GitHub Apps are added to your allow list. This happens irrespective of whether your allow list is currently enabled. If you install a GitHub App and then the creator of that application changes the addresses in its allow list, your allow list is automatically updated with those changes.
You can identify the IP addresses that have been automatically added from GitHub Apps by reviewing the description field. The description for these IP addresses is: "Managed by the NAME GitHub App." Unlike addresses you add manually, you cannot edit, delete, or disable IP addresses that are automatically added from GitHub Apps.
Note: The addresses in the IP allow list of a GitHub App only affect requests made by installations of the GitHub App. The automatic addition of a GitHub App's IP address to an organization's allow list does not allow access to a GitHub user who connects from that IP address.
For more information about how to create an allow list for a GitHub App you have created, see "Managing allowed IP addresses for a GitHub App."
-
In the top right corner of GitHub, click your profile photo, then click Your organizations.
-
Next to the organization, click Settings.
-
In the left sidebar, click Organization security.
-
Under "IP allow list", select Enable IP allow list configuration for installed GitHub Apps.

-
Click Save.
Editing an allowed IP address
-
In the top right corner of GitHub, click your profile photo, then click Your organizations.
-
Next to the organization, click Settings.
-
In the left sidebar, click Organization security.
-
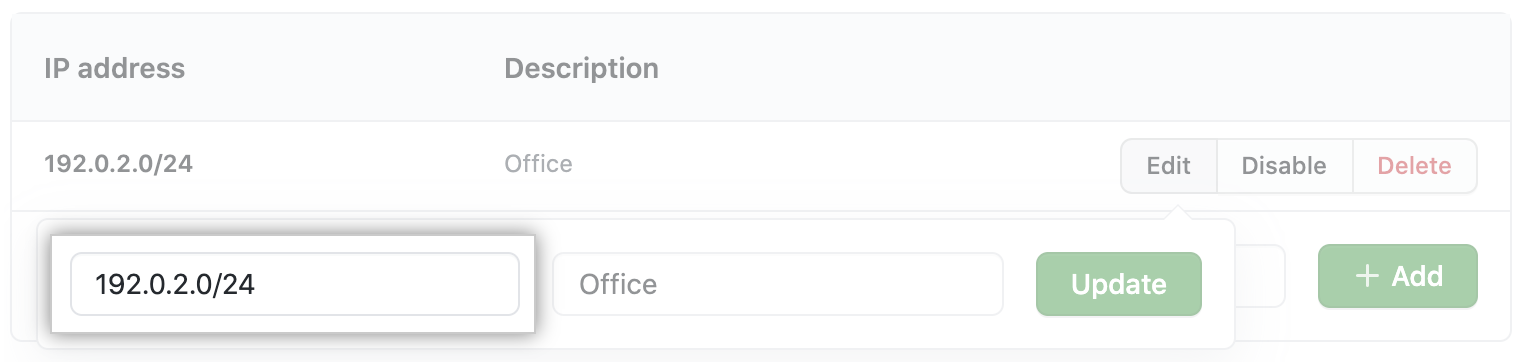
Under "IP allow list", to the right of the entry you want to edit, click Edit.

-
Type an IP address, or range of addresses, in CIDR notation.
-
Type a description of the allowed IP address or range.

-
Click Update.
Deleting an allowed IP address
-
In the top right corner of GitHub, click your profile photo, then click Your organizations.
-
Next to the organization, click Settings.
-
In the left sidebar, click Organization security.
-
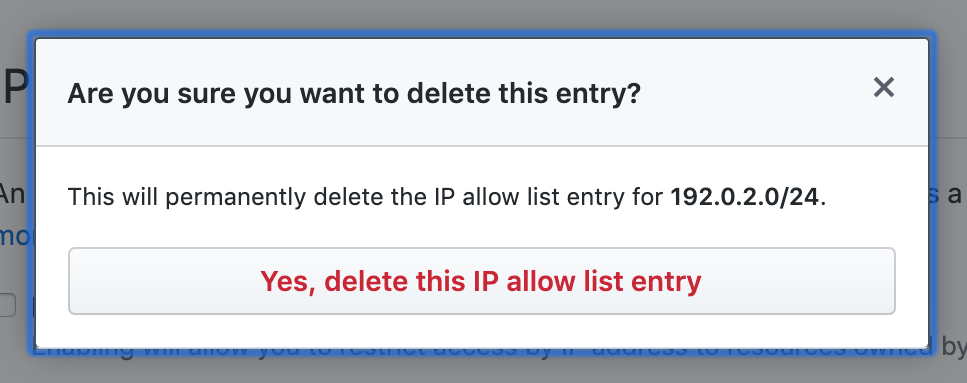
Under "IP allow list", to the right of the entry you want to delete, click Delete.

-
To permanently delete the entry, click Yes, delete this IP allow list entry.
Using GitHub Actions with an IP allow list
Warning: If you use an IP allow list and would also like to use GitHub Actions, you must use self-hosted runners. For more information, see "Hosting your own runners."
To allow your self-hosted runners to communicate with GitHub, add the IP address or IP address range of your self-hosted runners to the IP allow list. For more information, see "Adding an allowed IP address."