Wednesday, 02 October 2019
2 years since Catalan Independence Referendum, an update

Note 1: This is not KDE or Free Software related, if you're not interested, stop reading, no one is forcing you to read
Note 2: Yes, this is still going to Planet KDE, KDE friends and colleagues ask me about it almost every time we met, so there's definitely interest
Note 3: You're more than welcome to comment, but remember this blog is my house, so don't complain when i don't tolerate stuff i wouldn't tolerate at my home
You may remember Catalonia held an Independence referendum 2 years ago, lots of things have happened since then, I'm going to try to summarize, if you're interested in my initial reaction read my blog from that very same day.
On October 27 2017, following the referendum results, the Parliament of Catalonia declared Independence by a majority of 70 out of 135 MPs. That was mostly ignored by every single country in the world. A few hours later the Spanish government used bigger-army-diplomacy (AKA article 155 of Spanish Constitution) to decide that the Parliament of Catalonia would be suspended and new elections would happen in Catalonia on December 21.
On November 2nd 2017, a judge put most of the Catalan government in jail with the charges of "you've been terribly bad".
They still remain in jail awaiting for trial results (trial finished a few months ago).
Notable exceptions of government officials not in jail are president Carles Puigdemont and Ministers Clara PonsatĂ and Toni ComĂn, that exiled themselves to other European countries. Spain has tried several times to get European countries to extradite them to Spain because "they've been terribly bad", but that has failed every single time, so they ended up revoking the extradition requests.
Elections happened on December 21 2017, and to shocking surprise of no one, almost virtually the same results happened if you count the pro-independence vs anti-independence blocks.
Since then the Catalan pro-independence government has been basically very low-key in their actions.
Meanwhile, Spain had a its own elections in April this year. They did this nice thing of letting the jailed (but still not sentenced to anything, so innocent) Catalan politicians run, and several of them won Congress seats. Then they said "oh but you know, you're a very dangerous person, so we're not going to let you attend Congress sessions". Not that it matters now, since Spain is unable to govern itself and is having it's 4th election in 4 years this November.
We also had elections in the European Union, and you know what? The same happened! They let catalan-jailed politicians run but then they decided they would not let them take the seats. Actually, this time is even worse since Carles Puigdemont and Toni ComĂn, that are living in Brussels without any extradition petition (i.e. they're basically free citizens of Europe), have also been rejected from taking their seats for some esoteric reason.
As a "fun fact", in late 2018 some Spanish regions had elections. Andalucia was one of them and the current government is a coalition of PP+C+VOX, i.e. right wing conservatives, right wing liberals and ultra right wing nut-jobs. One of their first decisions was to put away 100000 euros for grants to teach Spanish to Spanish born people (not for helping immigrants, they're right wing crazies after all) living in Catalonia that don't know how speak Spanish. I'm 99.99% sure the number of people that matches that description is very close to 0 people. You heard well, the poorest region of Spain decided to subsidize the 4th richest region for something that is virtually useless. Thanks!
Much less "fun fact", last week Monday, the Spanish police decided to detain 9 pro-independence people (later to be 7 since 2 were let go) with terrorism charges. The investigation is on-going and technically it should be secret, but we've seen pictures all over the news of what the cops say to be material to make bombs, and all i can see is a pressure cooking pot and some fireworks used typically for Ball de diables.
I don't want to 100% rule out this people having actual plans to do something nasty, but Spanish police/judges/state history of just fabricating charges against people they don't like is so long (An anarchist recently spent *18* months in jail awaiting trial for tweeting stuff "Goku lives, the fight continues" to be then just found innocent after trial) that i would not be surprised either if this is just Spain doing bigger-army-diplomacy again.
TL;DR: Everything is fucked up and I can't really see a way out at this point.
Saturday, 28 September 2019
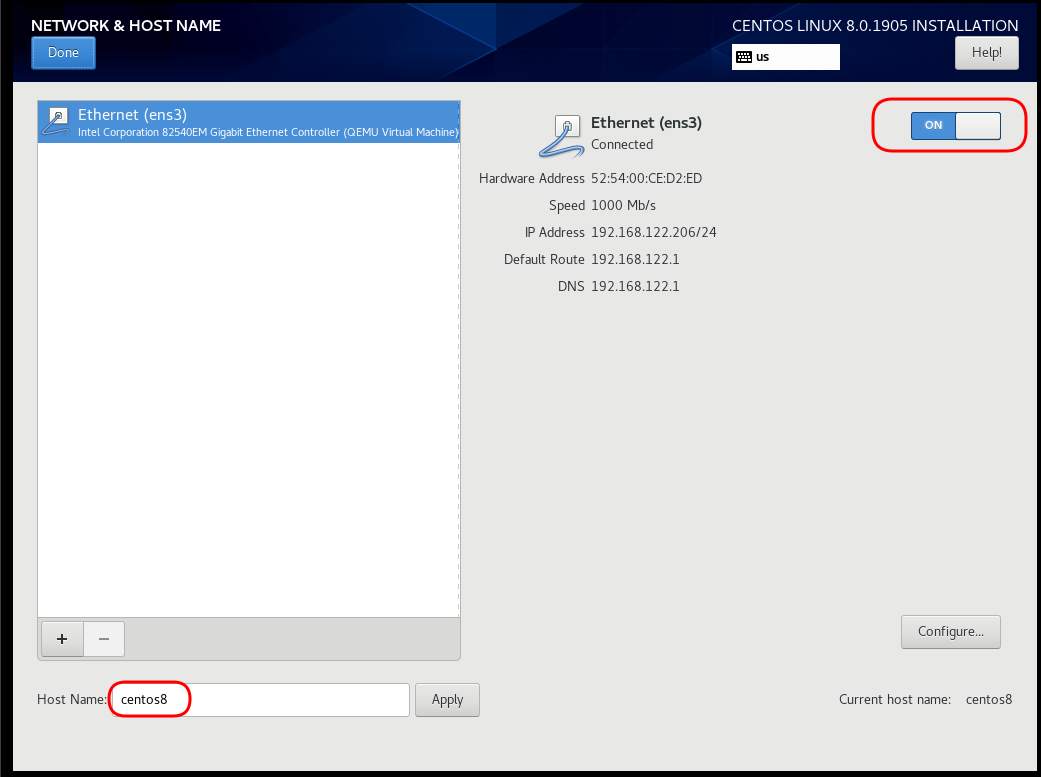
CentOS 8 NetInstall
a few days ago CentOS-8 (1905) was released and you can find details here ReleaseNotes
Below is a visual guide on how to net-install centos8 1905
notes on a qemu-kvm
Boot

Select Language

Menu
I have marked the next screens. For netinstall you need to setup first network

Time

Network
Disable kdump

Add Repo
ftp.otenet.gr/linux/centos/8/BaseOS/x86_64/os/
Server Installation

Disk

Review

Begin Installation

Root

User
Make this user administrator

Installation


Reboot

Grub

Boot

CentOS-8 (1905)

Thursday, 26 September 2019
Using template file with terraform
When using tf most of times you need to reuse your Infrastructure as Code, and so your code should be written in such way. In my (very simple) use-case, I need to reuse user-data for cloud-init to setup different VMs but I do not want to rewrite basic/common things every time. Luckily, we can use the template_file.
user-data.yml
In the below yaml file, you will see that we are using tf string-template to produce hostname with this variable:
"${hostname}"here is the file:
#cloud-config

disable_root: true
ssh_pwauth: no

users:
  - name: ebal
    ssh_import_id:
      - gh:ebal
    shell: /bin/bash
    sudo: ALL=(ALL) NOPASSWD:ALL

# Set TimeZone
timezone: Europe/Athens

hostname: "${hostname}"

# Install packages
packages:
  - mlocate
  - figlet

# Update/Upgrade & Reboot if necessary
package_update: true
package_upgrade: true
package_reboot_if_required: true

# Remove cloud-init
runcmd:
  - figlet "${hostname}" > /etc/motd
  - updatedb
Variables
Let’s see our tf variables:
$ cat Variables.tfvariable "hcloud_token" {
description = "Hetzner Access API token"
default = ""
}
variable "gandi_api_token" {
description = "Gandi API token"
default = ""
}
variable "domain" {
description = " The domain name "
default = "example.org"
}Terraform Template
So we need to use user-data.yml as a template and replace hostname with var.domain
$ cat example.tfTwo simple steps:
- First we read user-data.yml as template and replace hostname with var.domain
- Then we render the template result to user_data as string
provider "hcloud" {
  token = "${var.hcloud_token}"
}

data "template_file" "userdata" {
  template = "${file("user-data.yml")}"
  vars = {
    hostname  = "${var.domain}"
  }
}

resource "hcloud_server" "node1" {
  name = "node1"
  image = "ubuntu-18.04"
  server_type = "cx11"
  user_data = "${data.template_file.userdata.rendered}"
}
$ terraform version
Terraform v0.12.3And that’s it !
Sunday, 22 September 2019
Akademy 2019

It's 10 days already since Akademy 2019 finished and I'm already missing it :/
Akademy is a week-long action-packed conference, talks, BoFs, daytrip, dinner with old and new friends, it's all a great combination and shows how amazing KDE (yes, the community, that's our name) is.
On the talks side i missed some that i wanted to attend because i had to extend my time at the registration booth helping fellow KDE people that had forgotten to register (yes, our setup could be a bit easier, doesn't help that you have to register for talks, for travel support and for the actual conference in three different places), but I am not complaining, you get to interact with lots of people in the registration desk, it's a good way to meet people you may not have met otherwise, so please make sure you volunteer next year ;)
One of the talks i want to highlight is Dan VrĂĄtil's talk about C++, I agree with him that we could do much better in making our APIs more expressive using the power of "modern" C++ (when do we stop it calling modern?). It's a pity that the slides are not up so you'll have to live with KĂŠvin Ottens sketch of it for now.

My talk was sadly not very well attended since i was sharing time with the more interesting talk by Marco and Bhushan about Plasma in embedded devices (i would have gone there if it wasn't because i had a talk) so if you're interested in fuzzing please read my slides and give me a shout if you want to volunteer to help us fuzz all the things!
On the BoFs side one of the hardest but most interesting we had was the one about KDE Applications (the N things we release monthly in one go) vs KDE applications (all applications made by us), and i think we may be on the right track there, there's a plan, needs finishing out, but I'm confident it may actually work :)
One of the things that shows how amazing this conference is and how many interesting things are happening is the fact that i made a small list of bugs i wanted to work on if i ever got bored of the talks or the BoFs, i don't think i even started on any of them ^_^
Akademy 2020
Akademy is a core event for KDE and we need to find people to help us organising it every year. If you think you can help, please have a look at the call for hosts document.
Thanks
I would like to thank the UnixMiB friends for hosting us, i know it's lots of work and i hope you know we all very much appreciate the effort you put in.
I would like to thank the Akademy-team on KDE's side too, you are amazing and pull out great work year after year, keep it up!
I would like to thank the KDE e.V. for partially sponsoring my attendance to Akademy, please donate to KDE if you think the work done at Akademy is important.
Friday, 20 September 2019
Partition MisAlignment
this article also has an alternative title:
How I Learned to Stop Worrying and Loved my Team
This is a story of troubleshooting cloud disk volumes (long post).
Cloud Disk Volume
Working with data disk volumes in the cloud have a few benefits. One of them is when the volume runs out of space, you can just increase it! No need of replacing the disk, no need of buying a new one, no need of transferring 1TB of data from one disk to another. It is a very simple matter.
Partitions Vs Disks
My personal opinion is not to use partitions. Cloud data disk on EVS (elastic volume service) or cloud volumes for short, they do not need a partition table. You can use the entire disk for data.
Use: /dev/vdb instead of /dev/vdb1
Filesystem
You have to choose your filesystem carefully. You can use XFS that supports Online resizing via xfs_growfs, but you can not shrunk them. But I understand that most of us are used to work with extended filesystem ext4 and to be honest I also feel more comfortable with ext4.
You can read the below extensive article in wikipedia Comparison of file systems for more info, and you can search online regarding performance between xfs and ext4. There are really close to each other nowadays.
Increase Disk
Today, working on a simple operational task (increase a cloud disk volume), I followed the official documentation. This is something that I have done in the past like a million times. To provide a proper documentation I will use redhat’s examples:
In a nutshell
- Umount data disk
- Increase disk volume within the cloud dashboard
- Extend (change) the geometry
- Check filesystem
- Resize ext4 filesystem
- Mount data disk
Commands
Let’s present the commands for reference:
# umount /dev/vdb1

[increase cloud disk volume]

# partprobe

# fdisk /dev/vdb
[delete partition]
[create partition]

# partprobe

# e2fsck /dev/vdb1
# e2fsck -f /dev/vdb1
# resize2fs /dev/vdb1
# mount /dev/vdb1
And here is fdisk in more detail:
Fdisk
# fdisk /dev/vdb

Welcome to fdisk (util-linux 2.27.1).
Changes will remain in memory only, until you decide to write them.
Be careful before using the write command.

Command (m for help): p
Disk /dev/vdb: 1.4 TiB, 1503238553600 bytes, 2936012800 sectors
Units: sectors of 1 * 512 = 512 bytes
Sector size (logical/physical): 512 bytes / 512 bytes
I/O size (minimum/optimal): 512 bytes / 512 bytes
Disklabel type: dos
Disk identifier: 0x0004e2c8

Device     Boot Start        End    Sectors  Size Id Type
/dev/vdb1           1 2097151999 2097151999 1000G 83 Linux
Delete
Command (m for help): d
Selected partition 1
Partition 1 has been deleted.
Create
Command (m for help): n
Partition type
   p   primary (0 primary, 0 extended, 4 free)
   e   extended (container for logical partitions)
Select (default p): p
Partition number (1-4, default 1):
First sector (2048-2936012799, default 2048):
Last sector, +sectors or +size{K,M,G,T,P} (2048-2936012799, default 2936012799):

Created a new partition 1 of type 'Linux' and of size 1.4 TiB.
Command (m for help): p
Disk /dev/vdb: 1.4 TiB, 1503238553600 bytes, 2936012800 sectors
Units: sectors of 1 * 512 = 512 bytes
Sector size (logical/physical): 512 bytes / 512 bytes
I/O size (minimum/optimal): 512 bytes / 512 bytes
Disklabel type: dos
Disk identifier: 0x0004e2c8

Device     Boot Start        End    Sectors  Size Id Type
/dev/vdb1        2048 2936012799 2936010752  1.4T 83 Linux
Write
Command (m for help): w
The partition table has been altered.
Calling ioctl() to re-read partition table.
Syncing disks.
File system consistency check
An interesting error occurred, something that I had never seen before when using e2fsck
# e2fsck /dev/vdb1
e2fsck 1.42.13 (17-May-2015)
ext2fs_open2: Bad magic number in super-block
e2fsck: Superblock invalid, trying backup blocks...
e2fsck: Bad magic number in super-block while trying to open /dev/vdb1

The superblock could not be read or does not describe a valid ext2/ext3/ext4
filesystem.  If the device is valid and it really contains an ext2/ext3/ext4
filesystem (and not swap or ufs or something else), then the superblock
is corrupt, and you might try running e2fsck with an alternate superblock:
    e2fsck -b 8193 <device>
 or
    e2fsck -b 32768 <device>
Superblock invalid, trying backup blocks
Panic
I think I lost 1 TB of files!
At that point, I informed my team to raise awareness.

Yes I know, I was a bit sad at the moment. I’ve done this work a million times before, also the Impostor Syndrome kicked in!
Snapshot
I was lucky enough because I could create a snapshot, de-attach the disk from the VM, create a new disk from the snapshot and work on the new (test) disk to try recovering 1TB of lost files!
Make File System
mke2fs has a dry-run option that will show us the superblocks:
mke2fs 1.42.13 (17-May-2015)
Creating filesystem with 367001344 4k blocks and 91750400 inodes
Filesystem UUID: f130f422-2ad7-4f36-a6cb-6984da34ead1
Superblock backups stored on blocks:
        32768, 98304, 163840, 229376, 294912, 819200, 884736, 1605632, 2654208,
        4096000, 7962624, 11239424, 20480000, 23887872, 71663616, 78675968,
        102400000, 214990848
Testing super blocks
so I created a small script to test every super block against /dev/vdb1
e2fsck  -b  32768      /dev/vdb1
e2fsck  -b  98304      /dev/vdb1
e2fsck  -b  163840     /dev/vdb1
e2fsck  -b  229376     /dev/vdb1
e2fsck  -b  294912     /dev/vdb1
e2fsck  -b  819200     /dev/vdb1
e2fsck  -b  884736     /dev/vdb1
e2fsck  -b  1605632    /dev/vdb1
e2fsck  -b  2654208    /dev/vdb1
e2fsck  -b  4096000    /dev/vdb1
e2fsck  -b  7962624    /dev/vdb1
e2fsck  -b  11239424   /dev/vdb1
e2fsck  -b  20480000   /dev/vdb1
e2fsck  -b  23887872   /dev/vdb1
e2fsck  -b  71663616   /dev/vdb1
e2fsck  -b  78675968   /dev/vdb1
e2fsck  -b  102400000  /dev/vdb1
e2fsck  -b  214990848  /dev/vdb1
Unfortunalyt none of the above commands worked!
last-ditch recovery method
There is a nuclear option DO NOT DO IT
mke2fs -S /dev/vdb1Write superblock and group descriptors only. This is useful if all of the superblock and backup superblocks are corrupted, and a last-ditch recovery method is desired. It causes mke2fs to reinitialize the superblock and group descriptors, while not touching the inode table and the block and inode bitmaps.
Then e2fsck -y -f /dev/vdb1 moved 1TB of files under lost+found with their inode as the name of every file.
I cannot stress this enough: DO NOT DO IT !
Misalignment
So what is the issue?
See the difference of fdisk on 1TB and 1.4TB
Device     Boot Start        End    Sectors  Size Id Type
/dev/vdb1           1 2097151999 2097151999 1000G 83 Linux

Device     Boot Start        End    Sectors  Size Id Type
/dev/vdb1        2048 2936012799 2936010752  1.4T 83 Linux
The First sector is now at 2048 instead of 1.
Okay delete disk, create a new one from the snapshot and try again.
Fdisk Part Two
Now it is time to manually put the first sector on 1.
# fdisk /dev/vdb

Welcome to fdisk (util-linux 2.27.1).
Changes will remain in memory only, until you decide to write them.
Be careful before using the write command.

Command (m for help): p

Disk /dev/vdb: 1.4 TiB, 1503238553600 bytes, 2936012800 sectors
Units: sectors of 1 * 512 = 512 bytes
Sector size (logical/physical): 512 bytes / 512 bytes
I/O size (minimum/optimal): 512 bytes / 512 bytes
Disklabel type: dos
Disk identifier: 0x0004e2c8

Device     Boot Start        End    Sectors  Size Id Type
/dev/vdb1        2048 2936012799 2936010752  1.4T 83 Linux

Command (m for help): d
Selected partition 1
Partition 1 has been deleted.

Command (m for help): n
Partition type
   p   primary (0 primary, 0 extended, 4 free)
   e   extended (container for logical partitions)
Select (default p): p
Partition number (1-4, default 1): 1
First sector (2048-2936012799, default 2048): 1
Value out of range.
Value out of range.
damn it!
sfdisk
In our SRE team, we use something like a Bat-Signal to ask for All hands on a problem and that was what we were doing. A colleague made a point that fdisk is not the best tool for the job, but we should use sfdisk instead. I actually use sfdisk to create backups and restore partition tables but I was trying not to deviate from the documentation and I was not sure that everybody knew how to use sfdisk.
So another colleague suggested to use a similar 1TB disk from another VM.
I could hear the gears in my mind working…
sfdisk export partition table
sfdisk -d /dev/vdb > vdb.out
# fdisk -l /dev/vdb
Disk /dev/vdb: 1000 GiB, 1073741824000 bytes, 2097152000 sectors
Units: sectors of 1 * 512 = 512 bytes
Sector size (logical/physical): 512 bytes / 512 bytes
I/O size (minimum/optimal): 512 bytes / 512 bytes
Disklabel type: dos
Disk identifier: 0x0009e732

Device     Boot Start        End    Sectors  Size Id Type
/dev/vdb1           1 2097151999 2097151999 1000G 83 Linux

# sfdisk -d /dev/vdb > vdb.out

# cat vdb.out
label: dos
label-id: 0x0009e732
device: /dev/vdb
unit: sectors

/dev/vdb1 : start=           1, size=  2097151999, type=83
okay we have something here to work with, start sector is 1 and the geometry is 1TB for an ext file system. Identically to the initial partition table (before using fdisk).
sfdisk restore partition table
sfdisk /dev/vdb < vdb.out
# sfdisk /dev/vdb < vdb.out

Checking that no-one is using this disk right now ... OK

Disk /dev/vdb: 1.4 TiB, 1503238553600 bytes, 2936012800 sectors
Units: sectors of 1 * 512 = 512 bytes
Sector size (logical/physical): 512 bytes / 512 bytes
I/O size (minimum/optimal): 512 bytes / 512 bytes
Disklabel type: dos
Disk identifier: 0x0004e2c8

Old situation:

Device     Boot Start        End    Sectors  Size Id Type
/dev/vdb1        2048 2936012799 2936010752  1.4T 83 Linux

>>> Script header accepted.
>>> Script header accepted.
>>> Script header accepted.
>>> Script header accepted.
>>> Created a new DOS disklabel with disk identifier 0x0009e732.
Created a new partition 1 of type 'Linux' and of size 1000 GiB.
/dev/vdb2:
New situation:

Device     Boot Start        End    Sectors  Size Id Type
/dev/vdb1           1 2097151999 2097151999 1000G 83 Linux

The partition table has been altered.
Calling ioctl() to re-read partition table.
Syncing disks.

# fdisk -l /dev/vdb
Disk /dev/vdb: 1.4 TiB, 1503238553600 bytes, 2936012800 sectors
Units: sectors of 1 * 512 = 512 bytes
Sector size (logical/physical): 512 bytes / 512 bytes
I/O size (minimum/optimal): 512 bytes / 512 bytes
Disklabel type: dos
Disk identifier: 0x0009e732

Device     Boot Start        End    Sectors  Size Id Type
/dev/vdb1           1 2097151999 2097151999 1000G 83 Linux
Filesystem Check ?
# e2fsck -f /dev/vdb1
e2fsck 1.42.13 (17-May-2015)
Pass 1: Checking inodes, blocks, and sizes
Pass 2: Checking directory structure
Pass 3: Checking directory connectivity
Pass 4: Checking reference counts
Pass 5: Checking group summary information
SATADISK: 766227/65536000 files (1.9% non-contiguous), 200102796/262143999 blocks
f#ck YES
Mount ?
# mount /dev/vdb1 /mnt

# df -h /mnt
Filesystem      Size  Used Avail Use% Mounted on
/dev/vdb1       985G  748G  187G  81% /mnt
f3ck Yeah !!
Extend geometry
It is time to extend the partition geometry to 1.4TB with sfdisk.
If you remember from the fdisk output
Device     Boot Start        End    Sectors  Size Id Type
/dev/vdb1           1 2097151999 2097151999 1000G 83 Linux
/dev/vdb1        2048 2936012799 2936010752  1.4T 83 Linux
We have 2936010752 sectors in total.
The End sector of 1.4T is 2936012799
Simple math problem: End Sector - Sectors = 2936012799 - 2936010752 = 2047
The previous fdisk command, had the Start Sector at 2048,
So 2048 - 2047 = 1 the preferable Start Sector!
New sfdisk
By editing the text vdb.out file to re-present our new situation:
# diff vdb.out vdb.out.14
6c6
< /dev/vdb1 : start=           1, size=  2097151999, type=83
---
> /dev/vdb1 : start=           1, size=  2936010752, type=83
1.4TB
Let’s put everything together
# sfdisk /dev/vdb < vdb.out.14
Checking that no-one is using this disk right now ... OK

Disk /dev/vdb: 1.4 TiB, 1503238553600 bytes, 2936012800 sectors
Units: sectors of 1 * 512 = 512 bytes
Sector size (logical/physical): 512 bytes / 512 bytes
I/O size (minimum/optimal): 512 bytes / 512 bytes
Disklabel type: dos
Disk identifier: 0x0009e732

Old situation:

Device     Boot Start        End    Sectors  Size Id Type
/dev/vdb1           1 2097151999 2097151999 1000G 83 Linux

>>> Script header accepted.
>>> Script header accepted.
>>> Script header accepted.
>>> Script header accepted.
>>> Created a new DOS disklabel with disk identifier 0x0009e732.
Created a new partition 1 of type 'Linux' and of size 1.4 TiB.
/dev/vdb2:
New situation:

Device     Boot Start        End    Sectors  Size Id Type
/dev/vdb1           1 2936010752 2936010752  1.4T 83 Linux

The partition table has been altered.
Calling ioctl() to re-read partition table.
Syncing disks.

# e2fsck /dev/vdb1
e2fsck 1.42.13 (17-May-2015)
SATADISK: clean, 766227/65536000 files, 200102796/262143999 blocks

# e2fsck -f /dev/vdb1
e2fsck 1.42.13 (17-May-2015)
Pass 1: Checking inodes, blocks, and sizes
Pass 2: Checking directory structure
Pass 3: Checking directory connectivity
Pass 4: Checking reference counts
Pass 5: Checking group summary information
SATADISK: 766227/65536000 files (1.9% non-contiguous), 200102796/262143999 blocks

# resize2fs /dev/vdb1
resize2fs 1.42.13 (17-May-2015)
Resizing the filesystem on /dev/vdb1 to 367001344 (4k) blocks.
The filesystem on /dev/vdb1 is now 367001344 (4k) blocks long.

# mount /dev/vdb1 /mnt

# df -h  /mnt
Filesystem      Size  Used Avail Use% Mounted on
/dev/vdb1       1.4T  748G  561G  58%  /mnt
Finally!!
Partition Alignment
By the way, you can read this amazing article to fully understand why this happened:
Tuesday, 17 September 2019
Thoughts on GNU and Richard Stallman
Richard Stallman has resigned as president and from the board of directors of the Free Software Foundation. I welcome this decision.
As a co-maintainer of GNU packages (including Guix, the Guix Workflow Language, the Guile Picture Language, etc), and as a contributor to various other GNU software, I would like to state that while I'm grateful for Richard Stallman's founding of the GNU project and his past contributions to GNU, it would be wrong to continue to remain silent on the negative effects his behaviour and words have had over the past years. His actions have hurt people and alienated them from the free software movement.
When I joined GNU I used to think of Richard as just a bit of a quirky person with odd habits, with a passion for nitpicking and clear language, but also with a vision of freeing people from oppression at the hands of a boring dystopia mediated by computers. Good intentions, however, aren't enough. Richard's actions over the past years sadly have been detrimental to achieving the vision that he outlined in the GNU Manifesto, to benefit all computer users.
GNU's not Unix, but Richard ain't GNU either (RAGE?). GNU is bigger than any one person, even its founder. I'm still convinced that GNU has an important role to play towards providing a harmonized, trustworthy, freedom-respecting operating system environment that benefits all computer users. I call upon other maintainers of GNU software to embrace the responsibilities that working on a social project such as GNU brings. The GNU Manifesto states that "GNU serves as an example to inspire and a banner to rally others to join us in sharing". Let us do that by welcoming people of all backgrounds into GNU and by working hard to provide a healthy environment for fruitful collaboration.
Monday, 09 September 2019
Spoofing commits to repositories on GitHub

The following has already been reported to GitHub via HackerOne. Someone from GitHub has closed the report as “informative” but told me that it’s a known low-risk issue. As such, while they haven’t explicitly said so, I figure they don’t mind me blogging about it.
Check out this commit in torvalds’ linux.git on GitHub. In case this is fixed, here’s a screenshot of what I see when I look at this link:

How did this get past review? It didn’t. You can spoof commits in any repo on GitHub due to the way they handle forks of repositories internally. Instead of copying repositories when forks occur, the objects in the git repository are shared and only the refs are stored per-repository. (GitHub tell me that private repositories are handled differently to avoid private objects leaking out this way. I didn’t verify this but I have no reason to suspect it is not true.)
To reproduce this:
- Fork a repository
- Push a commit to your fork
- Put your commit ref on the end of:
https://github.com/[parent]/[repo]/commit/
That’s all there is to it. You can also add .diff or .patch to the end of the URL and those URLs work too, in the namespace of the parent.
The situation that worries me relates to distribution packaging. Debian has a policy that deltas to packages in the stable repository should be as small as possible, targetting fixes by backporting patches from newer releases.
If you get a bug report on your Debian package with a link to a commit on GitHub, you had better double check that this commit really did come from the upstream author and hasn’t been spoofed in this way. Even if it shows it was authored by the upstream’s GitHub account or email address, this still isn’t proof because this is easily spoofed in git too.
The best defence against being caught out by this is probably signed commits, but if the upstream is not doing that, you can clone the repository from GitHub and check to see that the commit is on a branch that exists in the upstream repository. If the commit is in another fork, the upstream repo won’t have a ref for a branch that contains that commit.
Tuesday, 27 August 2019
FSFE booth on Veganmania Donauinsel 2019

FSFE Information stall on Veganmania Donauinsel 2019
Once more free software activists from Vienna used the opportunity of the local vegan summer festival to inform about the possibility to increase our independence on computers and mobile devices. It was the second such event in Vienna this year. But unlike the first which was directly in the city center with loads of passers by this street festival took place in Viennas big recreation area on the island in the Danube river. It is rather close to the city center also and therefore many local people visit it in their spare time. The organisers estimated 9000 visitors per day.
The FSFE booth was manned there all the time from Saturday between 12:00 and 21:00 and Sunday from 10:00 to 19:00. It had a great spot far enough away from the stage with live music in order to allow undisturbed conversations and still close enough to the other 90 stalls with drinks, food, merchantise and a variety of stalls on other subjects like animal welfare, veganism sustainability, shelters and environmental protection.
Since it was an outdoor event on a meadow and because we don’t own a tent we couldn’t hang-up our posters. We just used our umbrella to not be exposed directly to the strong summer sun. And we had huge luck with the weather. Shortly after the festival was closed down on Saturday heavy rain started and it lasted until shortly before the event started again the next day.
Over the years we have collected a few regulars on our information stalls who normally drop by but again mostly totally new people frequented our FSFE information desk. Many of them had no prior knowledge what free software is about. Most of the time we were engaged in conversations with interested people and many explicitly thanked us for being there. We frequently explained why we man an FSFE information stall on a vegan summer festival: If you use the same ethical considerations that lead people to adopt a vegan life style in information technology you end up with free software.
A researcher explicitly came from an other county to the city because he wanted to visit our FSFE stall and talk to us about social implications of free software.
This weekend was an other very successful FSFE stall and we look forward to the next opportunity to man our information desk. We might even try to have stalls on other public events in the future which feature NGO information desks. At least if the fees are not unreasonably high.
Monday, 26 August 2019
Open Source is more than licenses
A few weeks ago I was honored to deliver the keynote of the Open Source Awards in Edinburgh. I decided to talk about a subject that I wanted to talk about for quite some time but never found the right opportunity for. There is no video recording of my talk but several people asked me for a summary. So I decided to use some spare time in a plane to summarize it in a blog post.
I started to use computers and write software in the early 80s when I was 10 years old. This was also the time when Richard Stallman wrote the 4 freedoms, started the GNU project, founded the FSF and created the GPL. His idea was that users and developers should be in control of the computer they own which requires Free Software. At the time the computing experience was only the personal computer in front of you and the hopefully Free and Open Source software running on it.
The equation was (Personal Hardware) + (Free Software) = (Digital Freedom)
In the meantime the IT world has changed and evolved a lot. Now we have ubiquitous internet access, computer in cars, TVs, watches and other IoT devices. We have the full mobile revolution. We have cloud computing where the data storage and compute are distributed over different data centers owned and controlled by different people and organizations all over the world. We have strong software patents, DRM, code signing and other crypto, software as a service, more closed hardware, social networking and the power of the network effect.
Overall the world has changed a lot since the 80s. Most of the Open Source and Free Software community still focuses mainly on software licenses. I’m asking myself if we are not missing the bigger picture by limiting the Free Software and Open Source movement to licensing questions only.
Richard Stallman wanted to be in control of his computer. Let’s go through some of the current big questions regarding control in IT and let’s see how we are doing:
Facebook is lately under a lot of attack for countless violations of user privacy, being involved in election meddling, triggering a genocide in Myanmar, threatening democracy and many other things. Let’s see if Free Software would solve this problem:
If Facebook would release all the code tomorrow as Free and Open Source software our community would be super happy. WE have won. But would it really solve any problems? I can’t run Facebook on my own computer because I don’t have a Facebook server cluster. And even if I could it would be very lonely there because I would be the only user. So Free Software is important and great but actually doesn’t give users and freedom or control in the Facebook case. More is needed than Free Software licenses.
Microsoft
I hear from a lot of people in the Free and Open Source community that Microsoft is good now. They changed under the latest CEO and are no longer the evil empire. They now ship a Linux kernel in Windows 10 and provide a lot of Free and Open Source tools in their Linux containers in the Azure Cloud. I think it’s definitely a nice step in the right direction but their Cloud solutions still have the strongest vendor lock-in, Windows 10 is not free in price nor gives you freedom. In fact they don’t have an Open Source business model anywhere. They just USE Linux and Open Source. So the fact that more software in the Microsoft ecosystem is now available under Free Software licenses doesn’t give any more freedom to the users.
Machine Learning
Machine Learning is an important new technology that can be used for many thing from picture recognition to voice recognition to self driving cars. The interesting thing is that the hardware and the software alone are useless. What is also needed for a working machine learning system are the data to train the neural network. This training data is often the secret ingredient which is super valuable. So if Tesla would release all their software tomorrow as Free Software and you would buy a Tesla to have access to the hardware than you are still unable to study, build and improve the self driving car functionality. You would need the millions of hours of video recording and driver data to make your neural network useful. So Free software alone is not enough to give users control
5G
There is a lot of discussions in the western world if 5G infrastructure can be trusted. Do we know if there are back doors in cell towers if they are bought from Huawei or other Chinese companies? The Free and Open Source community answers that the software should be licenses under a Free Software license and then all is good. But can we actually check if the software running on the infrastructure is the same we have as source code? For that we would need reproducible builds, access to all the code signing and encryption keys and the infrastructure should fetch new software updates from our update server and not the one provided by the manufacturer. So the software license is important but doesn’t give you the full control and freedom.
Android
Android is a very popular mobile OS in the Free Software community. The reason is that it’s released under a Free Software license. I know a lot of Free Software activists who run a custom build of Android on their phone and only install Free Software from app stores like F-Droid. Unfortunately 99% of normal users out there don’t get these freedoms because their phones can’t be unlocked, or they lack the technical knowledge how to do it or they rely on software that is only available in the Google PlayStore. Users are trapped in the classic vendor lock-in. So the fact that the Android core is Free Software actually doesn’t give much freedom to 99% of all its users.
So what is the conclusion?
I think the Open Source and Free Software community who cares about the 4 freedoms of Stallman and being in control of their digital lives and user freedom has to expand their scope. Free Software licenses are needed but are by far not enough anymore to fight for user freedom and to guarantee users are in control of their digital life. The formula (Personal Hardware) + (Free Software) = (Digital Freedom) is not valid anymore. There are more ingredients needed. I hope that the Free Software community can and will reform itself to focus on more topics than licenses alone. The world needs people who fight for digital rights and user freedoms now more than ever.
Saturday, 24 August 2019
Walkthrough Installation of WackoWiki v5.5.12
WackoWiki is the wiki of my choice and one of the first opensource project I’ve ever contributed, and I still use wackowiki for personal use.
A few days ago, wackowiki released version 5.5.12. In this blog post I will try to share my experience on installing wackowiki on a new ubuntu 18.04 LTS.
Ansible Role
I’ve created an example ansible role for the wackowiki for the Requirements section: WackoWiki Ansible Role
Requirements
Ubuntu 18.04.3 LTS
apt -y install
       php
       php-common
       php-bcmath
       php-ctype
       php-gd
       php-iconv
       php-json
       php-mbstring
       php-mysql
       apache2
       libapache2-mod-php
       mariadb-server
       unzip
Apache2
We need to enable mod_reqwrite in apache2 but also to add the appropiate configuration in the default conf in VirtualHost
# a2enmod rewrite# vim /etc/apache2/sites-available/000-default.conf
<VirtualHost *:80>
...
    # enable.htaccess
    <Directory /var/www/html/>
        Options Indexes FollowSymLinks MultiViews
        AllowOverride All
        Require all granted
    </Directory>
...
</VirtualHost>
MySQL
wacko.sql
CREATE DATABASE IF NOT EXISTS wacko;
CREATE USER 'wacko'@'localhost' IDENTIFIED BY 'YOURNEWPASSWORD';
GRANT  ALL PRIVILEGES ON wacko.* TO 'wacko'@'localhost';
FLUSH  PRIVILEGES;
# mysql < wacko.sql
WackoWiki
curl -sLO https://downloads.sourceforge.net/wackowiki/wacko.r5.5.12.zip
unzip wacko.r5.5.12.zip
mv wacko.r5.5.12/wacko /var/www/html/wacko/
chown -R www-data:www-data /var/www/html/wacko/
Web Installation


Post Install
Last, we need to remove write permission for the wackowiki configuration file and remove setup folder
root@ubuntu:~# chmod -w /var/www/html/wacko/config/config.php
root@ubuntu:~# mv /var/www/html/wacko/setup/ /var/www/html/._setup
WackoWiki


Monday, 19 August 2019
Blocking untrusted USB devices


For fun and security (and a bit of paranoia), I thought I should whitelist my trusted USB devices and block everything else.
USBGuard
We have a couple of tools that can help us with that. USBGuard is the one I found to be the most configurable and well documented.
NOTICE: All commands here require certain privileges. To make commands easier to read, I omitted adding
sudoin the beginning. But you probably need to.
Installation
USBGuard should already be packaged for your favorite Linux distribution.
One important thing to consider though is that on Debian (and derivatives) installing a package that comes with a systemd service file ends up being started and enabled by default. That means that if your input devices are USB-connected, you will find yourself locked out of your system. This may include even devices that are not physically plugged in a USB port (eg. your laptop built-in keyboard).
The upstream developer actually has a relevant warning:
WARNING: before you start using usbguard be sure to configure it first unless you know exactly what you are doing (all USB devices will get blocked).
But that didn't stop the Debian developers, who maintain that package, to allow USBGuard daemon to start with zero configuration đŸ¤ˇ
Systemd
You can find more detailed guides on how to prevent this "feature", but for the scope of this post here is what I did.
Systemd comes with a mask feature, that will prevent a certain service from being started. So for instance, if you try this:
sudo systemctl mask nginx.service
sudo systemctl start nginx.service
You'll get this error:
Failed to start nginx.service: Unit nginx.service is masked.
In our case, we can't use the mask command because USBGuard is not installed yet. But what mask actually does is just create a symlink. So all we have to do is create it manually:
sudo ln -s /dev/null /etc/systemd/system/usbguard.service
And now we can safely install USBGuard:
sudo apt install usbguard
Configuration
First thing to do is create an initial policy that whitelists all of our usb devices. Now it's a good time to plug-in devices that you tend to use often and you already trust. You can of course whitelist devices at any point.
usbguard generate-policy
The above command will display the list of your currently plugged devices with an allow keyword in the beginning. Let's save that to USBGuard's configuration file:
usbguard generate-policy > /etc/usbguard/rules.conf
Now it's safe to unmask, start and enable USBGuard daemon:
systemctl unmask usbguard.service
systemctl start usbguard.service
systemctl enable usbguard.service
Testing
To test this actually works try to plug a new device, not whitelisted yet. Let's a simple USB stick. Hopefully it will be blocked. To confirm that:
usbguard list-devices
This lists all your detected devices. The new device you just plugged-in should have a block keyword in the beginning. For a more filtered output:
usbguard list-devices | grep block
You should see something like this:
13: block id 0xxx:0xxx serial <...>
Allowing devices
Now let's say you actually want to unblock this device, because it came from a friend you trust. The command we run above also contained an ID number. The first thing on that line. We can use that and allow that device:
usbguard allow-device 13
Whitelisting devices
Using allow-device doesn't whitelist the device for ever. So let's say you bought a new external disk and you want to whitelist it. USBGuard has an append-rule command. You just need to paste the whole device line starting with an allow keyword.
Plug the device and see the USBGuard output:
usbguard list-devices | grep block
You should see something like this:
21: block id 0xxx:0xxx serial <...>
Copy the whole line starting from id and then use it but prefix it with an allow keyword (mind the single quotes used to wrap the entire rule):
usbguard append-rule 'allow id 0xxx:0xxx serial <...>'
Editing rules
At any point you can see the whitelisted devices:
usbguard list-rules
And you use the id number in the beginning of each line in order to interact with that specific rule. For example to remove a device:
usbguard remove-rule <id>
And remember, there is no such thing as absolute security. It all comes down to your Threat model.
Comments and reactions on Mastodon, Diaspora, Twitter and Lobsters.
Saturday, 17 August 2019
Building Archlinux Packages in Gitlab
GitLab is my favorite online git hosting provider, and I really love the CI feature (that now most of the online project providers are also starting supporting it).
Archlinux uses git and you can find everything here: Arch Linux git repositories
There are almost 2500 packages there! There are 6500 in core/extra/community (primary repos) and almost 55k Packages in AUR, the Archlinux User Repository.
We are going to use git to retrieve our PKGBUILD from aur archlinux as an example.
The same can be done with one of the core packages by using the above git repo.
So here is a very simple .gitlab-ci.yml file that we can use to build an archlinux package in gitlab
image: archlinux/base:latest

before_script:
    - export PKGNAME=tallow

run-build:
  stage: build
  artifacts:
    paths:
    - "*.pkg.tar.xz"
    expire_in: 1 week
  script:
      # Create "Bob the Builder" !
    - groupadd bob && useradd -m -c "Bob the Builder" -g bob bob
      # Update archlinux and install git
    - pacman -Syy && pacman -Su --noconfirm --needed git base-devel
      # Git Clone package repository
    - git clone https://aur.archlinux.org/$PKGNAME.git
    - chown -R bob:bob $PKGNAME/
      # Read PKGBUILD
    - source $PKGNAME/PKGBUILD
      # Install Dependencies
    - pacman -Syu --noconfirm --needed --asdeps "${makedepends[@]}" "${depends[@]}"
      # Let Bob the Builder, build package
    - su - bob -s /bin/sh -c "cd $(pwd)/$PKGNAME/ && makepkg"
      # Get artifact
    - mv $PKGNAME/*.pkg.tar.xz ./
You can use this link to verify the above example: tallow at gitlab
But let me explain the steps:
- First we create a user, Bob the Builder as in archlinux we can not use root to build a package for security reasons.
- Then we update our container and install git and base-devel group. This group contains all relevant archlinux packages for building a new one.
- After that, we
git clonethe package repo - Install any dependencies. This is a neat trick that I’ve found in archlinux forum using source command to create shell variables (arrays).
- Now it is time for Bob to build the package !
- and finally, we move the artifact in our local folder
Thursday, 15 August 2019
MinIO Intro Notes
MinIO is a high performance object storage server compatible with Amazon S3 APIs
In a previous article, I mentioned minio as an S3 gateway between my system and backblaze b2. I was impressed by minio. So in this blog post, I would like to investigate the primary use of minio as an S3 storage provider!
Install Minio
Minio, is also software written in Go. That means we can simple use the static binary executable in our machine.
Download
The latest release of minio is here:
curl -sLO https://dl.min.io/server/minio/release/linux-amd64/minio
chmod +x minio
Version
./minio version
$ ./minio version

Version: 2019-08-01T22:18:54Z
Release-Tag: RELEASE.2019-08-01T22-18-54Z
Commit-ID: c5ac901e8dac48d45079095a6bab04674872b28b
Operating System
Although we can use the static binary from minio’s site, I would propose to install minio through your distribution’s package manager, in Arch Linux is:
$ sudo pacman -S minio
this method, will also provide you, with a simple systemd service unit and a configuration file.
/etc/minio/minio.conf
# Local export path.
MINIO_VOLUMES="/srv/minio/data/"
# Access Key of the server.
# MINIO_ACCESS_KEY=Server-Access-Key
# Secret key of the server.
# MINIO_SECRET_KEY=Server-Secret-Key
# Use if you want to run Minio on a custom port.
# MINIO_OPTS="--address :9199"
Docker
Or if you like docker, you can use docker!
docker pull minio/minio
docker run -p 9000:9000 minio/minio server /data
Standalone
We can run minion as standalone
$ minio server /data
Create a test directory to use as storage:
$ mkdir -pv minio_data/
mkdir: created directory 'minio_data/'
$ /usr/bin/minio server ./minio_data/
┏━━━━━━━━━━━━━━━━━━━━━━━━━━━━━━━━━━━━━━━━━━━━━━━━━━━━━━━━━━━━━━━┓
┃ You are running an older version of MinIO released 1 week ago ┃
┃ Update: Run `minio update`                                    ┃
┗━━━━━━━━━━━━━━━━━━━━━━━━━━━━━━━━━━━━━━━━━━━━━━━━━━━━━━━━━━━━━━━┛

Endpoint:  http://192.168.1.3:9000  http://192.168.42.1:9000  http://172.17.0.1:9000  http://172.18.0.1:9000  http://172.19.0.1:9000  http://192.168.122.1:9000  http://127.0.0.1:9000
AccessKey: KYAS2LSSPXRZFH9P6RHS
SecretKey: qPZnIBJDe6GTRrUWcfdtKk7GPL4fGyqANDzJxkur

Browser Access:
   http://192.168.1.3:9000  http://192.168.42.1:9000  http://172.17.0.1:9000  http://172.18.0.1:9000  http://172.19.0.1:9000  http://192.168.122.1:9000  http://127.0.0.1:9000

Command-line Access: https://docs.min.io/docs/minio-client-quickstart-guide
   $ mc config host add myminio http://192.168.1.3:9000 KYAS2LSSPXRZFH9P6RHS qPZnIBJDe6GTRrUWcfdtKk7GPL4fGyqANDzJxkur

Object API (Amazon S3 compatible):
   Go:         https://docs.min.io/docs/golang-client-quickstart-guide
   Java:       https://docs.min.io/docs/java-client-quickstart-guide
   Python:     https://docs.min.io/docs/python-client-quickstart-guide
   JavaScript: https://docs.min.io/docs/javascript-client-quickstart-guide
   .NET:       https://docs.min.io/docs/dotnet-client-quickstart-guide
Update Minio
okay, our package is from one week ago, but that’s okay. We can overwrite our package build (although not
recommended) with this:
$ sudo curl -sLo /usr/bin/minio https://dl.min.io/server/minio/release/linux-amd64/minio
again, NOT recommended.
Check version
minio version
Version: 2019-08-01T22:18:54Z
Release-Tag: RELEASE.2019-08-01T22-18-54Z
Commit-ID: c5ac901e8dac48d45079095a6bab04674872b28b
minio update
An alternative way, is to use the built-in update method:
$ sudo minio update
┏━━━━━━━━━━━━━━━━━━━━━━━━━━━━━━━━━━━━━━━━━━━━━━━━━━━━━━━━━━━━━━━━━━┓
┃ You are running an older version of MinIO released 5 days ago    ┃
┃ Update: https://dl.min.io/server/minio/release/linux-amd64/minio ┃
┗━━━━━━━━━━━━━━━━━━━━━━━━━━━━━━━━━━━━━━━━━━━━━━━━━━━━━━━━━━━━━━━━━━┛

Update to RELEASE.2019-08-07T01-59-21Z ? [y/n]: y
MinIO updated to version RELEASE.2019-08-07T01-59-21Z successfully.
minio version
Version: 2019-08-07T01:59:21Z
Release-Tag: RELEASE.2019-08-07T01-59-21Z
Commit-ID: 930943f058f01f37cfbc2265d5f80ea7026ec55d
Run minio
run minion as standalone and localhost (not exposing our system to outside):
minio server --address 127.0.0.1:9000 ~/./minio_data/output
$ minio server --address 127.0.0.1:9000 ~/./minio_data/

Endpoint:  http://127.0.0.1:9000
AccessKey: KYAS2LSSPXRZFH9P6RHS
SecretKey: qPZnIBJDe6GTRrUWcfdtKk7GPL4fGyqANDzJxkur

Browser Access:
   http://127.0.0.1:9000

Command-line Access: https://docs.min.io/docs/minio-client-quickstart-guide
   $ mc config host add myminio http://127.0.0.1:9000 KYAS2LSSPXRZFH9P6RHS qPZnIBJDe6GTRrUWcfdtKk7GPL4fGyqANDzJxkur

Object API (Amazon S3 compatible):
   Go:         https://docs.min.io/docs/golang-client-quickstart-guide
   Java:       https://docs.min.io/docs/java-client-quickstart-guide
   Python:     https://docs.min.io/docs/python-client-quickstart-guide
   JavaScript: https://docs.min.io/docs/javascript-client-quickstart-guide
   .NET:       https://docs.min.io/docs/dotnet-client-quickstart-guide
Web Dashboard
minio comes with it’s own web dashboard!


New Bucket
Let’s create a new bucket for testing purposes:


Minio Client
minio comes with it’s own minio client or mc
Install minio client
Binary Download
curl -sLO https://dl.min.io/client/mc/release/linux-amd64/mc
or better through your package manager:
sudo pacman -S minio-client
Access key / Secret Key
Now export our AK/SK in our enviroment
export -p MINIO_ACCESS_KEY=KYAS2LSSPXRZFH9P6RHS
export -p MINIO_SECRET_KEY=qPZnIBJDe6GTRrUWcfdtKk7GPL4fGyqANDzJxkur
minio host
or you can configure the minio server as a host:
./mc config host add myminio http://127.0.0.1:9000 KYAS2LSSPXRZFH9P6RHS qPZnIBJDe6GTRrUWcfdtKk7GPL4fGyqANDzJxkur
I prefer this way, cause I dont have to export keys every time.
List buckets
$ mc ls myminio
[2019-08-05 20:44:42 EEST]      0B bucket0001/

$ mc ls myminio/bucket0001
(empty)
List Policy
mc admin policy list myminio
$ mc admin policy list myminio
readonly
readwrite
writeonly
Credentials
If we do not want to get random Credentials every time, we can define them in our environment:
export MINIO_ACCESS_KEY=admin
export MINIO_SECRET_KEY=password
minio server --address 127.0.0.1:9000 .minio_data{1...10}
with minio client:
$ mc config host add myminio http://127.0.0.1:9000 admin password

mc: Configuration written to `/home/ebal/.mc/config.json`. Please update your access credentials.
mc: Successfully created `/home/ebal/.mc/share`.
mc: Initialized share uploads `/home/ebal/.mc/share/uploads.json` file.
mc: Initialized share downloads `/home/ebal/.mc/share/downloads.json` file.
Added `myminio` successfully.
mc admin config get myminio/ | jq .credential
$ mc admin config get myminio/ | jq .credential
{
  "accessKey": "8RMC49VEC1IHYS8FY29Q",
  "expiration": "1970-01-01T00:00:00Z",
  "secretKey": "AY+IjQZomX6ZClIBJrjgxRJ6ugu+Mpcx6rD+kr13",
  "status": "enabled"
}
s3cmd
Let’s configure s3cmd to use our minio data server:
$ sudo pacman -S s3cmd
Configure s3cmd
s3cmd --configure
$ s3cmd --configure

Enter new values or accept defaults in brackets with Enter.
Refer to user manual for detailed description of all options.

Access key and Secret key are your identifiers for Amazon S3. Leave them empty for using the env variables.
Access Key: KYAS2LSSPXRZFH9P6RHS
Secret Key: qPZnIBJDe6GTRrUWcfdtKk7GPL4fGyqANDzJxkur
Default Region [US]:
Use "s3.amazonaws.com" for S3 Endpoint and not modify it to the target Amazon S3.
S3 Endpoint [s3.amazonaws.com]: http://127.0.0.1:9000Use "%(bucket)s.s3.amazonaws.com" to the target Amazon S3. "%(bucket)s" and "%(location)s" vars can be used
if the target S3 system supports dns based buckets.
DNS-style bucket+hostname:port template for accessing a bucket [%(bucket)s.s3.amazonaws.com]:
Encryption password is used to protect your files from reading
by unauthorized persons while in transfer to S3
Encryption password:
Path to GPG program [/usr/bin/gpg]: When using secure HTTPS protocol all communication with Amazon S3
servers is protected from 3rd party eavesdropping. This method is
slower than plain HTTP, and can only be proxied with Python 2.7 or newer
Use HTTPS protocol [Yes]: nOn some networks all internet access must go through a HTTP proxy.
Try setting it here if you can't connect to S3 directly
HTTP Proxy server name: New settings:
Access Key: KYAS2LSSPXRZFH9P6RHS
Secret Key: qPZnIBJDe6GTRrUWcfdtKk7GPL4fGyqANDzJxkur
Default Region: US
S3 Endpoint: http://127.0.0.1:9000
DNS-style bucket+hostname:port template for accessing a bucket: %(bucket)s.s3.amazonaws.com
Encryption password:
Path to GPG program: /usr/bin/gpg
Use HTTPS protocol: False
HTTP Proxy server name:
HTTP Proxy server port: 0
Test access with supplied credentials? [Y/n] y
Please wait, attempting to list all buckets...
ERROR: Test failed: [Errno -2] Name or service not known
Retry configuration? [Y/n] n
Save settings? [y/N] y
Configuration saved to '/home/ebal/.s3cfg'Test it
$ s3cmd ls
2019-08-05 17:44  s3://bucket0001
Distributed
Let’s make a more complex example and test the distributed capabilities of minio
Create folders
mkdir -pv .minio_data{1..10}
$ mkdir -pv .minio_data{1..10}

mkdir: created directory '.minio_data1'
mkdir: created directory '.minio_data2'
mkdir: created directory '.minio_data3'
mkdir: created directory '.minio_data4'
mkdir: created directory '.minio_data5'
mkdir: created directory '.minio_data6'
mkdir: created directory '.minio_data7'
mkdir: created directory '.minio_data8'
mkdir: created directory '.minio_data9'
mkdir: created directory '.minio_data10'
Start Server
Be-aware you have to user 3 dots (…) to enable erasure-code distribution (see below).
and start minio server like this:
minio server --address 127.0.0.1:9000 .minio_data{1...10}
$ minio server --address 127.0.0.1:9000 .minio_data{1...10}

Waiting for all other servers to be online to format the disks.

Status:         10 Online, 0 Offline.
Endpoint:  http://127.0.0.1:9000
AccessKey: CDSBN216JQR5B3F3VG71
SecretKey: CE+ti7XuLBrV3uasxSjRyhAKX8oxtZYnnEwRU9ik

Browser Access:
   http://127.0.0.1:9000

Command-line Access: https://docs.min.io/docs/minio-client-quickstart-guide
   $ mc config host add myminio http://127.0.0.1:9000 CDSBN216JQR5B3F3VG71 CE+ti7XuLBrV3uasxSjRyhAKX8oxtZYnnEwRU9ik

Object API (Amazon S3 compatible):
   Go:         https://docs.min.io/docs/golang-client-quickstart-guide
   Java:       https://docs.min.io/docs/java-client-quickstart-guide
   Python:     https://docs.min.io/docs/python-client-quickstart-guide
   JavaScript: https://docs.min.io/docs/javascript-client-quickstart-guide
   .NET:       https://docs.min.io/docs/dotnet-client-quickstart-guide
configure mc
$ ./mc config host add myminio http://127.0.0.1:9000 WWFUTUKB110NS1V70R27 73ecITehtG2rOF6F08rfRmbF+iqXjNr6qmgAvdb2
Added `myminio` successfully.
admin info
mc admin info myminio
$ mc admin info myminio
●  127.0.0.1:9000
   Uptime: 3 minutes
  Version: 2019-08-07T01:59:21Z
  Storage: Used 25 KiB
   Drives: 10/10 OK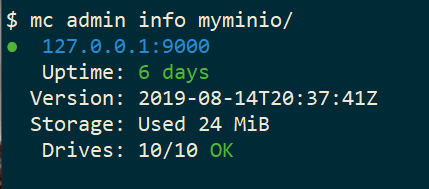
Create files
Creating random files
for i in $(seq 10000) ;do echo $RANDOM > file$i ; done
and by the way, we can use mc to list our local files also!
$ mc ls file* | head

[2019-08-05 21:27:01 EEST]      6B file1
[2019-08-05 21:27:01 EEST]      5B file10
[2019-08-05 21:27:01 EEST]      5B file100
[2019-08-05 21:27:01 EEST]      6B file11
[2019-08-05 21:27:01 EEST]      6B file12
[2019-08-05 21:27:01 EEST]      6B file13
[2019-08-05 21:27:01 EEST]      6B file14
[2019-08-05 21:27:01 EEST]      5B file15
[2019-08-05 21:27:01 EEST]      5B file16
Create bucket
mc ls myminio
$ mc mb myminio/bucket0002
Bucket created successfully `myminio/bucket0002`.

$ mc ls myminio
[2019-08-05 21:41:35 EEST]      0B bucket0002/
Copy files
mc cp file* myminio/bucket0002/

be patient, even in a local filesystem, it will take a long time.

Erasure Code
copying from MinIO docs
you may lose up to half (N/2) of the total drives
MinIO shards the objects across N/2 data and N/2 parity drives
Here is the
$ du -sh .minio_data*

79M    .minio_data1
79M    .minio_data10
79M    .minio_data2
79M    .minio_data3
79M    .minio_data4
79M    .minio_data5
79M    .minio_data6
79M    .minio_data7
79M    .minio_data8
79M    .minio_data9
but what size did our files had?
$ du -sh files/
40M     files
Very insteresting.
$ tree .minio_data*Here is shorter list, to get an idea how objects are structured: minio_data_tree.txt
$ mc ls myminio/bucket0002 | wc -l
10000
Delete a folder
Let’s see how handles corrupted disks, but before that let’s keep a hash of our files:
md5sum file* > /tmp/files.beforenow remove:
$ rm -rf .minio_data10

$ ls -la
total 0
drwxr-x---  1 ebal ebal    226 Aug 15 20:25 .
drwx--x---+ 1 ebal ebal   3532 Aug 15 19:13 ..
drwxr-x---  1 ebal ebal     40 Aug 15 20:25 .minio_data1
drwxr-x---  1 ebal ebal     40 Aug 15 20:25 .minio_data2
drwxr-x---  1 ebal ebal     40 Aug 15 20:25 .minio_data3
drwxr-x---  1 ebal ebal     40 Aug 15 20:25 .minio_data4
drwxr-x---  1 ebal ebal     40 Aug 15 20:25 .minio_data5
drwxr-x---  1 ebal ebal     40 Aug 15 20:25 .minio_data6
drwxr-x---  1 ebal ebal     40 Aug 15 20:25 .minio_data7
drwxr-x---  1 ebal ebal     40 Aug 15 20:25 .minio_data8
drwxr-x---  1 ebal ebal     40 Aug 15 20:25 .minio_data9
Notice that folder: minio_data10 is not there.
mc admin info myminio/
$ mc admin info myminio/
●  127.0.0.1:9000
   Uptime: 6 days
  Version: 2019-08-14T20:37:41Z
  Storage: Used 57 MiB
   Drives: 9/10 OK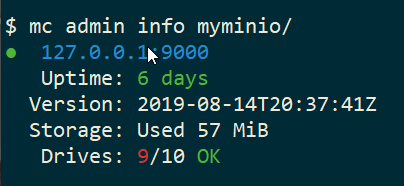
This is the msg in minio server console:
API: SYSTEM()
Time: 20:23:50 EEST 08/15/2019
DeploymentID: 7852c1e1-146a-4ce9-8a05-50ad7b925fef
Error: unformatted disk found
       endpoint=.minio_data10
       3: cmd/prepare-storage.go:40:cmd.glob..func15.1()
       2: cmd/xl-sets.go:212:cmd.(*xlSets).connectDisks()
       1: cmd/xl-sets.go:243:cmd.(*xlSets).monitorAndConnectEndpoints()
Error: unformatted disk found
We will see that minio will try to create the disk/volume/folder in our system:
$ du -sh .minio_data*
79M    .minio_data1
0       .minio_data10
79M    .minio_data2
79M    .minio_data3
79M    .minio_data4
79M    .minio_data5
79M    .minio_data6
79M    .minio_data7
79M    .minio_data8
79M    .minio_data9
Heal
Minio comes with a healing ability:
$ mc admin heal --recursive myminio/
$ du -sh .minio_data*

79M     .minio_data1
79M     .minio_data10
79M     .minio_data2
79M     .minio_data3
79M     .minio_data4
79M     .minio_data5
79M     .minio_data6
79M     .minio_data7
79M     .minio_data8
79M     .minio_data9
$ mc admin heal --recursive myminio/
◐ bucket0002/file9999
10,000/10,000 objects; 55 KiB in 58m21s
┌────────┬────────┬─────────────────────┐
│ Green │ 10,004 │ 100.0% ████████████ │
│ Yellow │ 0 │ 0.0% │
│ Red │ 0 │ 0.0% │
│ Grey │ 0 │ 0.0% │
└────────┴────────┴─────────────────────┘Friday, 09 August 2019
Order your Akademy t-shirt *NOW*
If you want an Akademy 2019 t-shirt you have until Monday 12th Aug at 1100CEST (i.e. in 2 days and a bit) to order it.
Head over to https://akademy.kde.org/2019/akademy-2019-t-shirt and get yourself one of the exclusive t-shirts with Jen's awesome design :)

Sunday, 28 July 2019
My KDE Onboarding Sprint 2019 report
This week I took part on the KDE Onboarding Sprint 2019 (part of what's been known as Nuremberg Megasprint (i.e. KDEConnect+KWin+Onboarding) in, you guessed it, Nuremberg.
The goal of the sprint was "how do we make it easier for people to start contributing". We mostly focused on the "start contributing *code*" side, though we briefly touched artists and translators too.
This is *my* summary, a more official one will appear somewhere else, so don't get annoyed at me if the blog is a bit opinionated (though i'll try it not to)
The main issues we've identified when trying to contribute to KDE software is:
* Getting dependencies is [sometimes] hard
* Actually running the software is [sometimes] hard
Dependencies are hard
Say you want to build dolphin from the git master branch. For that (at the time of writing) you need KDE Frameworks 5.57, this means that if you run the latest Ubuntu or the latest OpenSUSE you can't build it because they ship older versions.
Our current answer for that is kdesrc-build but it's not the most easy to use script, and sometimes you may end up building QtWebEngine or QtWebKit, which as a newbie is something you most likely don't want to do.
Running is hard
Running the software you have just built (once you've passed the dependencies problem) is not trivial either.
Most of our software can't be run uninstalled (KDE Frameworks are a notable exception here, but newbies rarely start developing KDE Frameworks).
This means that you may try to run make install, which if you didn't pass -DCMAKE_INSTALL_PREFIX pointing somewhere in your home you'll probably have to run make install as root since it defaults to /usr/local (this will be fixed in next extra-cmake-modules release to point to a somewhat better prefix) that isn't that useful either since none of your software is looking for stuff in /usr/local. Newbies may be tempted to use -DCMAKE_INSTALL_PREFIX=/usr but that's *VERY* dangerous since it can easily mess up your own system.
For applications, our typical answer is use -DCMAKE_INSTALL_PREFIX=/home/something/else at cmake stage, run make install and then set the environment variables to pick up things from /home/something/else, a newbie will say "which variables" at this stage probably (and not newbies too, I don't think i remember them all). To help with that we generate a prefix.sh in the build dir and after the next extra-cmake-release we will tell the users that they need to run it for things to work.
But still that's quite convoluted and I know from experience answering people in IRC that lots of people get stuck there. It's also very IDE unfriendly since IDEs don't usually have the "install" concept, it's run & build for them.
Solutions
We ended up focusing on two possible solutions:
* Conan: Conan "the C/C++ Package Manager for Developers" (or so they say) is something like pip in the python world but for C/C++. The idea is that by using Conan to get the dependencies we will solve most of the problems in that area. Whether it can help or not with the running side is still unclear, but some of our people involved in the Conan effort think they may either be able to come up with a solution or get the Conan devs to help us with it. Note Conan is not my speciality by far, so this may not be totally correct.
* Flatpak: Flatpak is "a next-generation technology for building and distributing desktop applications on Linux" (or so they say). The benefits of using flatpak are multiple, but focusing on onboarding are. "Getting dependencies is solved", dependencies are either part of the flatpatk SDK and you have them or the flatpak manifest for the application says how to get and build them and that will automagically work for you as it works for everyone else using the same manifest. "Running is solved" because when you build a flatpak it gets built into a self contained artifact so running it is just running it, no installing or environment variable fiddling is needed. We also have [preliminary] support in KDevelop (or you can use Gnome Builder if you want a more flatpak-centric experience for now). The main problem we have with flatpak at this point is that most of our apps are not totally flatpak-ready (e.g. Okular can't print). But that's something we need to fix anyway so it shouldn't be counted as a problem (IMHO).
Summary
*Personally* i think Flatpak is the way to go here, but that means that collectively we need to say "Let's do it", it's something we all have to take into account and thus we have to streamline the manifest handling/updating, focus on fixing the Flatpak related issues that our software may have, etc.
Thanks
I would like to thank SUSE for hosting us in their offices and the KDE e.V. for sponsoring my attendance to the sprint, please donate to KDE if you think the work done at sprints is important.
Saturday, 20 July 2019
A Dead Simple VPN
DSVPN is designed to address the most common use case for using a VPN
Works with TCP, blocks IPv6 leaks, redirect-gateway out-of-the-box!
last updated: 20190810
- iptables rules example added
- change vpn.key to dsvpn.key
- add base64 example for easy copy/transfer across machines

dsvpn binary
I keep a personal gitlab CI for dsvpn here: DSVPN
Compile
Notes on the latest ubuntu:18.04 docker image:
# git clone https://github.com/jedisct1/dsvpn.git
Cloning into 'dsvpn'...
remote: Enumerating objects: 88, done.
remote: Counting objects: 100% (88/88), done.
remote: Compressing objects: 100% (59/59), done.
remote: Total 478 (delta 47), reused 65 (delta 29), pack-reused 390
Receiving objects: 100% (478/478), 93.24 KiB | 593.00 KiB/s, done.
Resolving deltas: 100% (311/311), done.

# cd dsvpn

# ls
LICENSE  Makefile  README.md  include  logo.png  src

# make
cc -march=native -Ofast -Wall -W -Wshadow -Wmissing-prototypes -Iinclude -o dsvpn src/dsvpn.c src/charm.c src/os.c
strip dsvpn

# ldd dsvpn
linux-vdso.so.1 (0x00007ffd409ba000)
libc.so.6 => /lib/x86_64-linux-gnu/libc.so.6 (0x00007fd78480b000)
/lib64/ld-linux-x86-64.so.2 (0x00007fd784e03000)

# ls -l dsvpn
-rwxr-xr-x 1 root root 26840 Jul 20 15:51 dsvpn
Just copy the dsvpn binary to your machines.
Symmetric Key
dsvpn uses symmetric-key cryptography, that means both machines uses the same encyrpted key.

dd if=/dev/urandom of=dsvpn.key count=1 bs=32
Copy the key to both machines using a secure media, like ssh.
base64
An easy way is to convert key to base64
cat dsvpn.key | base64
ZqMa31qBLrfjjNUfhGj8ADgzmo8+FqlyTNJPBzk/x4k=on the other machine:
echo ZqMa31qBLrfjjNUfhGj8ADgzmo8+FqlyTNJPBzk/x4k= | base64 -d > dsvpn.key
Server
It is very easy to run dsvpn in server mode:
eg.
dsvpn server dsvpn.key auto
Interface: [tun0]
net.ipv4.ip_forward = 1
Listening to *:443
ip addr show tun0
4: tun0: <POINTOPOINT,MULTICAST,NOARP,UP,LOWER_UP> mtu 9000 qdisc fq_codel state UNKNOWN group default qlen 500
    link/none
    inet 192.168.192.254 peer 192.168.192.1/32 scope global tun0
       valid_lft forever preferred_lft forever
I prefer to use 10.8.0.0/24 CIDR in my VPNs, so in my VPN setup:
dsvpn server /root/dsvpn.key auto 443 auto 10.8.0.254 10.8.0.2
Using 10.8.0.254 as the VPN Server IP.
systemd service unit - server
I’ve created a simple systemd script dsvpn_server.service
or you can copy it from here:
/etc/systemd/system/dsvpn.service
[Unit]
Description=Dead Simple VPN - Server

[Service]
ExecStart=/usr/local/bin/dsvpn server /root/dsvpn.key auto 443 auto 10.8.0.254 10.8.0.2
Restart=always
RestartSec=20

[Install]
WantedBy=network.target
and then:
systemctl enable dsvpn.service
systemctl  start dsvpn.service
Client
It is also easy to run dsvpn in client mode:
eg.
dsvpn client dsvpn.key 93.184.216.34
# dsvpn client dsvpn.key 93.184.216.34
Interface: [tun0]
Trying to reconnect
Connecting to 93.184.216.34:443...
net.ipv4.tcp_congestion_control = bbr
Connected
ip addr show tun0
4: tun0: <POINTOPOINT,MULTICAST,NOARP,UP,LOWER_UP> mtu 9000 qdisc fq_codel state UNKNOWN group default qlen 500
    link/none
    inet 192.168.192.1 peer 192.168.192.254/32 scope global tun0
       valid_lft forever preferred_lft forever
dsvpn works in redict-gateway mode,
so it will apply routing rules to pass all the network traffic through the VPN.
ip route list
0.0.0.0/1 via 192.168.192.254 dev tun0
default via 192.168.122.1 dev eth0 proto static
93.184.216.34 via 192.168.122.1 dev eth0
128.0.0.0/1 via 192.168.192.254 dev tun0
192.168.122.0/24 dev eth0 proto kernel scope link src 192.168.122.69
192.168.192.254  dev tun0 proto kernel scope link src 192.168.192.1
As I mentioned above, I prefer to use 10.8.0.0/24 CIDR in my VPNs, so in my VPN client:
dsvpn client /root/dsvpn.key 93.184.216.34 443 auto 10.8.0.2 10.8.0.254
Using 10.8.0.2 as the VPN Client IP.
ip addr show tun0
11: tun0: <POINTOPOINT,MULTICAST,NOARP,UP,LOWER_UP> mtu 9000 qdisc fq_codel state UNKNOWN group default qlen 500
    link/none
    inet 10.8.0.2 peer 10.8.0.254/32 scope global tun0
       valid_lft forever preferred_lft forever
systemd service unit - client
I’ve also created a simple systemd script for the client dsvpn_client.service
or you can copy it from here:
/etc/systemd/system/dsvpn.service
[Unit]
Description=Dead Simple VPN - Client

[Service]
ExecStart=/usr/local/bin/dsvpn client /root/dsvpn.key 93.184.216.34 443 auto 10.8.0.2 10.8.0.254
Restart=always
RestartSec=20

[Install]
WantedBy=network.target
and then:
systemctl enable dsvpn.service
systemctl  start dsvpn.service
and here is an MTR from the client:

Enjoy !
firewall
It is important to protect your traffic from network leaks. That mean, sometimes, we do not want our network traffic to pass through our provider if the vpn server/client went down. To prevent any network leak, here is an example of iptables rules for a virtual machine:
# Empty iptables rule file
*filter
:INPUT   ACCEPT [0:0]
:FORWARD ACCEPT [0:0]
:OUTPUT  ACCEPT [0:0]

-A INPUT -i lo -j ACCEPT
-A INPUT -m conntrack --ctstate RELATED,ESTABLISHED -j ACCEPT
-A INPUT -m conntrack --ctstate INVALID -j DROP
-A INPUT -p icmp --icmp-type 8 -m conntrack --ctstate NEW -j ACCEPT

# LibVirt
-A INPUT -i eth0 -s 192.168.122.0/24 -j ACCEPT

# Reject incoming traffic
-A INPUT -j REJECT

# DSVPN
-A OUTPUT -p tcp -m tcp -o eth0 -d 93.184.216.34 --dport 443 -j ACCEPT
# LibVirt
-A OUTPUT -o eth0 -d 192.168.122.0/24 -j ACCEPT
# Allow tun
-A OUTPUT -o tun+ -j ACCEPT

# Reject outgoing traffic
-A OUTPUT -p tcp -j REJECT --reject-with tcp-reset
-A OUTPUT -p udp -j REJECT --reject-with icmp-port-unreachable

COMMIT
Here is the prefable output:

Friday, 19 July 2019
Popular licenses in OpenAPI

Today I was wondering what the most commonly used license that people use in OpenAPI, so I went and did a quick analysis.
Results
The top 5 (with count and percentage; n=552):
| License name | count | percentage |
|---|---|---|
| CC-BY-3.0 | 250 | 45,29% |
| Apache-2.01 | 218 | 39,49% |
| MIT | 15 | 2,71% |
| 8 | 1,44% | |
| “Open Government License – British Columbia” | 6 | 1,09% |
The striked-out entries are the ones that I would not really consider a proper license.
The license names inside quotation marks are the exact copy-paste from the field. The rest are de-duplicated into their SPDX identifiers.
After those top 5 the long end goes very quickly into only one license per listed API. Several of those seem very odd as well.
Methodology
Note: Before you start complaining, I realise this is probably a very sub-optimal solution code-wise, but it worked for me. In my defence, I did open up my copy of the Sed & Awk Pocket Reference before my eyes went all glassy and I hacked up the following ugly method. Also note that the shell scripts are in Fish shell and may not work directly in a 100% POSIX shell.
First, I needed to get a data set to work on. Hat-tip to Mike Ralphson for pointing me to APIs Guru as a good resource. I analysed their APIs-guru/openapi-directory repository2, where in the APIs folder they keep a big collection of public APIs. Most of them following the OpenAPI (previously Swagger) specification.
git clone https://github.com/APIs-guru/openapi-directory.git
cd openapi-directory/APIs
Next I needed to list all the licenses found there. For this I assumed the name: tag in YAML4 (the one including the name of the license) to be in the very next line after the license: tag3 – I relied on people writing OpenAPI files in the same order as it is laid out in the OpenAPI Specification. I stored the list of all licenses, sorted alphabetically in a separate api_licenses file:
grep 'license:' **/openapi.yaml **/swagger.yaml -A 1 --no-filename | \
grep 'name:' | sort > api_licenses
Then I generated another file called api_licenses_unique that would include only all names of these licenses.
grep 'license:' **/openapi.yaml **/swagger.yaml -A 1 --no-filename | \
grep 'name:' | sort | uniq > api_licenses_unique
Because I was too lazy to figure out how to do this properly5, I simply wrapped the same one-liner into a script to go through all the unique license names and count how many times they show up in the (non-duplicated) list of all licenses found.
for license in (grep 'license:' **/openapi.yaml **/swagger.yaml -A 1 \
--no-filename | grep 'name' | sort | uniq)
                           grep "$license" api_licenses --count
                       end
In the end I copied the console output of this last command, opened api_licenses_unique, and pasted said output in the first column (by going into Block Selection Mode in Kate).
Clarification on what I consider “proper license” and re-count of Creative Commons licenses (12 July 2019 update)
I was asked what I considered as a “proper license” above, and specifically why I did not consider “Creative Commons” as such.
First, if the string did not even remotely look like a name of a license, I did not consider that as a proper license. This is the case e.g. with “This page was built with the Swagger API.”.
As for the string “Creative Commons”, it – at best – indicates a family o licenses, which span a vast spectrum from CC0-1.0 (basically public domain) on one end to CC-BY-NC-CA-4.0 (basically, you may copy this, but not change anything, nor get money out of it, and you must keep the same license) on the other. For reference, on the SPDX license list, you will find 32 Creative Commons licenses. And SPDX lists only the International and Universal versions of them7.
Admiteldy, – and this is a caveat in my initial method above – it may be that there is an actual license following the lines after the “Creative Commons” string … or, as it turned out to be true, that the initial 255 count of name: Creative Commons licenses included also valid CC license names such as name: Creative Commons Attribution 3.0.
So, obviously I made a boo-boo, and therefore went and dug deeper ;)
To do so, and after looking at the results a bit more, I noticed that the url: entries of the name: Creative Commons licenses seem to point to actual CC licenses, so I decided to rely on that. Luckily, this turned out to be true.
I broadened up the initial search to one extra line, to include the url: line, narrowed down the next search to name: Creative Commons, and in the end only to url:
grep 'license:' **/openapi.yaml **/swagger.yaml -A 2 --no-filename | \
grep 'name: Creative Commons' -A 1 | grep 'url' | sort > api_licenses_cc
Next, I searched for the most common license – CC-BY-3.0:
grep --count 'creativecommons.org/licenses/by/3.0' api_licenses_cc
The result was 250, so for the remaining6 5 I just opened the api_licenses_cc file and counted them manually.
Using this method the list of all “Creative Commons” license turned out to be as follows:
- CC-BY-3.0 (250, of which one was specific to Australian jurisdiction)
- CC-BY-4.0 (3)
- CC-BY-NC-4.0 (1)
- CC-BY-NC-ND-2.0 (1)
In this light, I am amending the results above, and removing the bogus “Creative Commons” entry. Apart from removing the bogus entry, it does not change the ranking, nor the counts, of the top 5 licenses.
Further clean-up of Apache (17 July 2019 update)
Upon further inspection it looked odd that I was getting so many Apache-2.0 matches – if you added all the Apache-2.0 hits (initially 421) with all the CC-BY-3.0 hits (250), you already reached a higher number than all the occurrances of the license: field in all the files (552). Clearly something was off.
So I re-counted the Apache hits by limiting myself only to the url: field of the license:, instead of the name: and came to a half of the original number. Which brought it from first down to second place. Basically I applied the same method as above for counting Creative Commons licenses.
Better method (25 July 2019 update)
I just learnt from Jaka “Lynx” Kranjc of a better solution. Basically, I could cut down quite a bit by simply using uniq --count, which produces a unique list and prepends a column of how many times it found that occurance – super useful!
I will not edit my findings above again, but am mentioning the better method below, together with the attached results, so others can simply check.
grep 'license:' **/openapi.yaml **/swagger.yaml -A 1 --no-filename | \
grep 'name:' |  uniq -c | sort > OpenAPI_grouped_by_license_name.txt
… produces OpenAPI_grouped_by_license_name.txt
grep 'license:' **/openapi.yaml **/swagger.yaml -A 2 --no-filename | \
grep 'url:' |  uniq -c | sort > OpenAPI_grouped_by_license_url.txt
… produces OpenAPI_grouped_by_license_url.txt
hook out → not proud of the method, but happy with having results
-
This should come as no surprise, as Apache-2.0 is used as the official specification’s example. ↩
-
At the time of this writing, that was commit 506133b. ↩
-
I tried it also with 3 lines, and the few extra results that came up where mostly useless. ↩
-
I did a quick check and the repository seems to include no OpenAPIs in JSON format. ↩
-
I expected
for license in api_licenses_uniqueto work, but it did not. ↩ -
The result of
wc -l api_licenses_ccwas 255. ↩ -
Prior to version 4.0 of Creative Commons licenses each CC license had several versions localised for specific jurisdictions. ↩
Thursday, 18 July 2019
slack-desktop and xdg-open
Notes from archlinux
xdg-open - opens a file or URL in the user’s preferred application
When you are trying to authenticate to a new workspace (with 2fa) using the slack-desktop, it will open your default browser and after the authentication your browser will re-direct you to the slack-desktop again using something like this
slack://6f69f7c8b/magic-login/t3bnakl6qabc-16869c6603bdb64f3a6f69f7c8b2d920fa26149f990e0556b4e5c6f26984db0aThis is mime query !
$ xdg-mime query default x-scheme-handler/slack
slack.desktop

$ locate slack.desktop
/usr/share/applications/slack.desktop
$ more /usr/share/applications/slack.desktop

[Desktop Entry]
Name=Slack
Comment=Slack Desktop
GenericName=Slack Client for Linux
Exec=/usr/bin/slack --disable-gpu %U
Icon=/usr/share/pixmaps/slack.png
Type=Application
StartupNotify=true
Categories=GNOME;GTK;Network;InstantMessaging;
MimeType=x-scheme-handler/slack;
I had to change the Exec entry above to point to my slack-desktop binary
Monday, 15 July 2019
KDE Applications 19.08 branches created
Make sure you commit anything you want to end up in the KDE Applications 19.08 release to them
We're already past the dependency freeze.
The Freeze and Beta is this Thursday 18 of July.
More interesting dates
August 1, 2019: KDE Applications 19.08 RC (19.07.90) Tagging and Release
August 8, 2019: KDE Applications 19.08 Tagging
August 15, 2019: KDE Applications 19.08 Release
https://community.kde.org/Schedules/Applications/19.08_Release_Schedule
Sunday, 14 July 2019
kubernetes with minikube - Intro Notes
Notes based on Ubuntu 18.04 LTS
My notes for this k8s blog post are based upon an Ubuntu 18.05 LTS KVM Virtual Machine. The idea is to use nested-kvm to run minikube inside a VM, that then minikube will create a kvm node.
minikube builds a local kubernetes cluster on a single node with a set of small resources to run a small kubernetes deployment.
Archlinux –> VM Ubuntu 18.04 LTS runs minikube/kubeclt —> KVM minikube node
Pre-requirements
Nested kvm
Host
(archlinux)
$ grep ^NAME /etc/os-release
NAME="Arch Linux"
Check that nested-kvm is already supported:
$ cat /sys/module/kvm_intel/parameters/nested
N
If the output is N (No) then remove & enable kernel module again:
$ sudo modprobe -r kvm_intel
$ sudo modprobe kvm_intel nested=1
Check that nested-kvm is now enabled:
$ cat /sys/module/kvm_intel/parameters/nested
Y
Guest
Inside the virtual machine:
$ grep NAME /etc/os-release
NAME="Ubuntu"
PRETTY_NAME="Ubuntu 18.04.2 LTS"
VERSION_CODENAME=bionic
UBUNTU_CODENAME=bionic
$ egrep -o 'vmx|svm|0xc0f' /proc/cpuinfo
vmx$ kvm-ok
INFO: /dev/kvm exists
KVM acceleration can be used
LibVirtd
If the above step fails, try to edit the xml libvirtd configuration file in your host:
# virsh edit ubuntu_18.04
and change cpu mode to passthrough:
from
  <cpu mode='custom' match='exact' check='partial'>
    <model fallback='allow'>Nehalem</model>
  </cpu>
to
<cpu mode='host-passthrough' check='none'/>
Install Virtualization Tools
Inside the VM
sudo apt -y install
  qemu-kvm
  bridge-utils
  libvirt-clients
  libvirt-daemon-system
Permissions
We need to be included in the libvirt group
sudo usermod -a -G libvirt $(whoami)
newgrp libvirt
kubectl
kubectl is a command line interface for running commands against Kubernetes clusters.
size: ~41M
$ export VERSION=$(curl -sL https://storage.googleapis.com/kubernetes-release/release/stable.txt)
$ curl -LO https://storage.googleapis.com/kubernetes-release/release/$VERSION/bin/linux/amd64/kubectl

$ chmod +x kubectl
$ sudo mv kubectl /usr/local/bin/kubectl

$ kubectl completion bash | sudo tee -a /etc/bash_completion.d/kubectl
$ kubectl version
if you wan to use bash autocompletion without logout/login use this:
source <(kubectl completion bash)What the json output of kubectl version looks like:
$ kubectl version -o json | jq .
The connection to the server localhost:8080 was refused - did you specify the right host or port?
{
  "clientVersion": {
    "major": "1",
    "minor": "15",
    "gitVersion": "v1.15.0",
    "gitCommit": "e8462b5b5dc2584fdcd18e6bcfe9f1e4d970a529",
    "gitTreeState": "clean",
    "buildDate": "2019-06-19T16:40:16Z",
    "goVersion": "go1.12.5",
    "compiler": "gc",
    "platform": "linux/amd64"
  }
}
Message:
The connection to the server localhost:8080 was refused - did you specify the right host or port?it’s okay if minikube hasnt started yet.
minikube
size: ~40M
$ curl -sLO https://storage.googleapis.com/minikube/releases/latest/minikube-linux-amd64

$ chmod +x minikube-linux-amd64

$ sudo mv minikube-linux-amd64 /usr/local/bin/minikube

$ minikube version
minikube version: v1.2.0

$ minikube update-check
CurrentVersion: v1.2.0
LatestVersion: v1.2.0

$ minikube completion bash | sudo tee -a /etc/bash_completion.d/minikube
To include bash completion without login/logout:
source $(minikube completion bash)
KVM2 driver
We need a driver so that minikube can build a kvm image/node for our kubernetes cluster.
size: ~36M
$ curl -sLO https://storage.googleapis.com/minikube/releases/latest/docker-machine-driver-kvm2

$ chmod +x docker-machine-driver-kvm2

$ mv docker-machine-driver-kvm2 /usr/local/bin/
Start minikube
$ minikube start --vm-driver kvm2
* minikube v1.2.0 on linux (amd64)
* Downloading Minikube ISO ...
 129.33 MB / 129.33 MB [============================================] 100.00% 0s
* Creating kvm2 VM (CPUs=2, Memory=2048MB, Disk=20000MB) ...
* Configuring environment for Kubernetes v1.15.0 on Docker 18.09.6
* Downloading kubeadm v1.15.0
* Downloading kubelet v1.15.0
* Pulling images ...
* Launching Kubernetes ...
* Verifying: apiserver proxy etcd scheduler controller dns
* Done! kubectl is now configured to use "minikube"
Check via libvirt, you will find out a new VM, named: minikube
$ virsh list
 Id    Name                           State
----------------------------------------------------
 1     minikube                       running
Something gone wrong:
Just delete the VM and configuration directories and start again:
$ minikube delete
$ rm -rf ~/.minikube/ ~/.kube
kubectl version
Now let’s run kubectl version again
$ kubectl version -o json | jq .
{
  "clientVersion": {
    "major": "1",
    "minor": "15",
    "gitVersion": "v1.15.0",
    "gitCommit": "e8462b5b5dc2584fdcd18e6bcfe9f1e4d970a529",
    "gitTreeState": "clean",
    "buildDate": "2019-06-19T16:40:16Z",
    "goVersion": "go1.12.5",
    "compiler": "gc",
    "platform": "linux/amd64"
  },
  "serverVersion": {
    "major": "1",
    "minor": "15",
    "gitVersion": "v1.15.0",
    "gitCommit": "e8462b5b5dc2584fdcd18e6bcfe9f1e4d970a529",
    "gitTreeState": "clean",
    "buildDate": "2019-06-19T16:32:14Z",
    "goVersion": "go1.12.5",
    "compiler": "gc",
    "platform": "linux/amd64"
  }
}
Dashboard
Start kubernetes dashboard
$ kubectl proxy --address 0.0.0.0 --accept-hosts '.*'
Starting to serve on [::]:8001
Tuesday, 09 July 2019
Beware of some of the Qt 5.13 deprecation porting hints
QComboBox::currentIndexChanged(QString) used to have (i.e. in Qt 5.13.0) a deprecation warning that said "Use currentTextChanged() instead".
That has recently been reverted since both are not totally equivalent, sure, you can probably "port" from one to the other, but the "use" wording to me seems like a "this is the same" and they are not.
Another one of those is QPainter::initFrom, which inits a painter with the pen, background and font to the same as the given widget. This is deprecated, because it's probably wrong ("what is the pen of a widget?") but the deprecation warning says "Use begin(QPaintDevice*)" but again if you look at the implementation, they don't really do the same. Still need to find time to complain to the Qt developers and get it fixed.
Anyhow, as usual, when porting make sure you do a correct port and not just blind changes.
Monday, 08 July 2019
Repair a Faulty Disk in Raid-5
Quick notes
Identify slow disk
# hdparm -Tt /dev/sda

/dev/sda:
 Timing cached reads:   2502 MB in  2.00 seconds = 1251.34 MB/sec
 Timing buffered disk reads: 538 MB in  3.01 seconds = 178.94 MB/sec

# hdparm -Tt /dev/sdb

/dev/sdb:
 Timing cached reads:   2490 MB in  2.00 seconds = 1244.86 MB/sec
 Timing buffered disk reads: 536 MB in  3.01 seconds = 178.31 MB/sec

# hdparm -Tt /dev/sdc

/dev/sdc:
 Timing cached reads:   2524 MB in  2.00 seconds = 1262.21 MB/sec
 Timing buffered disk reads: 538 MB in  3.00 seconds = 179.15 MB/sec

# hdparm -Tt /dev/sdd

/dev/sdd:
 Timing cached reads:   2234 MB in  2.00 seconds = 1117.20 MB/sec
 Timing buffered disk reads: read(2097152) returned 929792 bytes
Set disk to Faulty State and Remove it
#  mdadm --manage /dev/md0 --fail /dev/sdd
mdadm: set /dev/sdd faulty in /dev/md0

#  mdadm --manage /dev/md0 --remove  /dev/sdd
mdadm: hot removed /dev/sdd from /dev/md0
Verify Status
# mdadm --verbose --detail /dev/md0
/dev/md0:
        Version : 1.2
  Creation Time : Thu Feb  6 15:06:34 2014
     Raid Level : raid5
     Array Size : 2929893888 (2794.16 GiB 3000.21 GB)
  Used Dev Size : 976631296 (931.39 GiB 1000.07 GB)
   Raid Devices : 4
  Total Devices : 3
    Persistence : Superblock is persistent

    Update Time : Mon Jul  8 00:51:14 2019
          State : clean, degraded
 Active Devices : 3
Working Devices : 3
 Failed Devices : 0
  Spare Devices : 0

         Layout : left-symmetric
     Chunk Size : 512K

           Name : ServerOne:0  (local to host ServerOne)
           UUID : d635095e:50457059:7e6ccdaf:7da91c9b
         Events : 18122

    Number   Major   Minor   RaidDevice State
       0       8       16        0      active sync   /dev/sdb
       6       8       32        1      active sync   /dev/sdc
       4       0        0        4      removed
       4       8        0        3      active sync   /dev/sda
Format Disk
- quick format to identify bad blocks,
- better solution zeroing the disk
# mkfs.ext4 -cc -v /dev/sdd - middle ground to use
-c
-c Check the device for bad blocks before creating the file system. If this option is specified twice, then a slower read-write test is used instead of a fast read-only test.
# mkfs.ext4 -c -v /dev/sdd output:
Running command: badblocks -b 4096 -X -s /dev/sdd 244190645
Checking for bad blocks (read-only test):   9.76% done, 7:37 elapsed
Remove ext headers
# dd if=/dev/zero of=/dev/sdd bs=4096 count=4096Using dd to remove any ext headers
Test disk
# hdparm -Tt /dev/sdd

/dev/sdd:
 Timing cached reads:   2174 MB in  2.00 seconds = 1087.20 MB/sec
 Timing buffered disk reads: 516 MB in  3.00 seconds = 171.94 MB/sec
Add Disk to Raid
# mdadm --add /dev/md0 /dev/sdd
mdadm: added /dev/sdd
Speed
# hdparm -Tt /dev/md0

/dev/md0:
 Timing cached reads:   2480 MB in  2.00 seconds = 1239.70 MB/sec
 Timing buffered disk reads: 1412 MB in  3.00 seconds = 470.62 MB/sec
Status
# cat /proc/mdstat
Personalities : [raid6] [raid5] [raid4]
md0 : active raid5 sdd[5] sda[4] sdc[6] sdb[0]
      2929893888 blocks super 1.2 level 5, 512k chunk, algorithm 2 [4/3] [UU_U]
      [>....................]  recovery =  0.0% (44032/976631296) finish=369.5min speed=44032K/sec

unused devices: <none>
Verify Raid
# mdadm --verbose --detail /dev/md0
/dev/md0:
        Version : 1.2
  Creation Time : Thu Feb  6 15:06:34 2014
     Raid Level : raid5
     Array Size : 2929893888 (2794.16 GiB 3000.21 GB)
  Used Dev Size : 976631296 (931.39 GiB 1000.07 GB)
   Raid Devices : 4
  Total Devices : 4
    Persistence : Superblock is persistent

    Update Time : Mon Jul  8 00:58:38 2019
          State : clean, degraded, recovering
 Active Devices : 3
Working Devices : 4
 Failed Devices : 0
  Spare Devices : 1

         Layout : left-symmetric
     Chunk Size : 512K

 Rebuild Status : 0% complete

           Name : ServerOne:0  (local to host ServerOne)
           UUID : d635095e:50457059:7e6ccdaf:7da91c9b
         Events : 18244

    Number   Major   Minor   RaidDevice State
       0       8       16        0      active sync   /dev/sdb
       6       8       32        1      active sync   /dev/sdc
       5       8       48        2      spare rebuilding   /dev/sdd
4 8 0 3 active sync /dev/sdaSunday, 07 July 2019
sRGB↔XYZ conversion

In an earlier post, I’ve shown how to calculate an sRGB↔XYZ conversion matrix. It’s only natural to follow up with a code for converting between sRGB and XYZ colour spaces. While the matrix is a significant portion of the algorithm, there is one more step necessary: gamma correction.
What is gamma correction?
Human perception of light’s brightness approximates a power function of its intensity. This can be expressed as \(P = S^\alpha\) where \(P\) is the perceived brightness and \(S\) is linear intensity. \(\alpha\) has been experimentally measure to be less than one which means that people are more sensitive to changes to dark colours rather than to bright ones.
Based on that observation, colour space’s encoding can be made more efficient by using higher precision when encoding dark colours and lower when encoding bright ones. This is akin to precision of floating point numbers scaling with value’s magnitude. In RGB systems, the role of precision scaling is done by gamma correction. When colour is captured (for example from a digital camera) it goes through gamma compression which spaces dark colours apart and packs lighter colours more densely. When displaying an image, the opposite happens and encoded value goes through gamma expansion.
Many RGB systems use a simple \(S = E^\gamma\) expansion formula, where \(E\) is the encoded (or non-linear) value. With decoding \(\gamma\) approximating \(1/\alpha\), equal steps in encoding space correspond roughly to equal steps in perceived brightness. Image on the right demonstrates this by comparing two colour gradients. The first one has been generated by increasing encoded value in equal steps and the second one has been created by doing the same to light intensity. The former includes many dark colours while the latter contains a sudden jump in brightness from black to the next colour.
sRGB uses slightly more complicated formula stitching together two functions: $$ \begin{align} E &= \begin{cases} 12.92 × S & \text{if } S ≤ S_0 \\ 1.055 × S^{1/2.4} - 0.055 & \text{otherwise} \end{cases} \\[0.5em] S &= \begin{cases} E / 12.92 & \text{if } E ≤ E_0 \\ ((E + 0.055) / 1.055)^{2.4} & \text{otherwise} \end{cases} \\[0.5em] S_0 &= 0.00313066844250060782371 \\ E_0 &= 12.92 × S_0 \\ &= 0.04044823627710785308233 \end{align} $$
The formulas assume values are normalised to [0, 1] range. This is not always how they are expressed so a scaling step might be necessary.
sRGB encoding
Most common sRGB encoding uses eight bits per channel which introduces a scaling step: \(E_8 = ⌊E × 255⌉\). In an actual implementation, to increase efficiency and accuracy of gamma operations, it’s best to fuse the multiplication into aforementioned formulas. With that arguably obvious optimisation, the equations become: $$ \begin{align} E_8 &= \begin{cases} ⌊3294.6 × S⌉ & \text{if } S ≤ S_0 \\ ⌊269.025 × S^{1/2.4} - 14.025⌉ & \text{otherwise} \end{cases} \\[0.5em] S &= \begin{cases} E_8 / 3294.6 & \text{if } E_8 ≤ 10 \\ ((E + 14.025) / 269.025)^{2.4} & \text{otherwise} \end{cases} \end{align} $$
This isn’t the only way to represent colours of course. For example, 10-bit colour depth changes the scaling factor to 1024; 16-bit high colour uses five bits for red and blue channels while five or six for green producing different scaling factors for different primaries; and HDTV caps the range to [16, 235]. Needless to say, correct formulas need to be chosen based on the standard in question.
The implementation
And that’s it. Encoding, gamma correction and the conversion matrix are all the necessary pieces to get the conversion implemented. To keep things interesting, let's this time write the code in TypeScript:
type Tripple = [number, number, number];
type Matrix = [Tripple, Tripple, Tripple];

/**
 * A conversion matrix from linear sRGB colour space with coordinates normalised
 * to [0, 1] range into an XYZ space.
 */
const xyzFromRgbMatrix: Matrix = [
	[0.4123865632529917,   0.35759149092062537, 0.18045049120356368],
	[0.21263682167732384,  0.7151829818412507,  0.07218019648142547],
	[0.019330620152483987, 0.11919716364020845, 0.9503725870054354]
];

/**
 * A conversion matrix from XYZ colour space to a linear sRGB space with
 * coordinates normalised to [0, 1] range.
 */
const rgbFromXyzMatrix: Matrix = [
	[ 3.2410032329763587,   -1.5373989694887855,  -0.4986158819963629],
	[-0.9692242522025166,    1.875929983695176,    0.041554226340084724],
	[ 0.055639419851975444, -0.20401120612390997,  1.0571489771875335]
];

/**
 * Performs an sRGB gamma expansion of an 8-bit value, i.e. an integer in [0,
 * 255] range, into a floating point value in [0, 1] range.
 */
function gammaExpansion(value255: number): number {
	return value255 <= 10
		? value255 / 3294.6
		: Math.pow((value255 + 14.025) / 269.025, 2.4);
}

/**
 * Performs an sRGB gamma compression of a floating point value in [0, 1] range
 * into an 8-bit value, i.e. an integer in [0, 255] range.
 */
function gammaCompression(linear: number): number {
	let nonLinear: number = linear <= 0.00313066844250060782371
		? 3294.6 * linear
		: (269.025 * Math.pow(linear, 5.0 / 12.0) - 14.025);
	return Math.round(nonLinear) | 0;
}

/**
 * Multiplies a 3✕3 matrix by a 3✕1 column matrix.  The result is another 3✕1
 * column matrix.  The column matrices are represented as single-dimensional
 * 3-element array.  The matrix is represented as a two-dimensional array of
 * rows.
 */
function matrixMultiplication3x3x1(matrix: Matrix, column: Tripple): Tripple {
	return matrix.map((row: Tripple) => (
		row[0] * column[0] + row[1] * column[1] + row[2] * column[2]
	)) as Tripple;
}

/**
 * Converts sRGB colour given as a triple of 8-bit integers into XYZ colour
 * space.
 */
function xyzFromRgb(rgb: Tripple): Tripple {
	return matrixMultiplication3x3x1(
		xyzFromRgbMatrix, rgb.map(gammaExpansion) as Tripple);
}

/**
 * Converts colour from XYZ space to sRGB colour represented as a triple of
 * 8-bit integers.
 */
function rgbFromXyz(xyz: Tripple): Tripple {
	return matrixMultiplication3x3x1(
		rgbFromXyzMatrix, xyz).map(gammaCompression) as Tripple;
} Wednesday, 03 July 2019
Down the troubleshooting rabbit-hole
Hardware Details
HP ProLiant MicroServer
AMD Turion(tm) II Neo N54L Dual-Core Processor
Memory Size: 2 GB - DIMM Speed: 1333 MT/s
Maximum Capacity: 8 GB
Running 24×7 from 23/08/2010, so nine years!

Prologue
The above server started it’s life on CentOS 5 and ext3. Re-formatting to run CentOS 6.x with ext4 on 4 x 1TB OEM Hard Disks with mdadm raid-5. That provided 3 TB storage with Fault tolerance 1-drive failure. And believe me, I used that setup to zeroing broken disks or replacing faulty disks.
As we are reaching the end of CentOS 6.x and there is no official dist-upgrade path for CentOS, and still waiting for CentOS 8.x, I made decision to switch to Ubuntu 18.04 LTS. At that point this would be the 3rd official OS re-installation of this server. I chose ubuntu so that I can dist-upgrade from LTS to LTS.
This is a backup server, no need for huge RAM, but for a reliable system. On that storage I have 2m files that in retrospect are not very big. So with the re-installation I chose to use xfs instead of ext4 filesystem.
I am also running an internal snapshot mechanism to have delta for every day and that pushed the storage usage to 87% of the 3Tb. If you do the math, 2m is about 1.2Tb usage, we need a full initial backup, so 2.4Tb (80%) and then the daily (rotate) incremental backups are ~210Mb per day. That gave me space for five (5) daily snapshots aka a work-week.
To remove this impediment, I also replaced the disks with WD Red Pro 6TB 7200rpm disks, and use raid-1 instead of raid-5. Usage is now ~45%
Problem
Frozen System
From time to time, this very new, very clean, very reliable system froze to death!
When attached monitor & keyboard no output. Strange enough I can ping the network interfaces but I can not ssh to the server or even telnet (nc) to ssh port. Awkward! Okay - hardware cold reboot then.
As this system is remote … in random times, I need to ask from someone to cold-reboot this machine. Awkward again.
Kernel Panic
If that was not enough, this machine also has random kernel panics.

Errors
Let’s start troubleshooting this system
# journalctl -p 3 -x
Important Errors
ERST: Failed to get Error Log Address Range.
APEI: Can not request [mem 0x7dfab650-0x7dfab6a3] for APEI BERT registers
ipmi_si dmi-ipmi-si.0: Could not set up I/O space
and more important Errors:
INFO: task kswapd0:40 blocked for more than 120 seconds.
      Not tainted 4.15.0-54-generic #58-Ubuntu
"echo 0 > /proc/sys/kernel/hung_task_timeout_secs" disables this message.
INFO: task xfsaild/dm-0:761 blocked for more than 120 seconds.
      Not tainted 4.15.0-54-generic #58-Ubuntu
"echo 0 > /proc/sys/kernel/hung_task_timeout_secs" disables this message.
INFO: task kworker/u9:2:3612 blocked for more than 120 seconds.
      Not tainted 4.15.0-54-generic #58-Ubuntu
"echo 0 > /proc/sys/kernel/hung_task_timeout_secs" disables this message.
INFO: task kworker/1:0:5327 blocked for more than 120 seconds.
      Not tainted 4.15.0-54-generic #58-Ubuntu
"echo 0 > /proc/sys/kernel/hung_task_timeout_secs" disables this message.
INFO: task rm:5901 blocked for more than 120 seconds.
      Not tainted 4.15.0-54-generic #58-Ubuntu
"echo 0 > /proc/sys/kernel/hung_task_timeout_secs" disables this message.
INFO: task kworker/u9:1:5902 blocked for more than 120 seconds.
      Not tainted 4.15.0-54-generic #58-Ubuntu
"echo 0 > /proc/sys/kernel/hung_task_timeout_secs" disables this message.
INFO: task kworker/0:0:5906 blocked for more than 120 seconds.
      Not tainted 4.15.0-54-generic #58-Ubuntu
"echo 0 > /proc/sys/kernel/hung_task_timeout_secs" disables this message.
INFO: task kswapd0:40 blocked for more than 120 seconds.
      Not tainted 4.15.0-54-generic #58-Ubuntu
"echo 0 > /proc/sys/kernel/hung_task_timeout_secs" disables this message.
INFO: task xfsaild/dm-0:761 blocked for more than 120 seconds.
      Not tainted 4.15.0-54-generic #58-Ubuntu
"echo 0 > /proc/sys/kernel/hung_task_timeout_secs" disables this message.
INFO: task kworker/u9:2:3612 blocked for more than 120 seconds.
      Not tainted 4.15.0-54-generic #58-Ubuntu
"echo 0 > /proc/sys/kernel/hung_task_timeout_secs" disables this message.
First impressions ?

BootOptions
After a few (hours) of internet research the suggestion is to disable
- ACPI stands for Advanced Configuration and Power Interface.
- APIC stands for Advanced Programmable Interrupt Controller.
This site is very helpful for ubuntu, although Red Hat still has a huge advanced on describing kernel options better than canonical.
Grub
# vim /etc/default/grub
GRUB_CMDLINE_LINUX="noapic acpi=off"
then
# update-grub
Sourcing file `/etc/default/grub'
Sourcing file `/etc/default/grub.d/50-curtin-settings.cfg'
Generating grub configuration file ...
Found linux image: /boot/vmlinuz-4.15.0-54-generic
Found initrd image: /boot/initrd.img-4.15.0-54-generic
Found linux image: /boot/vmlinuz-4.15.0-52-generic
Found initrd image: /boot/initrd.img-4.15.0-52-generic
done
Verify
# grep noapic /boot/grub/grub.cfg | head -1

        linux   /boot/vmlinuz-4.15.0-54-generic root=UUID=0c686739-e859-4da5-87a2-dfd5fcccde3d ro noapic acpi=off maybe-ubiquity
reboot and check again:
#  journalctl -p 3 -xb
-- Logs begin at Thu 2019-03-14 19:26:12 EET, end at Wed 2019-07-03 21:31:08 EEST. --
Jul 03 21:30:49 servertwo kernel: ipmi_si dmi-ipmi-si.0: Could not set up I/O space
okay !!!
ipmi_si
Unfortunately I could not find anything useful regarding
# dmesg | grep -i ipm
[   10.977914] ipmi message handler version 39.2
[   11.188484] ipmi device interface
[   11.203630] IPMI System Interface driver.
[   11.203662] ipmi_si dmi-ipmi-si.0: ipmi_platform: probing via SMBIOS
[   11.203665] ipmi_si: SMBIOS: mem 0x0 regsize 1 spacing 1 irq 0
[   11.203667] ipmi_si: Adding SMBIOS-specified kcs state machine
[   11.203729] ipmi_si: Trying SMBIOS-specified kcs state machine at mem address 0x0, slave address 0x20, irq 0
[   11.203732] ipmi_si dmi-ipmi-si.0: Could not set up I/O space

# ipmitool list
Could not open device at /dev/ipmi0 or /dev/ipmi/0 or /dev/ipmidev/0: No such file or directory

# lsmod | grep -i ipmi
ipmi_si                61440  0
ipmi_devintf           20480  0
ipmi_msghandler        53248  2 ipmi_devintf,ipmi_si
blocked for more than 120 seconds.
But let’s try to fix the timeout warnings:
INFO: task kswapd0:40 blocked for more than 120 seconds.
      Not tainted 4.15.0-54-generic #58-Ubuntu
"echo 0 > /proc/sys/kernel/hung_task_timeout_secs" disables this message
if you search online the above message, most of the sites will suggest to tweak dirty pages for your system.
This is the most common response across different sites:
This is a know bug. By default Linux uses up to 40% of the available memory for file system caching. After this mark has been reached the file system flushes all outstanding data to disk causing all following IOs going synchronous. For flushing out this data to disk this there is a time limit of 120 seconds by default. In the case here the IO subsystem is not fast enough to flush the data withing 120 seconds. This especially happens on systems with a lot of memory.
Okay this may be the problem but we do not have a lot of memory, only 2GB RAM and 2GB Swap. But even then, our vm.dirty_ratio = 20 setting is 20% instead of 40%.
But I have the ability to cross-check ubuntu 18.04 with CentOS 6.10 to compare notes:
ubuntu 18.04
# uname -r
4.15.0-54-generic

# sysctl -a | egrep -i  'swap|dirty|raid'|sort
dev.raid.speed_limit_max = 200000
dev.raid.speed_limit_min = 1000
vm.dirty_background_bytes = 0
vm.dirty_background_ratio = 10
vm.dirty_bytes = 0
vm.dirty_expire_centisecs = 3000
vm.dirty_ratio = 20
vm.dirtytime_expire_seconds = 43200
vm.dirty_writeback_centisecs = 500
vm.swappiness = 60
CentOS 6.11
#  uname -r
2.6.32-754.15.3.el6.centos.plus.x86_64

# sysctl -a | egrep -i  'swap|dirty|raid'|sort
dev.raid.speed_limit_max = 200000
dev.raid.speed_limit_min = 1000
vm.dirty_background_bytes = 0
vm.dirty_background_ratio = 10
vm.dirty_bytes = 0
vm.dirty_expire_centisecs = 3000
vm.dirty_ratio = 20
vm.dirty_writeback_centisecs = 500
vm.swappiness = 60
Scheduler for Raid
This is the best online documentation on the
optimize raid
Comparing notes we see that both systems have the same settings, even when the kernel version is a lot different, 2.6.32 Vs 4.15.0 !!!
Researching on raid optimization there is a note of kernel scheduler.
Ubuntu 18.04
# for drive in {a..c}; do cat /sys/block/sd${drive}/queue/scheduler; done

noop deadline [cfq]
noop deadline [cfq]
noop deadline [cfq]
CentOS 6.11
# for drive in {a..d}; do cat /sys/block/sd${drive}/queue/scheduler; done

noop anticipatory deadline [cfq]
noop anticipatory deadline [cfq]
noop anticipatory deadline [cfq]
noop anticipatory deadline [cfq]
Anticipatory scheduling
CentOS supports Anticipatory scheduling on the hard disks but nowadays anticipatory scheduler is not supported in modern kernel versions.
That said, from the above output we can verify that both systems are running the default scheduler cfq.
Disks
Ubuntu 18.04
- Western Digital Red Pro WDC WD6003FFBX-6
# for i in sd{b..c} ; do hdparm -Tt  /dev/$i; done

/dev/sdb:
 Timing cached reads:   2344 MB in  2.00 seconds = 1171.76 MB/sec
 Timing buffered disk reads: 738 MB in  3.00 seconds = 245.81 MB/sec

/dev/sdc:
 Timing cached reads:   2264 MB in  2.00 seconds = 1131.40 MB/sec
 Timing buffered disk reads: 774 MB in  3.00 seconds = 257.70 MB/sec
CentOS 6.11
- Seagate ST1000DX001
/dev/sdb:
 Timing cached reads:   2490 MB in  2.00 seconds = 1244.86 MB/sec
 Timing buffered disk reads: 536 MB in  3.01 seconds = 178.31 MB/sec

/dev/sdc:
 Timing cached reads:   2524 MB in  2.00 seconds = 1262.21 MB/sec
 Timing buffered disk reads: 538 MB in  3.00 seconds = 179.15 MB/sec

/dev/sdd:
 Timing cached reads:   2452 MB in  2.00 seconds = 1226.15 MB/sec
 Timing buffered disk reads: 546 MB in  3.01 seconds = 181.64 MB/sec
So what I am missing ?
My initial personal feeling was the low memory. But after running a manual rsync I’ve realized that:
cpu
was load average: 0.87, 0.46, 0.19
mem
was (on high load), when hit 40% of RAM, started to use swap.
KiB Mem :  2008464 total,    77528 free,   635900 used,  1295036 buff/cache
KiB Swap:  2097148 total,  2096624 free,      524 used.  1184220 avail Mem
So I tweaked a bit the swapiness and reduce it from 60% to 40%
and run a local snapshot (that is a bit heavy on the disks) and doing an upgrade and trying to increase CPU load. Still everything is fine !
I will keep an eye on this story.

Monday, 01 July 2019
Usability & Productivity Sprint 2019
I [partially, only 2 days out of the 7] attended the Usability & Productivity Sprint 2019 in Valencia two weekends ago.
I was very happy to meet quite some new developer blood, which is something we had been struggling a bit to get lately, so we're starting to get on the right track again :) And I can only imagine it'll get better and better due to the "Onboarding" goal :)
During the sprint we had an interesting discussion about how to get more people to know about usability, and the outcome is that probably we'll try to get some training to members of KDE to increase the knowledge of usability amongst us. Sounds like a good idea to me :)
On the more "what did *you* actually do" side:
* worked on fixing a crash i had on the touchpad kded, (already available on the latest released Plasma!)
* finished part of the implementation for Optional Content Group Links support in Okular (i started that 3 years ago and i was almost sure i had done all the work, but i clearly had not)
* Did some code reviews on existing okular phabricator merge requests (so sad i'm still behind though, we need more people reviewing there other than me)
* Together with Nicolas Fella worked on allowing extra fields from json files to be translated, we even documented it!
* Changed lots of applications released on KDE Applications to follow the KDE Applications versioning scheme, the "winner" was kmag, that had been stuck in version 1.0 for 15 years (and had more than 440 commits since then)
* Fixed a small issue with i18n in kanagram
I would like to thank SLIMBOOK for hosting us in their offices (and providing a shuttle from them to the hotel) and the KDE e.V. for sponsoring my attendance to the sprint, please donate to KDE if you think the work done at sprints is important.
Sunday, 30 June 2019
Dealing with Colors in lower Android versions

I’m currently working on a project which requires me to dynamically set the color of certain UI elements to random RGB values.
Unfortunately and surprisingly, handy methods for dealing with colors in Android are only available since API level 26 (Android O). Luckily though, the developer reference specifies, how colors are encoded internally in the Android operating system, so I was able to create a class with the most important color-related (for my use-case) methods which is able to function in lower Android versions as well.
I hope I can save some of you from headaches by sharing the code. Feel free to reuse as you please 
Happy Hacking!
PS: Is there a way to create Github-like gists with Gitea?
Thursday, 27 June 2019
KDE Applications 19.08 Schedule finalized
It is available at the usual place https://community.kde.org/Schedules/Applications/19.08_Release_Schedule
Dependency freeze is two weeks (July 11) and Feature Freeze a week after that, make sure you start finishing your stuff!
P.S: Remember last day to apply for Akademy Travel Support is this Sunday 30 of June!
Sunday, 23 June 2019
A good firewall for a small network
In this article I will outline the setup of my (not so) new firewall at home. I explain how I decided which hardware to get and which software to choose, and I cover the entire process of assembling the machine and installing the operating system. Hopefully this will be helpful to poeple in similar situations.
Introduction

While the ability of firewalls to protect against all the evils of the internets is certainly exaggerated, there are some important use cases for them: you want to prevent certain inbound traffic and manipulate certain outbound traffic e.g. route it through a VPN.
For a long time I used my home server (whose main purpose is network attached storage) to also do some basic routing and VPN, but this had a couple of important drawbacks:
- Just one NIC on the server meant traffic to/from the internet wasn’t physically required to go through the server.
- Less reliable due to more complex setup → longer downtimes during upgrades, higher chance of failure due to hard drives.
- I wouldn’t give someone else the root password to my data storage, but I did want my flat-mates to be able to reset and configure basic network components that they depend on (Router/Port-forwarding and WiFi).
- I wanted to isolate the ISP-provided router more strongly from the LAN as they have a history of security vulnerabilities.
The different off-the-shelf routers I had used over the years had also worked only so-so (even those that were customisable) so I decided I needed a proper router. Since WiFi access was already out-sourced to dedicated devices I really only needed a filtering and routing device.
Hardware
Board & CPU

The central requirements for the device were:
- low energy consumption
- enough CPU power to route traffic at Gbit-speed, run Tor and OpenVPN (we don’t have Gbit/s internet in Berlin, yet, but I still have hopes for the future)
- hardware crypto support to unburden the CPU for crypto tasks
- two NICs, one for the LAN and one for the WAN
I briefly thought about getting an ARM-based embedded board, but most reviews suggested that the performance wouldn’t be enough to satisfy my requirements and also the *BSD support was mixed at best and I didn’t want to rule out running OpenBSD or FreeBSD.
Back to x86-land: I had previously used PC Engines ALIX boards as routers and was really happy with them at the time. Their new APU boards promised better performance, but thanks to the valuable feedback and some benchmarking done by the community over at BSDForen.de, I came to the conclusion that they wouldn’t be able to push more than 200Mbit/s through an OpenVPN tunnel.
In the end I decided on the Gigabyte J3455N-D3H displayed at the top. It sports a rather atypical Intel CPU (Celeron J3455) with
- four physical cores @ 1.5Ghz
- AESNI support
- 10W TDP
Having four actual cores (instead of 2 cores + hyper threading) is pretty cool now that many security-minded operating systems have started deactivating hyper threading to mitigate CPU bugs [OpenBSD] [HardenedBSD]. And the power consumption is also quite low.
I would have liked for the two NICs on the mainboard to be from Intel, but I couldn’t find a mainboard at the time that offered this (other than super-expensive SuperMicro boards). At least the driver support on modern Realteks is quite good.
Storage & Memory
The board has two memory slots and supports a maximum of 4GiB each. I decided 4GiB are enough for now and gave it one module to allow for future extensions (I know that’s suboptimal for speed).
Storage-wise I originally planned on putting a left-over SATA-SSD into the case, but in the end, I decided a tiny USB3-Stick would provide sufficient performance and be much easier to replace/debug/…
Case & Power

Since I installed a real 19” wrack in my new flat, of course the case for the firewall would have to fit
nicely into that.
I had a surprisingly difficult time finding a good case, because I wanted one were the board’s ports
would be front-facing.
That seems to be quite a rare requirement, although I really don’t understand why.
Obviously having the network ports, serial ports and USB-Ports to the front makes changing the setup and
debugging so much easier ¯\_(ツ)_/¯
I also couldn’t find a good power supply for such a low-power device, but I still had a 60W PicoPSU supply lying around.
Even though it came with an overpowered PSU and a proprietary IO-Shield (more on that below), I decided on the SuperMicro SC505-203B. It really does look quite good, I have to say!
Assembly

Mounting the mainboard in the case is pretty straight-forward. The biggest issue was the aforementioned proprietary I/O-Shield that came with the SuperMicro case (and was designed only for SuperMicro-boards). It was possible to remove it, however, the resulting open space did not conform to ATX spec so it wasn’t possible to just fit the Gigabyte board’s shield into it.

I quickly took the measurements and starting cutting away on the shield to make it fit. This worked ok-ish in the end, but is more dangerous than it looks (be smarter than me, wear gloves ☝ ). In retrospect I also recommend that you do not remove the bottom fold on the shield, only left, right and top; that will make it hold a lot better in the case opening.

The board can be fit into the case using standard screws in the designated places. As mentioned above, I removed the original (actively cooled) power supply unit and used the 60W PicoPSU that I had lying around from before. Since it doesn’t have the 4-pin CPU cable I had improvise. There are adaptors for this, but if you have a left-over power supply, you can also tape together something. I also put the transformer into the case (duck-tape, yeah!) so that one can plug in the power cord from the back of the case as usual.
Software

Choice
There are many operating systems I could have chosen since I decided to use an x86 platform. My criteria were:
- free software (obviously)
- intuitive web user interface to do at least the basic things
- possibility to login via SSH if things don’t go as planned
- OpenVPN client
I feel better with operating systems based on FreeBSD or OpenBSD, mainly because I have more experience with them than with GNU/Linux distributions nowadays. In previous flats I had also used OpenWRT and dd-wrt based routers, but whenever I needed to tweak something beyond what the web interface offered, it got really painful. In general the whole IPtables based stack on Linux seems overly complicated, but maybe that’s just me.
In any case, there are no OpenBSD-based router operating systems with web interfaces (that I am aware of) so I had the choice between
- pfsense (FreeBSD-based)
- OPNSense, fork of pfsense, based on HardenedBSD / FreeBSD
There seem to be historic tensions between the people involved in both operating systems and I couldn’t find out if there were actual distinctions in the goals of the projects. In the end, I asked other people for recommendations and found the interface and feature list of OPNSense more convincing. Also, being based on HardenedBSD sounds good (although I am not sure if HardenedBSD-specifica will really ever play out on the router).
Initially I had some issues with the install and OPNSense people were super-friendly and responded immediately. Also the interface was a lot better than I expected so I am quite sure I made the right decision.
Install
Setup is very easy:
- Go to https://opnsense.org/download/, select
amd64andnanoand download the image. - Unzip the image (easy to forget this).
- Write the image to the USB-stick with
dd(as always withdd: be careful about the target device!) - Optionally plug a serial cable into the top serial port (the mainboard has two) and connect your Laptop/Desktop with baud rate 115200
- Plug the USB-stick into the firewall and boot it up.
There will be some beeping when you start the firewall. Some of this is due to the mainboard complaining that no keyboard is attached (can be ignored) and also OPNSense will play a melody when it is booted. If you are attached to the serial console you can select which interface will be WAN and which will be LAN (and their IP addresses). Otherwise you might need to plug around the LAN cables a bit to find out which is configured as which.
When I built this last year there were some more issues, but all of them have been resolved by the OPNSense people so it really is “plug’n’play”; I verified by doing a re-install!
Post-install

Go to the configured IP-address (192.168.1.1 by default) and login (root: opnsense by default).
If the web-interface comes up everything has worked fine and you can disconnect serial console and do the rest via the web-interface.
After login, I would to the following:
- change the password
- activate SSH on the LAN interface
- configure internet access and DHCP
- setup any of the other services you want
For me setting up the internet meant doing a “double-NAT” with the ISP-provided router, because I need its modem and nowadays it seems impossible to get a stand-alone VDSL modem. If you do something similar just configure internet as being over DHCP.
If you want hardware accelerated SSL (also OpenVPN), go to System → Firmware → Setting and change the firmware flavour to OpenSSL (instead of LibreSSL). After that check for updates and upgrade.
In the OpenVPN profile, under Hardware Crypto, you can now select Intel RDRAND engine - RAND.

Take your time to look through the interface! I found some pretty cool things like automatic backup of the configuration to a nextcloud server! The entire config of the firewall rests in one file so it’s really easy to setup a clean system from scratch.
All-in-all I am very happy with the system. Even though my setup is non-trivial, with only selected outgoing traffic going through the VPN (based on rules), I never had to get my hands dirty on the command line – everything can be done through the Web-UI.
Sunday, 16 June 2019
Information stalls at Linux Week and Veganmania in Vienna

Linux Weeks in Vienna 2018

Veganmania at MQ in Vienna 2018

Linux Weeks in Vienna 2019

Veganmania at MQ in Vienna 2019

Veganmania at MQ in Vienna 2019
As has been tradition for many years now, this year too saw the Viennese FSFE volunteers’ group hold information stalls at the Linuxwochen event and Veganmania in Vienna. Even though the active team has shrunk due to former activists moving away, having children or simply having very demanding jobs, we have still managed to keep up these information stalls in 2019.
Linux Weeks Vienna 2019
The information stall at the Linux weeks event in May was somewhat limited due to the fact that we didn’t get our usual posters and the roll-up in time. Unfortunately we discovered too late that they had obviously been lent out for an other event and hadn’t been returned afterwards. So we could only use our information material. But since at this event the FSFE is very well known, it wasn’t hard at all to carry out our usual information stall. It’s less about outreach work and more of a who-is-who of the free software community in Vienna anyway. For three days we met old friends and networked. Of course some newbies found their way to the event also. And therefore we could spread our messages a little further too.
In addition, we once again provided well visited workshops for Inkscape and Gimp. The little talk on the free rally game Trigger Rally even motivated an attending dedicated Fedora maintainer to create an up-to-date .rpm package in order to enable distribution of the most recent release to rpm distros.
Veganmania MQ Vienna 2019
The Veganmania at the Museums Quartier in Vienna is growing bigger every year. In 2019 it took place from 7th to 10th of June. Despite us having a less frequented spot with our information stall at the event due to construction work, it again was a full-blown success. Over the four days in perfect weather, the stall was visited by loads of people. There were times when we were stretched to give some visitors the individual attention they might have wanted. But I think in general we were able to provide almost all people with valuable insights and new ideas for their everyday computing. Once again Veganmania proved to be a very good setting for our FSFE information stall. It is always very rewarding to experience people getting a glimpse for the first time of how they could emancipate themselves from proprietary domination. Our down-to-earth approach seems to be the right way to go.
We do not only explain ethical considerations but also appeal to the self-interest of people concerning independence, reliability and free speech. Edward Snowden’s and Wikileaks discoveries clearly show how vulnerable we make ourselves in blindly trusting governments and companies. We describe with practical examples how free software can help us in working together or recovering old files by building on open standards. Of course pointing to the environmental (and economic) advantages of using old hardware with less resource hungry free software is a winning argument also.
Material
Alongside the introductory Austrian version of the leaflet about the freedoms free software enables, which was put together as a condensation of RMS’ book Free Software, Free Society, one of our all-time favourite leaflet features 10 popular GNU/Linux Distros with just a few words about their defining differences (advantages and disadvantages). I updated the leaflet just a day before the festival. I replaced Linux Mint, Open Suse and gNewSense with the recently even more popular Manjaro, MX Linux and PureOS. I also updated the information on the importance of open standards on the back. We have run out of our end-user business cards for our local association freie.it which makes knowledgable people available to others searching for help. Therefore, we decided to use the version we originally designed for inviting experts to the platform. It obviously was wrong to order the same amount of cards for both groups. Our selection of information material seems to work well as an invitation for people to give free software a try. Of course it feels probably also like a safeguard that people can contact me if they want to get my support – or that of someone else listed on freie.it.
Experiences
The first day was rather windy and we had to carefully manage our material if we didn’t want to have our leaflets flying all over the place. In the very early morning of the second day the wind was so strong that some tents where blown away and destroyed. There was even a storm warning which could have forced the organisers to cancel the event. Fortunately our material was well stored and the wind died down over the day. We also had to firmly hold-on to our sunshade because it was very hot, but beside that everything went fine.
It was just coincidence that Richard Matthew Stallman had a talk in Vienna on the evening of the first day of the Veganmania street festival. So at least one of us could take this rare opportunity to see RMS at a live talk while the other carried on with manning the information stall.
As we didn’t have our posters on Linuxwochen we investigated where they were and got them sent to us via snail mail just in time. We didn’t only get our posters but merchandise too. This was a premiere for our stall. It was clear from the beginning that we wouldn’t sell many shirts since most designs assumed prior knowledge of IT related concepts like binary counting. The general public doesn’t seem very aware of such details and people don’t even get the joke. (If we had had the same merchandise at the Linuxwochen we probably would have sold at least as many items despite having reached a much smaller crowd there.)
Outlook and thanks
There will be another information stall at the second Veganmania in Vienna this year, which takes place in end of August. The whole setting there is a little different as there isn’t a shopping street nearby but instead, the location is on the heavily frequented recreational area of Vienna’s Danube Island. Just like last year, it should be a good place for chatting about free software, as long as the weather is on our side.
I want to thank Martin for his incredible patience and ongoing dedication manning our stall. He is extremely reliable, always friendly and it is just a real pleasure working with him.
Thanks to kinderkutsche.at, a local place to rent and buy carrier bicycles, we could transport all our information material in a very environmentally friedly way.
Monday, 10 June 2019
MariaDB Galera Cluster on Ubuntu 18.04.2 LTS
MariaDB Galera Cluster on Ubuntu 18.04.2 LTS
Last Edit: 2019 06 11
Thanks to Manolis Kartsonakis for the extra info.
Official Notes here:
MariaDB Galera Cluster
a Galera Cluster is a synchronous multi-master cluster setup. Each node can act as master. The XtraDB/InnoDB storage engine can sync its data using rsync. Each data transaction gets a Global unique Id and then using Write Set REPLication the nodes can sync data across each other. When a new node joins the cluster the State Snapshot Transfers (SSTs) synchronize full data but in Incremental State Transfers (ISTs) only the missing data are synced.
With this setup we can have:
- Data Redundancy
- Scalability
- Availability

Installation
In Ubuntu 18.04.2 LTS three packages should exist in every node.
So run the below commands in all of the nodes - change your internal IPs accordingly
as root
# apt -y install mariadb-server
# apt -y install galera-3
# apt -y install rsync
host file
as root
# echo 10.10.68.91 gal1 >> /etc/hosts
# echo 10.10.68.92 gal2 >> /etc/hosts
# echo 10.10.68.93 gal3 >> /etc/hosts
Storage Engine
Start the MariaDB/MySQL in one node and check the default storage engine. It should be
MariaDB [(none)]> show variables like 'default_storage_engine';or
echo "SHOW Variables like 'default_storage_engine';" | mysql+------------------------+--------+
| Variable_name | Value |
+------------------------+--------+
| default_storage_engine | InnoDB |
+------------------------+--------+
Architecture
A Galera Cluster should be behind a Load Balancer (proxy) and you should never talk with a node directly.

Galera Configuration
Now copy the below configuration file in all 3 nodes:
/etc/mysql/conf.d/galera.cnf[mysqld]
binlog_format=ROW
default-storage-engine=InnoDB
innodb_autoinc_lock_mode=2
bind-address=0.0.0.0
# Galera Provider Configuration
wsrep_on=ON
wsrep_provider=/usr/lib/galera/libgalera_smm.so
# Galera Cluster Configuration
wsrep_cluster_name="galera_cluster"
wsrep_cluster_address="gcomm://10.10.68.91,10.10.68.92,10.10.68.93"
# Galera Synchronization Configuration
wsrep_sst_method=rsync
# Galera Node Configuration
wsrep_node_address="10.10.68.91"
wsrep_node_name="gal1"Per Node
Be careful the last 2 lines should change to each node:
Node 01
# Galera Node Configuration
wsrep_node_address="10.10.68.91"
wsrep_node_name="gal1"Node 02
# Galera Node Configuration
wsrep_node_address="10.10.68.92"
wsrep_node_name="gal2"
Node 03
# Galera Node Configuration
wsrep_node_address="10.10.68.93"
wsrep_node_name="gal3"
Galera New Cluster
We are ready to create our galera cluster:
galera_new_clusteror
mysqld --wsrep-new-clusterJournalCTL
Jun 10 15:01:20 gal1 systemd[1]: Starting MariaDB 10.1.40 database server...
Jun 10 15:01:24 gal1 sh[2724]: WSREP: Recovered position 00000000-0000-0000-0000-000000000000:-1
Jun 10 15:01:24 gal1 mysqld[2865]: 2019-06-10 15:01:24 139897056971904 [Note] /usr/sbin/mysqld (mysqld 10.1.40-MariaDB-0ubuntu0.18.04.1) starting as process 2865 ...
Jun 10 15:01:24 gal1 /etc/mysql/debian-start[2906]: Upgrading MySQL tables if necessary.
Jun 10 15:01:24 gal1 systemd[1]: Started MariaDB 10.1.40 database server.
Jun 10 15:01:24 gal1 /etc/mysql/debian-start[2909]: /usr/bin/mysql_upgrade: the '--basedir' option is always ignored
Jun 10 15:01:24 gal1 /etc/mysql/debian-start[2909]: Looking for 'mysql' as: /usr/bin/mysql
Jun 10 15:01:24 gal1 /etc/mysql/debian-start[2909]: Looking for 'mysqlcheck' as: /usr/bin/mysqlcheck
Jun 10 15:01:24 gal1 /etc/mysql/debian-start[2909]: This installation of MySQL is already upgraded to 10.1.40-MariaDB, use --force if you still need to run mysql_upgrade
Jun 10 15:01:24 gal1 /etc/mysql/debian-start[2918]: Checking for insecure root accounts.
Jun 10 15:01:24 gal1 /etc/mysql/debian-start[2922]: WARNING: mysql.user contains 4 root accounts without password or plugin!
Jun 10 15:01:24 gal1 /etc/mysql/debian-start[2923]: Triggering myisam-recover for all MyISAM tables and aria-recover for all Aria tables
# ss -at '( sport = :mysql )'
State                Recv-Q                Send-Q                                Local Address:Port                                  Peer Address:Port
LISTEN               0                     80                                        127.0.0.1:mysql                                      0.0.0.0:*
# echo "SHOW STATUS LIKE 'wsrep_%';" | mysql | egrep -i 'cluster|uuid|ready' | column -twsrep_cluster_conf_id 1
wsrep_cluster_size 1
wsrep_cluster_state_uuid 8abc6a1b-8adc-11e9-a42b-c6022ea4412c
wsrep_cluster_status Primary
wsrep_gcomm_uuid d67e5b7c-8b90-11e9-ba3d-23ea221848fd
wsrep_local_state_uuid 8abc6a1b-8adc-11e9-a42b-c6022ea4412c
wsrep_ready ON
Second Node
systemctl restart mariadb.serviceroot@gal2:~# echo "SHOW STATUS LIKE 'wsrep_%';" | mysql | egrep -i 'cluster|uuid|ready' | column -t
wsrep_cluster_conf_id 2
wsrep_cluster_size 2
wsrep_cluster_state_uuid 8abc6a1b-8adc-11e9-a42b-c6022ea4412c
wsrep_cluster_status Primary
wsrep_gcomm_uuid a5eaae3e-8b91-11e9-9662-0bbe68c7d690
wsrep_local_state_uuid 8abc6a1b-8adc-11e9-a42b-c6022ea4412c
wsrep_ready ON
Third Node
systemctl restart mariadb.serviceroot@gal3:~# echo "SHOW STATUS LIKE 'wsrep_%';" | mysql | egrep -i 'cluster|uuid|ready' | column -t
wsrep_cluster_conf_id 3
wsrep_cluster_size 3
wsrep_cluster_state_uuid 8abc6a1b-8adc-11e9-a42b-c6022ea4412c
wsrep_cluster_status Primary
wsrep_gcomm_uuid 013e1847-8b92-11e9-9055-7ac5e2e6b947
wsrep_local_state_uuid 8abc6a1b-8adc-11e9-a42b-c6022ea4412c
wsrep_ready ON
Primary Component (PC)
The last node in the cluster -in theory- has all the transactions. That means it should be the first to start next time from a power-off.
State
cat /var/lib/mysql/grastate.dateg.
# GALERA saved state
version: 2.1
uuid:    8abc6a1b-8adc-11e9-a42b-c6022ea4412c
seqno:   -1
safe_to_bootstrap: 0
if safe_to_bootstrap: 1 then you can bootstrap this node as Primary.
Common Mistakes
Sometimes DBAs want to setup a new cluster (lets say upgrade into a new scheme - non compatible with the previous) so they want a clean state/directory. The most common way is to move the current mysql directory
mv /var/lib/mysql /var/lib/mysql_BAKIf you try to start your galera node, it will fail:
# systemctl restart mariadbWSREP: Failed to start mysqld for wsrep recovery:
[Warning] Can't create test file /var/lib/mysql/gal1.lower-test
Failed to start MariaDB 10.1.40 database serverYou need to create and initialize the mysql directory first:
mkdir -pv /var/lib/mysql
chown -R mysql:mysql /var/lib/mysql
chmod 0755 /var/lib/mysql
mysql_install_db -u mysql
On another node, cluster_size = 2
# echo "SHOW STATUS LIKE 'wsrep_%';" | mysql  | egrep -i 'cluster|uuid|ready' | column -t

wsrep_cluster_conf_id     4
wsrep_cluster_size        2
wsrep_cluster_state_uuid  8abc6a1b-8adc-11e9-a42b-c6022ea4412c
wsrep_cluster_status      Primary
wsrep_gcomm_uuid          a5eaae3e-8b91-11e9-9662-0bbe68c7d690
wsrep_local_state_uuid    8abc6a1b-8adc-11e9-a42b-c6022ea4412c
wsrep_ready               ON
then:
# systemctl restart mariadbrsync from the Primary:
Jun 10 15:19:00 gal1 rsyncd[3857]: rsyncd version 3.1.2 starting, listening on port 4444
Jun 10 15:19:01 gal1 rsyncd[3884]: connect from gal3 (192.168.122.93)
Jun 10 15:19:01 gal1 rsyncd[3884]: rsync to rsync_sst/ from gal3 (192.168.122.93)
Jun 10 15:19:01 gal1 rsyncd[3884]: receiving file list
# echo "SHOW STATUS LIKE 'wsrep_%';" | mysql | egrep -i 'cluster|uuid|ready' | column -t
wsrep_cluster_conf_id 5
wsrep_cluster_size 3
wsrep_cluster_state_uuid 8abc6a1b-8adc-11e9-a42b-c6022ea4412c
wsrep_cluster_status Primary
wsrep_gcomm_uuid 12afa7bc-8b93-11e9-88fc-6f41be61a512
wsrep_local_state_uuid 8abc6a1b-8adc-11e9-a42b-c6022ea4412c
wsrep_ready ONBe Aware: Try to keep your DATA directory to a seperated storage disk
Adding new Nodes
A healthy Quorum has an odd number of nodes. So when you scale your galera gluster consider adding two (2) at every step!
# echo 10.10.68.94 gal4 >> /etc/hosts
# echo 10.10.68.95 gal5 >> /etc/hosts
Data Replication will lock your donor-node so it is best to put-off your donor-node from your Load Balancer:
Then explicit point your donor-node to your new nodes by adding the below line in your configuration file:
wsrep_sst_donor= gal3After the synchronization:
- comment-out the above line
- restart mysql service and
- put all three nodes behind the Local Balancer
Split Brain
Find the node with the max
SHOW STATUS LIKE 'wsrep_last_committed';
and set it as master by
SET GLOBAL wsrep_provider_options='pc.bootstrap=YES';
Weighted Quorum for Three Nodes
When configuring quorum weights for three nodes, use the following pattern:
node1: pc.weight = 4
node2: pc.weight = 3
node3: pc.weight = 2
node4: pc.weight = 1
node5: pc.weight = 0
eg.
SET GLOBAL wsrep_provider_options="pc.weight=3";
In the same VPC setting up pc.weight will avoid a split brain situation. In different regions, you can setup something like this:
node1: pc.weight = 2
node2: pc.weight = 2
node3: pc.weight = 2
  <->
node4: pc.weight = 1
node5: pc.weight = 1
node6: pc.weight = 1
Planet FSFE (en):  RSS 2.0 | Atom |
  FOAF |
/var/log/fsfe/flx » planet-en
Albrechts Blog
Alessandro at FSFE » English
Alessandro's blog
Alina Mierlus - Building the Freedom » English
Andrea Scarpino's blog
André Ockers on Free Software
Being Fellow #952 of FSFE » English
Bela's Internship Blog
Bernhard's Blog
Bits from the Basement
Blog of Martin Husovec
Blog » English
Blog – Think. Innovation.
Bobulate
Brian Gough's Notes
Chris Woolfrey -- FSFE UK Team Member
Ciarán's free software notes
Colors of Noise - Entries tagged planetfsfe
Communicating freely
Daniel Martí's blog
David Boddie - Updates (Full Articles)
ENOWITTYNAME
English Planet – Dreierlei
English on Björn Schießle - I came for the code but stayed for the freedom
English – Max's weblog
Escape to freedom
Evaggelos Balaskas - System Engineer
FSFE interviews its Fellows
FSFE supporters Vienna » English
Fellowship News
Florian Snows Blog » en
Frederik Gladhorn (fregl) » FSFE
Free Software & Digital Rights Noosphere
Free Software with a Female touch
Free Software –
Free Software – Frank Karlitschek_
Free Software – hesa's Weblog
Free as LIBRE
Free speech is better than free beer » English
Free, Easy and Others
From Out There
Giacomo Poderi
Green Eggs and Ham
Handhelds, Linux and Heroes
HennR's FSFE blog
Henri Bergius
Hook’s Humble Homepage
Hugo - FSFE planet
Inductive Bias
Jelle Hermsen » English
Jens Lechtenbörger » English
Karsten on Free Software
Losca
MHO
Mario Fux
Martin's notes - English
Matej's blog » FSFE
Matthias Kirschner's Web log - fsfe
Michael Clemens
Myriam's blog
Mäh?
Nice blog
Nico Rikken » fsfe
Nicolas Jean's FSFE blog » English
Nikos Roussos - opensource
PB's blog » en
Planet FSFE on Iain R. Learmonth
Po angielsku — mina86.com
Posts - Carmen Bianca Bakker
Posts on Hannes Hauswedell's homepage
Pressreview
Ramblings of a sysadmin (Posts about planet-fsfe)
Rekado
Repentinus » English
Riccardo (ruphy) Iaconelli - blog
Saint's Log
Seravo
TSDgeos' blog
Tarin Gamberini
Technology – Intuitionistically Uncertain
The Girl Who Wasn't There » English
The trunk
Thib's Fellowship Blog » fsfe
Thinking out loud » English
Thomas Løcke Being Incoherent
Told to blog - Entries tagged fsfe
Tonnerre Lombard
Torsten's FSFE blog » english
Viktor's notes » English
Vitaly Repin. Software engineer's blog
Weblog
Weblog
Weblog
Weblog
Weblog
Weblog
With/in the FSFE » English
a fellowship ahead
agger's Free Software blog
anna.morris's blog
ayers's blog
bb's blog
blog
drdanzs blog » freesoftware
egnun's blog » FreeSoftware
english – Davide Giunchi
foss – vanitasvitae's blog
free software blog
freedom bits
gollo's blog » English
julia.e.klein's blog
marc0s on Free Software
mkesper's blog » English
pichel's blog
polina's blog
rieper|blog » en
softmetz' anglophone Free Software blog
stargrave's blog
tobias_platen's blog
tolld's blog
wkossen's blog
yahuxo's blog